Wire mesh is an ideal material for light fences. It does not shadow the light, and therefore is widely used to fencing the beds, gardens, designations of the neighboring sites. To put a fence from the challenge with your own hands, you do not need to be an experienced master, just read the installation technology and choose the correct materials.
The appearance, durability and the cost of the fence from the challenge directly depends on the quality of the grid. Metal grid is available in three versions:
- neoscake;
- galvanized;
- plasticized.
The cheapest of all. It is not suitable for permanent fences, as it starts rust after the first rain. Usually the unprocessed black grid serves no more than 3-4 years. To extend the service life, the non-scattered challenge should be covered either by paint or special compositions that, after applying, form a water repellent on the grid. Periodically, such processing must be repeated, which is more expensive as a result than the acquisition of a galvanized grid.
Moisture is not afraid and protective processing does not require. The view of it is much more attractive, such a grid in section fences looks particularly well. The cost of galvanized grid is higher than the usual black, but since it serves longer, and it is not necessary to paint every 2-3 years, this option is more practical.
Plasticized Aha Mesh. It has a special polymer coating, resistant to corrosion. The coating is different not only to durability, but also a variety of colors, so you can choose a messet to the main fence or roof of the house. The in demand is considered to be a chain chain and green, less often you can see a white, red or yellow mesh fence.
Separate attention should be paid to the fencing support columns. Rabita grid can be fixed on metal pipes, steel profile, concrete columns and even wooden racks.
The most comfortable and practical supports are metal pipes of the square. Manufacturers offer pipes with already woven hooks, specifically to install fences from the grid. To reduce the installation of the fence, also use the used pipes, and the hooks are welded independently. In addition, the hook fastening is not the only option, you can fix the grid using steel wire.
How to calculate the number of materials
The most demanded for the manufacture of fences is considered a chain grid with a width of 1.5 m and cell sizes of 40-50 mm. The standard grid roll has a length of 10 m. To make the grid, the reference pillars must be installed in a step of 2-2.5 m. This means that one roll will require no more than 5 columns. The above-ground part of the supports should be 10 cm exceeded the width of the mesh, and pinches to the ground should be 1/3 of their height.
So, if you need to set the fence from the chain 30 m long and 1.5 m height, it will take 3 mesh rolls and 16 columns with a length of 2.3-2.5 m. On each post 3 hooks should be attached - top, down and in the middle . Multiplying the number of supports on 3, find out how much hooks need. If the fence is sectional, additionally calculate the amount of metal corners for the frame. The height of each section is equal to the width of the grid, and the run length is 2-2.5 m. The most convenient corner for the frame 40x40 mm thick 5 mm.
Production of tension fence
The tension fence from the chain grid is performed faster than the section, and costs cheaper. The installation process includes marking, the preparation of pits under the columns, the installation of columns and the fence canvas.
To work, you will need:
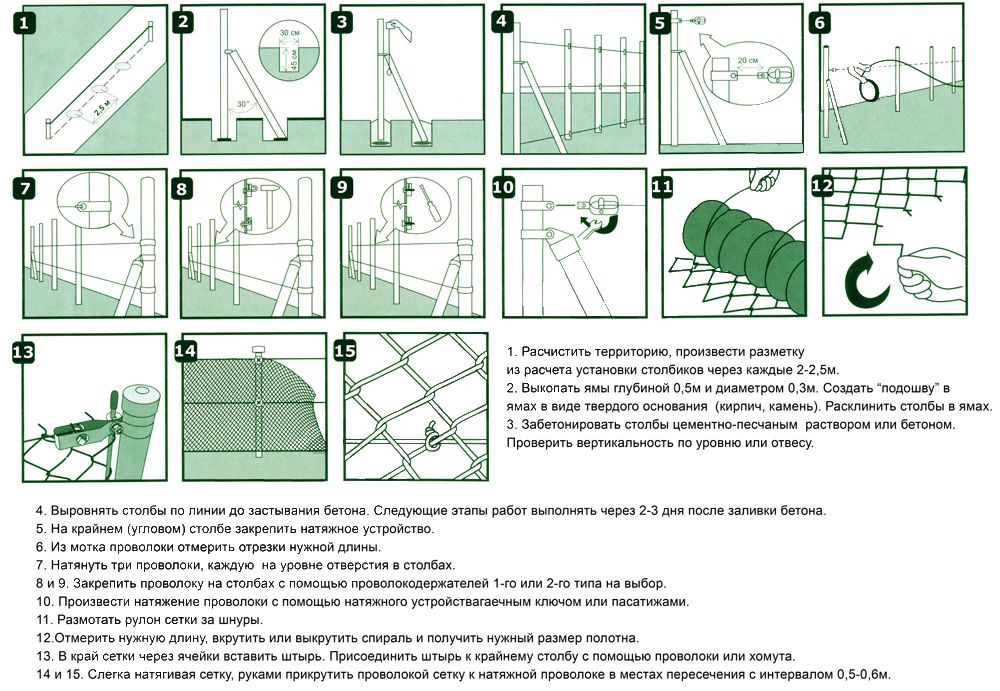
Step 1. Marking of the site
Take wooden pegs and a long twine and start marking. To begin with, determine the location of the extreme columns. In these places, pegs are riding, stretch between them the twine at an altitude of 10 cm above the ground. If the line of the fence has a foam, each of them also put the beacon and fix the rope. Next, on the markup line it is necessary to knock the pegs where intermediate supports will stand. The distance between the carriages must necessarily be the same and correspond to the width of the run.
Step 2. Preparation of pits under the poles
In places marked by pegs, with the help of a garden drill, holes depth from 80 to 120 cm. The denser of the soil, the smaller the depth. The diameter of the holes should be slightly larger than the diameter of the pillars. At the bottom of each pit, a sand pillow is a thickness of 10 cm.
Step 3. Installation of carrier pillars
Pipes are prepared: cleanse their surface from oil spots and rust, grind, hooks weld. Welding places are cleaned, relieved, and then the pipes are so ground and color. After that, the columns are lowered into the pit, exhibit them in terms of the level, strengthen the struts. If all supports have the same height and are located strictly on one line, you can pour a concrete solution. In the process of filling, the solution is plotting several times with a steel rod to remove air bubbles from concrete.
Sometimes metal supports are not installed, but drive into the ground: the holes make a small depth, approximately 30-40 cm, they lower the pipes and sledge hammering them to the desired depth. In order not to break the upper edge, the steel pipe with a brewed bottom is put on the poles. This method allows to save materials, and on dense stony soils are quite acquitted, but if the soil is sandy and unstable, the supports can lead to the side. Link to an article about b
Installing the fencing from the grid
To secure the grid on the pillars, you do not need to unwind the roll. It is raised vertically, attach to the first support and cling to hooks. If the hooks are missing, the mesh is screwed with steel wire in three to four places. It is recommended to leave 10-15 cm between the surface of the earth and the lower edge of the grid. It is possible to mount and close to the soil, but then the cells quickly enhance the grass, the garbage, branches that fallen leaves will accumulate.
Securing the challenge on the first post, go to the second. The roll is unwinding for 2-2.5 m, attach to the support and stretch the grid. In order for the tension to be uniform, in the height of the roll in the cells, the steel rods are 1.5 m long. Perform this process is best with the helper: one person pulls the grid, the other screws it with wire or clings on the hooks.
Even tightly stretched chain saves over time, especially at the top. Avoiding this will help the reinforcement wire or long steel rods, which have grown in cells along the perimeter of the fence at a distance of 5-7 cm from the top and welded to the columns. Sometimes the wire is made on top, and at the bottom edge, retreating from the ground 20 cm. In the end of the ends of the wire and hooks bend inside, the plugs are worn to all the reference columns.
Making a sectional fence
Marking and installation of reference racks for a sectional fence is made according to the technology described above. The only difference is that the columns should not be with hooks, but with welded metal plates. These plates have dimensions of 15x5 cm and a thickness of 5 mm; weld them from above and from below on the rack, retreating from the edges of 20 cm.
Step 1. Assembling frame
Measure the distance between the carriages of the columns and take 15-20 cm from it - it will be a frame width from the corners. The height of the section is equal to the width of the grid or the post altitude minus 20 cm. Steel corners are cut into the size of the section and weld into the rectangle. Then the scale is removed, the inner and outer surface of the frame is grinning.
Step 2. Grid Preparation
The roll rolon is laid on the ground, wound 2-2.5 m and carefully cut off with a grinder in width. Now in the extreme rows of cells on each side, reinforcement rods are made. It is not necessary to connect between the rods.
Step 3. Installation section
The grid is placed on the frame and weld the upper reinforcement to the inside of the corner. Then it is well stretched by the grid down and the bottom rod is welded, after which the sides are fixed. The finished section is raised vertically to the columns and weld to metallic plates. You can fix the section and bolts, drill the hole of the desired diameter in the protruding part of the plate.
When installing the next section, it is necessary to ensure that the edges of the adjacent frames are on the same line. Even the difference in 1-2 cm will be noticeable and give the fence with a sloppy view. At the end of the section, the section is ground and color. Thus, it is possible to make a fence of any sizes without much trouble.