When building or moving to a private house, dog owners think about building a capital home for their pet. And if a small dog can be kept in the house, then a large watchdog will require an aviary.
The aviary is also required when it is necessary to isolate the dog from guests, small children, and workers. You will also keep your lawn and beds intact.
Of course, you can solve the problem by building a kennel with your own hands and putting the dog on a chain. But, you must admit, this is somewhat cruel and outdated. The owner who loves his dog is unlikely to go for it.
In addition, the enclosure has many advantages over the booth - the dog has free space for movement, the enclosure protects the walking area from precipitation, wind, heat, if necessary, other people will be able to feed the dog in the enclosure during your departure.
Today you can buy a dog enclosure ready-made (prefabricated) or invite specialists to build it, but in this article we will consider, nevertheless, the option of self-building the enclosure.
Where to locate the dog enclosure
First of all, you need to decide on the location of the aviary on the site. You should not build it in remote areas - the dog must see the owners, what is happening in the yard, who comes and goes. Otherwise, the dog will feel forgotten, alone, howl or bark.
Also, do not place the aviary close to the fence - the sounds behind the fence (steps, cars, other dogs) will irritate your pet, and if it is a fence between the plots, then the neighbors will not be delighted.
The optimal location is in front of the site, on the side of the gate or wicket. 1.5-2 meters should be retreated from the fence (but this is already ideal).
Dimensions of the dog enclosure
Now we decide on the size of the future aviary. Of course, there are only minimum requirements here. Based on the height of the dog at the withers, the area of the enclosure should not be less: 50 cm - 6 square meters, up to 65 cm - 8 square meters, more than 65 cm - 10 square meters.
The maximum size can be any, based on the availability of free space, material capabilities and love for a pet
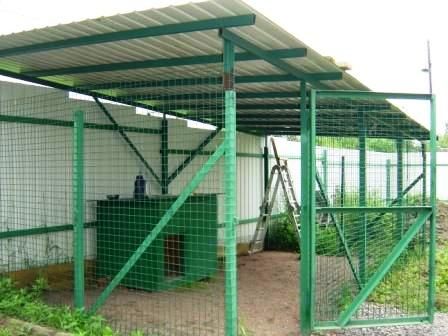
Inexpensive do-it-yourself dog enclosure
The cheapest option for building an open-air cage is to make a frame, a roof, a gate and cover the walls with a netting. Please note that the netting is unlikely to keep dogs of especially large breeds, but, for example, for a German shepherd it will be enough.
For the manufacture of the frame, you can use both a wooden beam and a metal professional pipe. Decide what material you are more used to working with, what tool is available, what is easier to bring to the site. The cost of the material in both cases will be approximately the same.
Wooden beams should be used with a cross section of at least 50 * 100 mm. and a professional pipe: 20 * 40 mm.
First of all, you need to install 4 support posts in the corners of the enclosure. They, of course, can be dug into the ground and concreted, but I would advise you to make a lower harness around the perimeter of the enclosure, and attach the racks to it. In this case, you will have the opportunity to move the aviary, if the need arises, and not to dismantle it completely.
An approximate layout of the aviary can be as in the drawing:
Base of the dog enclosure
The ideal base for the enclosure is a concrete screed raised from ground level. It is easy to wash and water will not flow on it during rain and in spring, when snow melts, your pet will always be dry and clean.
So, we fill in the concrete screed. We preliminarily clean and level the site. Along the perimeter, we expose the formwork from the boards to a height of 15-10 cm. Inside, we make a reinforcing frame from connected reinforcement (6 mm will be enough) or masonry mesh. Fill with concrete. The site should rise 10-15 cm above the ground. It is advisable to make a slight slope of the surface for water drainage.
If it is problematic to make a concrete platform or if you want to save money, then we make a wooden platform over the area of the enclosure. We install logs on the leveled platform - a bar of 50 * 100mm. on the edge, on top we lay end-to-end edged board or plywood sheets. All boards must be treated with an antiseptic, and the logs must also be treated with bituminous mastic or Kuzbasslak.
It is advisable to lay a wooden flooring on concrete, or at least Euro pallets. The concrete floor will be very cold, especially in winter.
Dog enclosure walls
Now we make the lower strapping around the perimeter of the base (preferably later they will need to be fastened with anchors or self-tapping screws). We attach 4 corner posts and two on the sides of the future wicket to the lower trim. If the distance between the 2 nearest racks is more than 1.5 m, then it is worth putting additional ones between them.
All wooden elements must be treated with antiseptics (Senezh, Teksturol, etc.)
The height of the racks should be 170-200 cm, so that it would be convenient for a person to walk in it. The front pillars should be 15 - 20 cm higher than the rear ones to ensure the slope of the roof.
We weld the profiled pipe, and fasten the wooden beam with mounting angles and self-tapping screws.
Then, similarly to the bottom, we make the upper strapping and lay the crate for the roof on it. The distance between the lathing bars is 25-30cm. We lay and fasten the profiled sheet, slate or sheets of ondulin. It is best, of course, to use a soft bituminous roof - it does not make noise when it rains.
We install horizontal jumpers, to which the mesh netting will be attached - one at the bottom, the second - along the height of the mesh.
It is more expedient to make the back wall and one of the side ones (from the booth side) deaf. Use plywood or profiled sheet for this.
Now we stretch the netting. It should be fixed from the inside of the enclosure. An assistant may be needed at this stage. Gently release the free end of the roll. Fix its lower end with self-tapping screws with a press washer, pull the upper end, fix it in the same way with a self-tapping screw. Then fix the entire edge.
In the same way, fix the net on all posts. If you have a metal frame, use self-tapping screws for metal with a drill or roofing. At the end, the mesh can be pressed to the racks with slats or welded sections of a professional pipe.
Cut off the mesh in the gate opening. We make the gate itself from the same material as the frame, we tighten it with a netting and hang it on the hinges. The door should open inward. There must be at least two latches on the wicket - one in the upper third of the height of the wicket, the other at the bottom.
If you wish, you can also make an opening window at the bottom of one of the walls for feeding the dog. This is very convenient if your pet will be fed by neighbors or relatives in your absence. The window should be located at a height of 20 cm from the floor and also have a latch.
You can read about how to make a booth with your own hands in THIS article.
When you install a booth inside the enclosure - do not be lazy to make a ladder to it (if, of course, the height of the enclosure allows - the dog will really like this "observation deck").
For small dogs, you can make an aviary a height of 0.8 -1 meter, but there must be a canopy with a roof of at least 2 sq. or completely covered but with a lower height of the walls closed by the netting.
That's all, the home for your pet is ready. The good news is that such an aviary can be made with your own hands quickly and inexpensively.