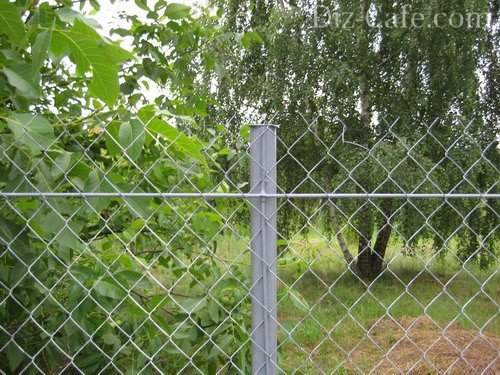
In some summer cooperatives, it is impossible to install a fence from slate and other materials, because They strongly shadow small sections. In this case, there will be a good way out of the chain grid - it does not prevent the sun's getting into the site, does not make it difficult to natural air circulation. Rabita is an inexpensive material that can serve for a very long time. Its additional plus is the possibility of using in quality. The author of this successful invention was Karl Rabitz. The grid began to be used already at the end of the XIX century, it was originally used during plastering.
Rabita is an affordable material that can afford to acquire any owner of the country area. In order to create a fence from the challenge with your own hands, except for the grid you will need thick wire, reinforcement rods, cable and support poles.
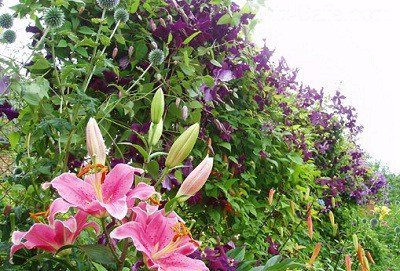
The fence from the chain can be an excellent living feed, serve as a support for curly plants. In this case, the site will be much more beautiful
Today manufacturers offer three types of chain nets:
- non-scattered grid refers to the cheapest, this option is better not to consider, because After a few months, it can be covered with rust;
- galvanized chain is found most often - for the price it is slightly more likely to be neocked, but at the same time it does not rust;
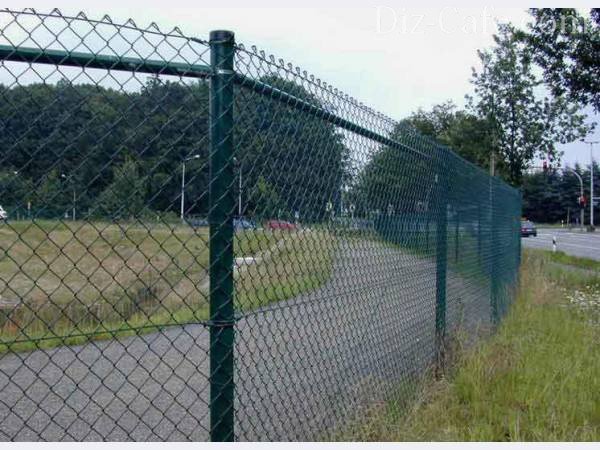
- rabita plasticized - metal mesh, which is top to protect against corrosion coated with multi-colored polymers.
The last option is very practical, and this mesh looks much aesthetically metallic. Therefore, a plasticized slaughterhouse, although it appeared recently, is already actively used by our gardeners.
When the grid is selected, attention should be paid to the size of the cells, the smaller the size, the speeds are stronger and more expensive. A grid with cells of 40-50 mm and a roll width of 1.5 m is quite suitable as a fence of the country area.
Option # 1 - "Stretched" fence from Rabit
The device of the fence from the grid of the Rabita may be different. The easiest way to make a fence is to pull the grid between the columns. Poles can use metal, wooden or concrete.

A simple way to make a tension fence from the slave without the use of rods - the grid is stretched between the columns and hangs on the hooks. Of course, over time, it can be saved, but such a fence can serve and long enough
The number of columns depends on the distance between them and the length of the fence. As practice shows, the best distance between the pillars of the fence from the metal grid is 2.5 m. As columns you can use b / y pipes that are not affected by corrosion. Now for sale and finished pillars for the fence, already painted, with hooks. Wooden poles are needed along the entire length before installing the protective composition. You can use and pillars from concrete and attach the grid to them with a wire or clamp.
The pillar height is calculated as follows. When you enlighten between the land and the fence to the width of the grid, add 5-10 cm, and then another meter-half, taking into account the underground part. As a result, you will get the average height of the pillar required to install the future fence. The load on the angular poles will be slightly larger, they should be deeper, therefore their length should exceed the length of the usual columns by about 20 cm.
The bases of all columns for greater strength is better to concrete. Pillars are a fence frame, after you install them, you can start mounting the grid. After the concrete hardens, they are attached to the poles or weld (if the pillar metallic) hooks for fastening the grid. Screws, rods, nails, wire are suitable as the material for fasteners, and any material bent into the hook. Roll with grid straighten and install at the corner post, we hang the grid on the hooks.
To ensure good tension and strength of the structure, in the first row of the mesh cells vertically, we felt the rod either a thick wire, the rods attach to a wooden post or weld to the metal. The grid will not be fixed in this way and does not see how it often happens without such a mount.
Then the roll is wounded on the span, until the next pillar. A little further place where the grid connects to the post, in the same way, do the rod. Keep behind the rod and stretch the grid if the rod does not use and pull it simply with your hands, you can pull the grid unevenly. It is best to do this together - one person at the lower edge, the other - at the top.
Now the armature is in the grid horizontally at a distance of at least 5 cm on both edges, top and bottom. Horizontal rods are welded or attached to the columns. If you pull the grid without rods, over time it will resist, and the rods will support its tension.
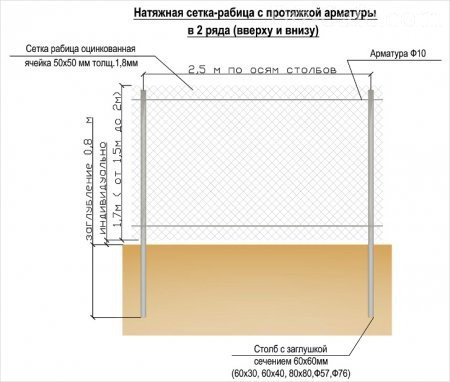
Diagram of the device for the collection of galvanized grid with stretch of reinforcement over the top and bottom side. Such a fence is a stronger design.
The fence is almost ready, now you need to get hooks on the posts and paint the pillars. Strong wire "mustache" better wrap down so that no one has injured. It is convenient to turn wire through the top row of cells and wrap sticking edges around it.
Here, the "mustache" carefully bent down to the rod, on such a fence you can dry things, the risk of injury is missing
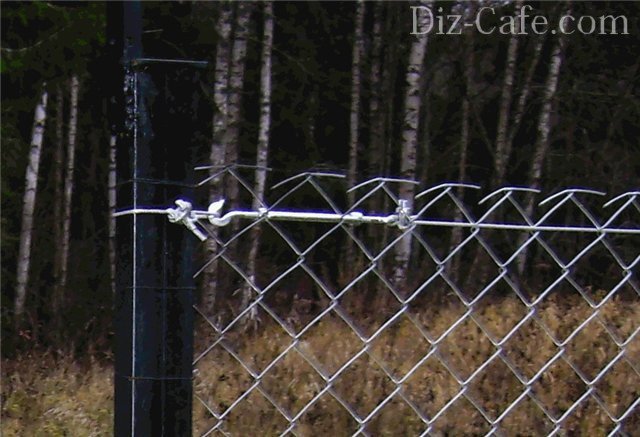
"Warms" of the upper cells must be beatened to avoid random injuries. On this photo they are sweeping weak - there is a risk of injury or break clothes
If you do not want to use reinforcement and concrete pillars, you can use the simplest equipment presented in this video:
Option # 2 - Eretion of the fence from sections
For the manufacture of the fence of this type, the sections are needed to be mounted. Initially, the device of the tensioning fence is made of markup and posts are installed.
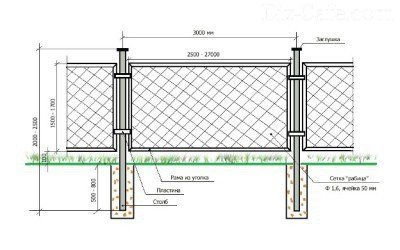
This scheme can be taken as a basis for determining the proportions of the size of the future facilities (click to increase)
It will be necessary to buy a 40/5 mm corner for the manufacture of a frame. The frame length is thus determined: from the distance between the columns, we subtract about 10-15 cm - this is its length. The same subtract from the height of the pillar above the level of soil - the resulting amount is the width of the frame. Corners are welded into rectangular structures. You can make the size of the sections at the calculation of the grid size (1.5 -2 m), you can unwind the roll and, if necessary, cut the size of the grid to the desired by the grinder.
Then, strips of metal (length 15-25 cm, 5 mm width, section 5 mm) are horizontally welded to the columns. At the edges of the pillar, you need to retreat 20 cm, set the section between two pillars and, using welding, attach it to horizontal strips. Now it remains only to paint a new fence.
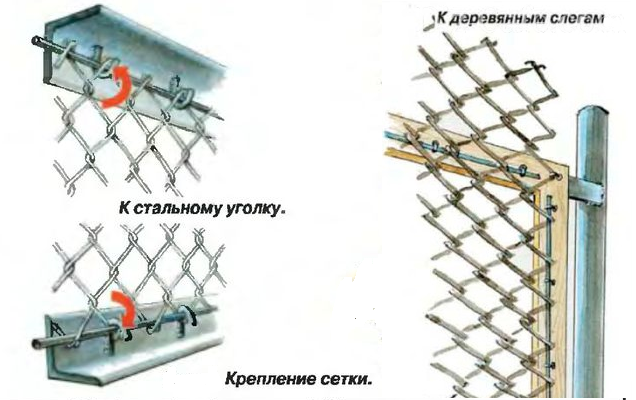
Pruts with a cross-section of 4 mm are made through the grid from 4 sides, first in the extreme row, then on top and bottom, the grid must be tightened well and weld the rods to the corners of the section. (Rods are welded to horizontal corners). It turns out a section from a corner with a grid chain welded on a rod from the inside