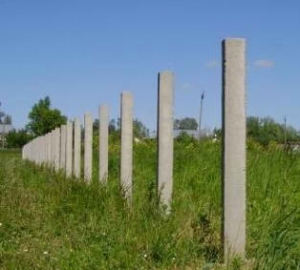
A simple and inexpensive way to denote the boundaries of the territory is to establish a fence from the chain grid. Of course, today there are many alternative materials that have a more presentable form, for example. But they are more expensive and time-consuming in the installation, more suitable for the capital outdoor fence of the country house.
And if you need to protect the construction site, summer cottage, separate the economic zone from the residential, or make an aviary for animals?
Is it reasonable to spend big money and a bunch of time, attract specialists if you can make a fence from the chain grid with your own hands in one day, and the result will be achieved? The manufacturer, calculation and installation in the form of step-by-step instructions are described below.
Advantages of the fence from the chain grid
- saving financial resources. The price of a fence from the chain grid is almost the lowest of all possible options for the fence. Competition in price can be made out that a woven from the branches, but in the rest he will lose;
- low weight. There is no need for a massive frame or filling of the foundation;
- strength and resistance to the factors of the external environment: moisture, temperature drops, ultraviolet, fire, mechanical damage;
- light traffic. The fence from the chain grid does not create obstacles to penetration of sunlight, and therefore, there will be no shaded zones and plants to feel comfortable in any part;
- undemanding in the care and lack of need for repair;
- the ability to withstand a significant load. For example, a wooden fence is easier to break, rather than break the metal network;
- availability. You can buy a chain grid in any construction store or on the market;
- a large range allows you to choose the one that is better suited for specific needs;
- high speed mounting. Install the fence from the chain grid can be alone in one day.
Of course, the grid fence is not deprived of the shortcomings, among which: an unavalizing appearance, the "transparency" of the fence and the need to paint. Part of the flaws are easily leveled if you know how to choose a chain grid correctly.
Types of grid Rabita for the fence - what better
Choosing what a chain net to use for the fence should take into account its main parameters:
1. Production material:
- low carbon steel (the grid is more plastic);
- stainless steel (rigid grid).
2. External coating:
- non-scattered challenge. Wire thickness - 1.2-5 mm, cell size 50-100 mm. Such a grid is inclined to rust, and needs painting;
- galvanized chain challenge. Wire thickness - 1.6-5 mm, cell size 50-100 mm. Does not need protection, has a long service life;
- plasticized (metallic with polymer coating). Wire thickness - 2.5-2.8 mm, cell size 25-50 mm. More presentable, with high-quality coverage has a long service life.
Council. Require the seller a certificate that confirms the quality of the coating. Simple PVC coating without additives, guaranteeing its resistance to ultraviolet and frost, will soon be unusable.
3. Sizes of the chain cell
The smaller the cell, the smaller the animals climbs through the grid. This is relevant in the construction of a fence, for example, for chickens or ducklings. But, such a grid will be harder, it will take more metal on its manufacture, it means that it will be more expensive. For the fence, the optimal option is a grid with a cell 50x50.
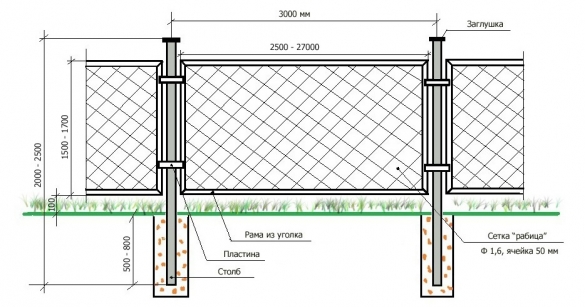
After the grid is selected, it is time to move to the main works, namely, to creating a sketch of the fence, the calculation of materials and the installation of the fence (tension and sectional).
How to make a fence from the chain grid do it yourself
Stage 1. Drawing of the fence from the grid of the Rabita
A drawing or sketch is a working graphic document that contains such data:
- place the installation of the fence, taking into account the driveway, trees, houses, other buildings on the site, etc.;
- features relief. If the site has a bias or height differences, the scheme will help to decide that it is more appropriate: smooth the soil or make a cascade fence;
- the length of the fence. In view of the fact that the width is determined by the width of the grid, the length of the bill is not necessary;
- place the installation of support pillars and backups.
Types of fences from Rabitsa by the type of carcass
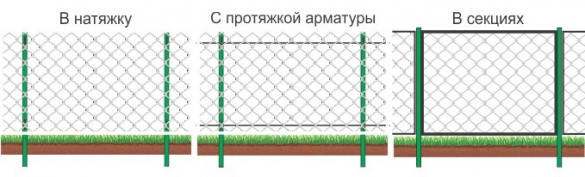
When designing the fence, a decision is also made regarding which framework for a fence from the chain grid will be used. Due to the fact that there are three ways to fasten the grid, there are three types of framework.
- tension fence - Easy mounted. The price of a tensioning fence from the chain grid is minimal. In order to build it, you need to install supports and pull the grid. The constructive disadvantage is that the grid will eventually be saved;
- stretch fence with broach. Broaching in the form of a durable wire serves as a support that supports the grid, not allowing it to be saved;
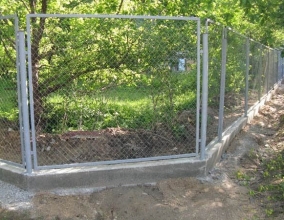
- sectional fence. It requires more expenses for the purchase of a frame for a frame and longer on the manufacture of sections. Although you can buy ready-made sections on the market. Naturally, the price of a sectional fence from the chain grid is the highest, but the design is more reliable and practical.
Note. When the uneven relief on the site is better to give preference to the fence of sections, this will allow you to put a fence from the chain grid, taking into account the height drops, without aligning the soil plane.
The correct drawing of the fence from the chain grid contains a description of the fence with key sizes and main nodes, incl. arrangement of corners.
Stage 2. Material for the construction of the fence: choice and calculation
Installing a fence from the chain grid will take only one or two days if you prepare all the necessary materials and tools in advance.
Construction Materials:
- Rabitz. Requirements for it are described above.
- Tension wire (when installing the tension fence). The function is to maintain the grid, provide additional attachment points and eliminate the possibility of sagging. A galvanized wire with a thickness of 2 mm is suitable for the fence. (from 130 rubles / mp).
As a more durable alternative, the wire is used by fittings, which is welded between columns or thin pipe. These materials exclude theft of the grid.
- Reference pillars for the fence from the grid of the Rabita.
- Profile angles (for the manufacture of a sectional fence). Using the corners form the framework of individual sections that are installed on the support pillars. The average price of the corner 40x40x3 - 97 rubles / mp.
- Wire thin or other fasteners for fastening the grid.
- Cement and sand (for concreting support pillars).
- Protective formulations for wood or metal processing.
From the tool you will need: Roulette, rope for markings of the site, shovel or bur.
What pillars can be used to fence from the challenge
Metal poles
Used hollow profile round or square section. The versatility of the metal pillar is not questionable. The iron support does not need to be processing during installation (primer and painting only), any type of fasteners are welded to the metal.
For a fence from the chain grid, a round column with a diameter of 60 mm is suitable. (average price with metal thickness in 2 mm - 159 rubles / mp) or rectangular, cross section 40x60 (price with a wall thickness in 2 mm - 163 rubles / mp.).
Wooden poles
Despite the fact that this is the easiest solution, supports from wood possess such a disadvantage as the susceptibility to weather influence and activity of microorganisms. In addition, the wood of dense breeds (oak, elm) is not cheap. You can use more popular breeds - pine, birch. With due process and constant care, they will preserve 20-25 years. However, in practice, wooden poles for the fence from the chain grid are used for temporary buildings. For the fence, a pillar is suitable with a size of 100x100 mm (70 rubles / mp).
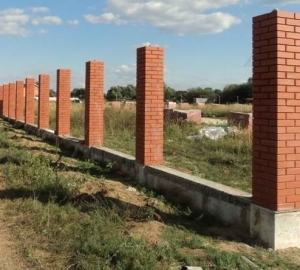
Brick poles
Durable and massive supports are too expensive for fence from the grid, therefore, in practice are not used. In addition, they need to fill the foundation.
Material prepared for WWW.Site site
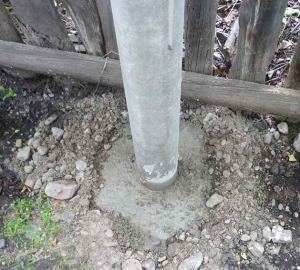
Concrete pillars
Relatively inexpensive material. You can make with your own hands or buy ready-made (approximate price for one support 80x80x2000 - 350 rub. / PC.). Actually if the store is in close proximity to the installation site, otherwise the cost of transportation will significantly increase the cost of the fence from the chain grid. At the same time, the mesh mount on a concrete pillar has its own specifics.
Asbestos cement pipes
Characterized relative low cost (price of pipes 100x3000 - 300 rubles), durability and resistance to rotting. But the grid stretch is uncomfortable, requires the use of clamps or clamps. In addition, hollow pipes, they are simply necessary to close the plugs, otherwise the frozen water will simply break the pipe from the inside.
3 stage. Calculation of the fence from the grid of the Rabit
- Number MP (Pulp meters) Mesh depends on the size of the site. Usually, the Rabita is sold by rolls of 10 m. Price galvanized grid Rabits 50x50x2 mm - from 54 rubles / m.KV. The price of an uncommunicated grid Rabita 50x50x2 mm - from 48 rubles / m.kv. Polymer grid price 50x50x2.2 mm - from 221 rubles / m.kv.
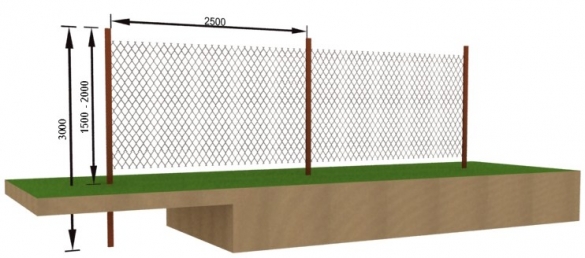
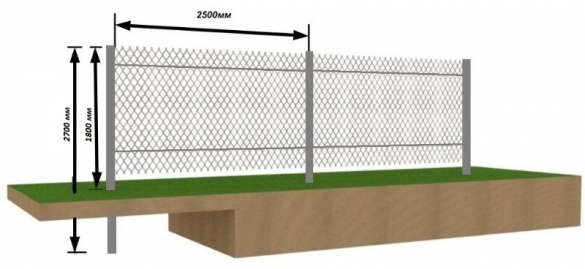
- The length of the wire for the stretch is equal to two wavelengths (or three, if the wire is installed in the middle). With a fence height of 1500 mm 2-3, the segment is enough.
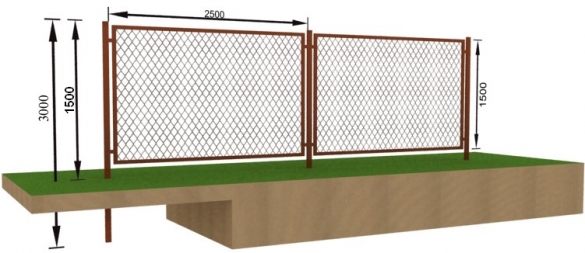
- The number of columns depends on the perimeter of the site (the total length of the fence) and is calculated based on the fact that the maximum distance between adjacent columns is 2,500 mm. This rule is invariably and for fence with stretch and for a sectional fence.
- The length of the profile corner is equal to the perimeter of the frame multiplied by the number of sections.
- Wire for fastening or other fasteners depending on the fastening method.
4 stage. Installing the fence from the chain grid do it yourself
1. Preparation of the soil surface
Place of installation of the fence does not need to be cleaned. It is enough to remove the garbage and eliminate interfering plants and shrubs. At the same time, plants that will grow near the grid (and not near the reference pillar) can be left if their development does not lead to the deformation of the grid.
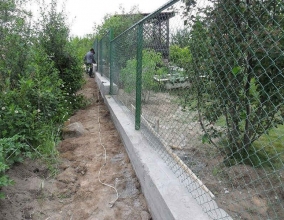
2. Filling the foundation under the fence from the grid Rabita
Do you need a foundation for a fence from the Rabita? There are fences mounted on the foundation. The fill of the concrete base can be explained only by installing the grid using heavy metal sections. What is in most cases unjustified.
3. Installing posts for a slaughter
Preparatory column processing for fence
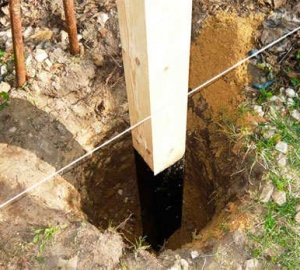
- Treatment of wooden pillars - The bar should be treated with an antiseptic (solution that is proactive to rotting the tree) in terms of recess in the soil. It has proven itself a line of food products (the price of 90 rubles / l).
- Treatment of metal columns - Iron supports need to be cleaned from rust and coat corrosion inhibitor (preventing rust development). Enjoy the demand of the company's products, which supplies several varieties of primers.
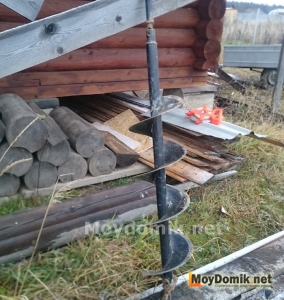
What depth to dig posts for the fence from the Rabita?
Despite the minimum sail of the mesh, the chain chain, with a length of 2.5 meters (between supports) and an altitude of 1.5 m, the fence may lean or fall. Therefore, the reference pillars are set to a depth of 1 meter, under certain conditions (the height of the fence, the type of soil on the site) the minimum depth of the pit 50-80 cm.
Methods for installing pillars under the fence
Installation on solid soil (clay)
Installation is possible in two ways:
- First, by scoring or screwing the supports to the desired depth. This method has a significant drawback, which manifests itself in the fact that it is difficult to withstand the level of installation when driving and easily deform the top of the driven pipe. Therefore, it is necessary to cover the plywood to avoid deformation.
- Secondly, by drilling / digging the hole under it, with the subsequent fill of concrete. In this case, the depth of the installation of the support is chosen taking into account the level of soil freezing. However, some masters argue that there is no need for this.
Installation on bulk and bunched soils
The technology is more laborious, the masters also allocate two installation options:
- First, set the support by 20 cm. Below the level of soil freezing. Then the soil is not squeezed out the pipe.
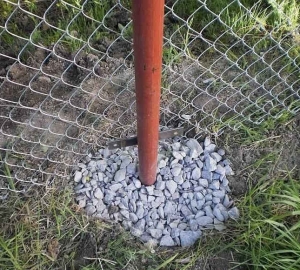
- Secondly, replace the soil around the support. To do this, it is necessary to make a hole of a larger diameter (twice the diameter of the pipe) and replace the soil in this place with rubble, at an altitude of 40 cm. To the surface of the soil, the column is concreted. This method creates drainage, which takes on the grounding of the soil and level it. In this case, the pillar will definitely not behave.
Council. Manual drilling, especially with a large number of holes under the poles - a very time-consuming task. It is better to find / rent / buy Motobur, with which the guide openings are made 50-60 cm, the remaining 40-50 cm of the pipe (post) are clogged with a sledgehammer.
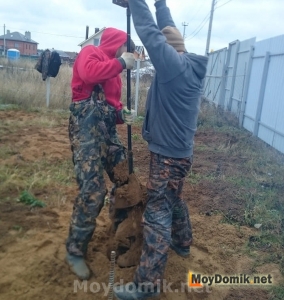
How to install poles for a slaughter
Installation of columns for a fence from the chain mesh does not differ from the arrangement of other types of fences. Installation procedure:
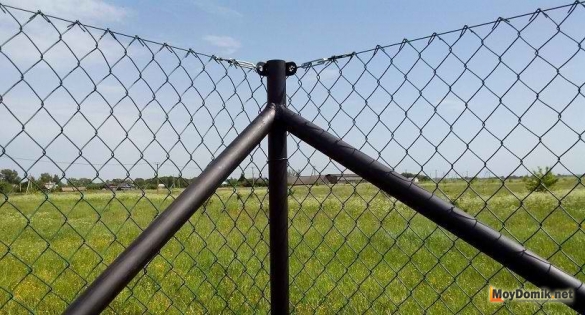
- first install angular pillars. When tightening, they are subjected to the greatest load, therefore it is advisable to increase the struts (oblique supports). The purpose of the strut is to prevent the tilt of the support. Alternatively, you can put more powerful pillars (thick-walled) in the corners;
- poles are installed in the site of the intake of the fence (in the corners of the fence, on the turns);
- a rope is tensioning between the already installed columns, which are mounted primarily by the supports for the gate and wicket;
- the entrance group is equipped (). Note, the input group of the fence from the chain grid is always performed as a section enhanced by additional jumpers;
- after that, ordinary columns are installed. It is advisable to do the distance between them. This rule is mandatory when installing a sectional fence.
Note. Hollow metal pipes are closed with plugs to eliminate water from entering and the appearance of rust.
4. Wire guide to stretch chain mesh
The task of the wire (cable) is to provide a solid tensioning of the grid between the columns. The necessary stretch provide such methods for fastening the chapters:
- tensioner;
- talp;
- hook with long thread;
- staples, clamps, flies and clamps only hold the wire from sagging on intermediate columns. They do not use them as tensioners.
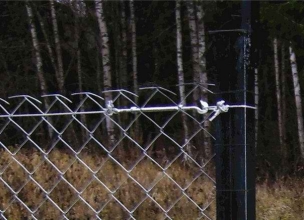
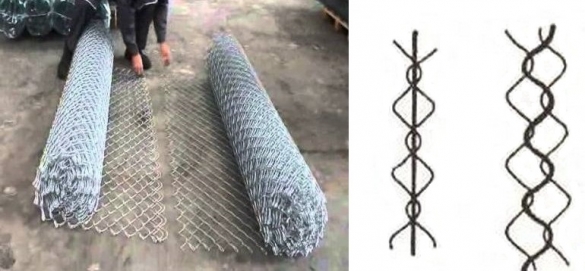
Rabita stretching order: the grid is tied by one end on the corner support of the pillar, and the second is tensioning. If the fence length is too large, intermediate fasteners are installed. Their function is to maintain wire.
Note. Some users advise passing a wire guide via grid cells. But this option is suitable only when installing a small fence, because to stretch the wire along the entire length, and then install the grid on the support - the occupation is severe and meaningless.
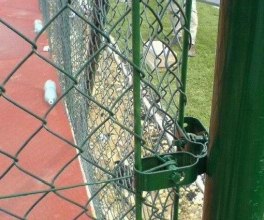
5. Fastening the chain mesh to the columns
Methods for fastening a chain mesh
- install on the outstretched tension wire;
- secure on the reinforcement;
- set into the section and secure individual sections.
How to pull the grid between the pillars of the supports during the construction of the tensioning fence
Rabbar mesh roll is installed vertically near the corner column (fastening to the metal columns). At the same time, the curved edges of the grid must be oriented upwards. This reduces the risk to be injured about the sharp ends of the wire.
Council. If the non-slip challenge grid is installed, then the masters are recommended to lift it above the soil level by 100-150 mm.
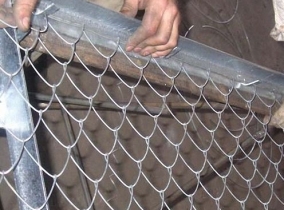
The grid is fixed in several places on the support. Then gradually unwinding, the grid is stretched and simultaneously attached to the upper horizontal jumper (wire or reinforcement).
When the first roll is over, the grid is pulled along the lower jumper. At the same time, it is important to unravel all the intanguible spirals of the grid.
After that, the second roll is screwed to the first roll (two rolls between themselves are connected), and the second roll is unwinding with tensioning.
Note. If the work is performed with the assistant, the connection (bunch of rolls) can be performed on a canopy. If independently, you need to connect pieces when the grid is not completely stretched, and its edge can be stretched along the length on Earth. Sometimes binding is performed by using a wooden jumper to which the edges of both rolls are attached.
After installing the chain mesh along the entire length of the fence, the mesh is fixed on the middle jumper.
When tightening the wire, special attention should be paid to the corners. Here you need to be extremely attentive to avoid skewing the mesh web.
How to pull the grid between the pillars of the supports during the construction of a sectional fence
First consider how to make sections for a fence from the chain grid
- from a metal corner you need to make a frame. Frame parameters: Length is equal to the length of the support pipe minus 100-150 mm; Width is equal to the distance between adjacent supports;
- the corner flashes on the workpiece with the help of a grinder;
- billets are welded into the frame;
- next, we work with the grid. From the roll roll, the desired size is wounded and separated by unscrewing the wire;
- at all four sides of the grid, the reinforcement rod is started. The rod allows you to pull the grid to the edge of the corner;
- the rod is welded to the edges of the frame inside the corner. Thus, the slaughterhouse is performed to the corner.
There is another option that suggests the inner side of the corner of metal pins (hooks) with a thickness of 3 mm. Then the pins bend inside the pliers, and the grid is stretched on them. After the whole grid is stretched, you need to boil the edges of the hooks to get a loop. This is how the probability of scaling the grid is eliminated.

After the frame is ready, go to its installation. To mount the profile tube of a separate section, you need to screw the metal plate on the support and welcome the section to it.
It should be noted that it is very difficult to make sections for a fence from the grid of Rabitz without experience. Difficulties are related to the fact that:
- problematically make sections of the same size;
- it is difficult to install a cutting machine cut, without sagging;
- the need to perform welding works;
- the complexity of the installation of the fence sections.
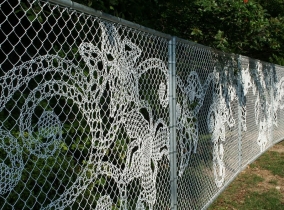
Decorative fence decoration from chain grid
The mesh fence is not distinguished by a bright design and attractiveness, but if desired, it can be decorated, as a result, it will be a pretty and durable fence for the site.
Ideas for mesh fence decor
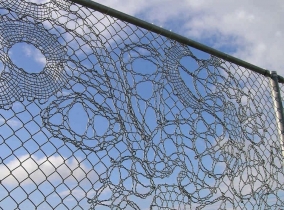
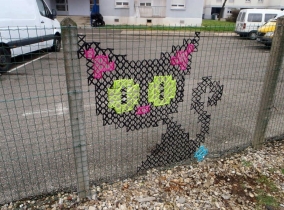
- openwork weaving. Performed thin wire on a grid with large cells. A simple pattern can be done with their own hands;
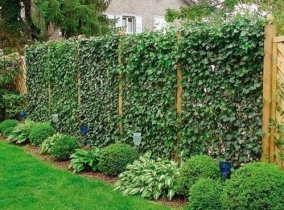
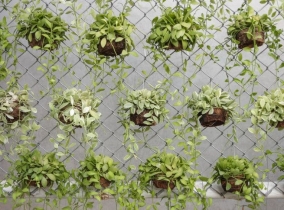
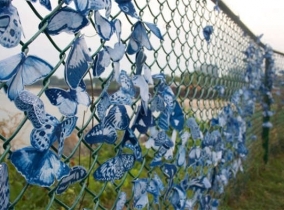
- decorative gardening. The falling out of fusing or curly plants along the fence from the grid will allow you to create a living fence around the site. Alternatively, you can attach hanging pots with flowers, as in the photo on the right;
- so as not to wait until the greens grow and melt the elevation, the grid can be decorated with decorative wire colors;
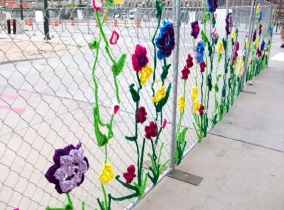
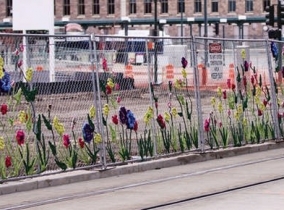
- creative design. Showing a little fantasy you can create original and funny decorations for a fence from the chain grid.
Fence from the chain grid do it yourself - video
The cost of the fence from the grid of the Rabit
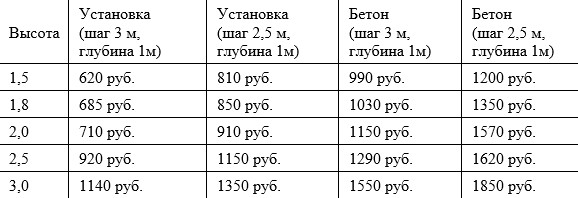
The total cost of building a fence from the chain grid is determined taking into account the materials used and their quantity. For example, the value of the material was indicated as they were discussed. The cost per meter is easy to calculate, knowing the flow of each material and the length of the fence.
The price of a fence from the chain grid for work with the installation for 1 mp. shown in the table
Thus, the fence from the grid Rabita is an economically advantageous and faster type of fence that can be made with your own hands.