Breeding rabbits is a profitable and uncomplicated activity. These animals do not require special care and exceptional conditions of detention, therefore 2-3 eared fluffs can be settled in a summer cottage or even in an apartment.
Many novice farmers are involved. And the first thing that should be purchased for a rabbit farm is cages.
 Rabbits are animals that do not require special conditions for keeping. That's why they don't have to buy houses for them: you can make them yourself.
Advantages of hand-made houses:
- during construction, all the features of the premises, its location and conditions of detention are taken into account;
- the costs of arranging a rabbit farm are significantly reduced;
- self-production of cells will help to avoid defects, which are often allowed at the factory.
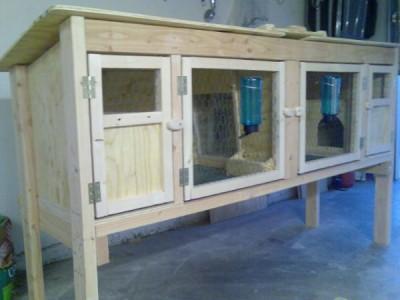
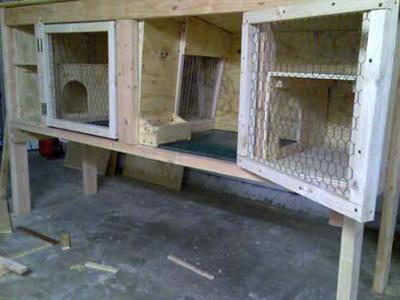
An example of a homemade house in the photo.
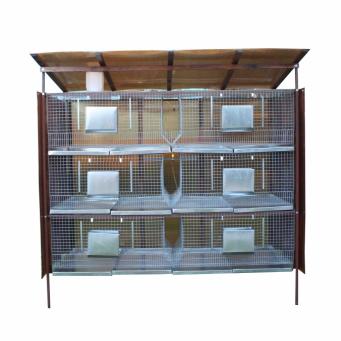
The benefits of factory cells:
- ideal design, which provides optimal conditions for the life of animals;
- the structure is equipped with nests, drinkers, feeders, pallets;
- factory products are constantly being improved, their designs are becoming more complicated: when buying a ready-made cage, a farmer can be sure that he will become the owner of modern equipment.
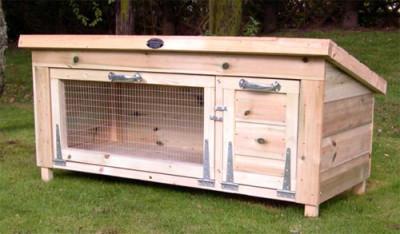
Factory houses are shown in the photo.
Advice! Buying ready-made cages will cost a considerable amount, while making your own rabbit dwellings is a very budgetary event.
Cell types
 If you are seriously going to start breeding rabbits, then you will have to build several rooms:
- for fattening rabbits;
- for keeping rabbits with cubs;
- for males.
To provide shelter for the rabbits, you need to build an entire "housing estate". It can be installed both outdoors and in a barn: it all depends on the natural conditions of a particular region. Drawings for creating cells can be developed independently or you can find ready-made ones in specialized magazines and on the Internet.
Male cages
 Males are settled in separate houses. This avoids fights, struggle for food, as well as unplanned mating (if males and females are kept in the same room). The size of the house should be such that the rabbit can move freely inside it. If the males are cramped, they will become skinny and obese. And this can affect reproductive function: rabbits will no longer give birth to offspring.
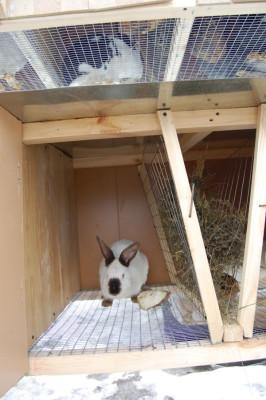
 Bunny houses with bunnies should be spacious enough. They are located in one tier and consist of two sections: main and uterine. So that the cubs do not freeze in winter, the uterine compartment must be carefully insulated.
Rabbits are populated in such houses at the age of 2-3 months, if they could not gain the necessary weight while living with their mother. To give the female the opportunity to give birth to new rabbits, the grown cubs are placed in a separate room and fed to the desired weight.
Cell types
Now there are many modifications, but the two-section cage is still the most popular design for keeping rabbits.
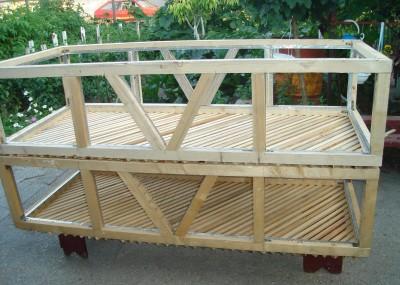
 A house for adult animals can be made by hand. It will take several hours to create a home, but you can be sure that the room meets all the requirements for keeping furry pets.
The finished cage for adult animals is shown in the photo.
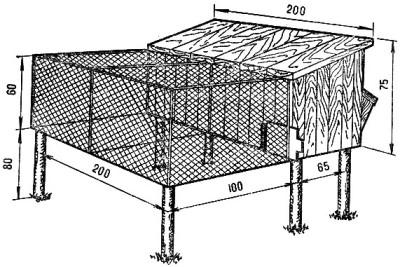
Stages of work:
- Make the frame of the house from 4 wooden beams. It should be rectangular; its dimensions are equal to the length and width of the future product.
- Set the house up on its legs. To do this, take 4 beams: 2 of them should have a length equal to the height of the front wall + 30 cm, and 2 more - the height of the rear wall + 30 cm. The frame of the front wall is formed by long beams, the back - shorter (a difference of 10-15 cm). Screw them to the rectangular base so that it rises 30 cm above the floor. These will be the legs.
- Attach a galvanized mesh to the rectangular floor base so that it covers the middle of the room. Leave a 35–40 cm space on each side for nesting compartments. Cover the floor in the nests with plywood of a suitable size so that it slightly clings to the net.
- Install the plywood side and back walls and complete the frame of the house. To do this, fasten 1 long bar at the very top between the front side rails.
- Separate the nest compartments from the rest of the room with slats. Place spacers between these strips and the back panel: plywood sheets with holes cut in them. The holes are needed to allow the rabbits to move freely between the nest and feed compartments. Attach a roof to each nest.
- Divide the room into 2 sections with a cross bar. Make feeders out of plywood and screw them on opposite sides of the divider bar.
- To keep the bottom well, turn the structure over and secure the mesh with nails and rods.
- make 4 sheets of plywood, which should be slightly less than the house in height. The hopper should look like a "V" and expand towards the top. Attach it between the troughs so that, after pouring, feed from this funnel flows unhindered into the troughs.
- Towards the back wall, make a nursery for coarser food such as hay and grass. Their width should be 30 cm. To make it convenient for rabbits to pull out blades of grass, make walls of wire rods on both sides.
- Attach the roof to the cage. It should protrude slightly above the cage. In the middle, where the feeders are located, build a slider door that you can slide out to add feed. For convenience, attach a wooden or metal handle to it.
- Attach the doors to the front wall, which are made of strips. Pull the net between the slats. The nest compartments can be left without external openings, or solid wooden doors can be used for them.
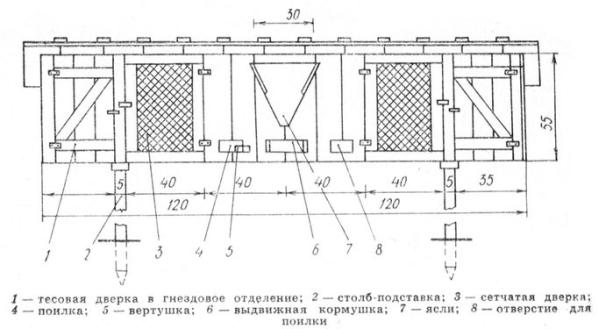
Drawings for making such cells are easy to find.
Houses for three month old rabbits
Up to three months, rabbits are kept in groups of 6-8 individuals, therefore, group dwellings are used for their maintenance. They are made in the same way as double cabins. The only difference is that a large number of rabbits require a different feeding system: they simply cannot eat all together from a small feeder.
Stages of work:
- The frame of the house is made in the same way as the frame of double cages for adult animals. However, it is not necessary to divide the room into two sections. The cage will consist of a nest and a feed compartment. In this case, the nesting compartment should be 1.5 times smaller than the stern compartment.
- Cover the floor of the nesting compartment with a wooden plank and separate it from the aft compartment with a plywood wall with a hole for the movement of animals. The outer wall of the nest must be made of plywood.
- The floor and the front of the aft compartment are made of mesh. In the front part, you need to attach a door made of rails.
- Place a trough along the entire length of the feed compartment. It should be positioned in such a way that part of it is in the cage, and part is outside (for the convenience of laying hay). It is made from a net so that it is convenient for animals to pull out the grass. It is better to raise the feeder 3–4 cm above the floor so that the food is not contaminated with rabbit waste.
Advice! Up to 12 animals can be kept in such a cage at a time.
There are ready-made blueprints for making such cells.
Two-tiered (three-tiered) shed
 Two-tier and three-tier structures are made in the same way as two-section houses for adult rabbits. But in this case, several cells are arranged in tiers one above the other.
Stages of making a two-tiered shed:
- Make 3 rectangular frames. They will become the floor and roof of future cells.
- Reinforce them on long bars. Connect the first rectangle with the beams so that legs 30 cm high remain from below.Fix the next rectangle at a height of 50 cm above the previous one, the third at a height of 10 cm above the second.
- On the first and third rectangles, attach a galvanized netting that will be the floor for the aft compartment. Equip both houses in the same way as a regular two-section cage.
- The second rectangle will serve as both a roof for the lower house and a pallet for the upper one. Between the second and third rectangles, you need to install a removable box into which waste from the upper house will be poured through the net.
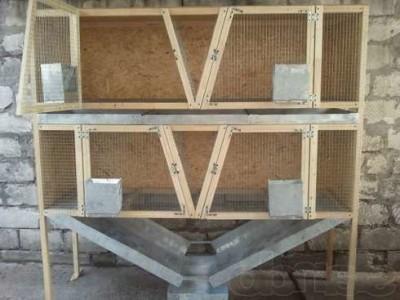
Thus, you can make not only a two-tier, but also a three-tier shed. If you make several of these structures, then you get a real rabbit farm.
How a multi-tiered structure for keeping rabbits might look like can be seen in the photo.
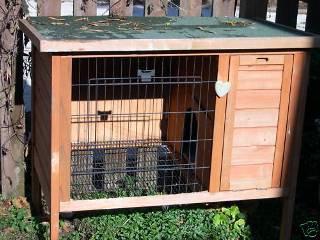
House for a rabbit with a nest
To make a house for a rabbit with a nest with your own hands, you need to take into account some of the features of this structure. The house for the rabbit is being built separately from other structures. It is good if it is portable so that animals can be moved from the street to the barn.
Stages of work:
- Chip off the frame for the house, make the back wall and the sides from plywood. This structure should have two compartments: the main one and the mother compartment.
- For each of them, make a separate door: to the rabbit compartment - from mesh, to the mother liquor - from plywood or thin boards.
- To keep the rabbits from freezing, insulate the mother house. It is advisable to make a double floor, walls and a roof in it, in the space between which you need to lay insulation: foam, straw or any other material. If the winters are very cold, then the "warm floor" system is suitable: a heating pad is placed between two levels of the floor. The wire from the unit is taken out so that the animals do not gnaw it.
- The roof is covered with a water-repellent material.
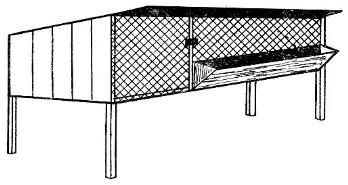
The photo shows how a house for a rabbit with a cub should look like.
Do you need a house with a walk?
 If the owner of a rabbit farm has a large green area at his disposal, then walking houses in this case are an excellent option. They look the same as ordinary rabbit houses, only on the back wall they have a door through which the rabbits are released for a walk.
A place for walking can be made by hand. Behind the cage, you need to equip a large aviary. Its frame is made of wooden slats, and the walls are covered with dense mesh. It is better to place the aviary on the sunny side: rabbits spend most of their life in dark cages, and they just need the sun.
Advice! If your farm is safe enough for rabbits to graze on the grass, then walking houses can be made without legs. Then the animals can eat pasture. And when the grass in the aviary is over, the rabbit dwelling can simply be moved to another place. If on the farm there is a possibility that mice, cats or martens will get into the aviary, then the aviary will be equipped on piles.
What is the advantage of walking cages? The point is, rabbits need space to run. If they have the opportunity to be in the fresh air and periodically knead their paws, then they will hurt less, gain weight faster and reproduce more actively. In addition, the fur of such animals will be much more fluffy and shiny than that of their sedentary relatives.
A walkable house can be the same as in the photo.
Place for a house
The choice of a place for a house depends on the climatic conditions of the region. If winter frosts are rare in your area, then rabbit houses can be safely placed outside. However, it is worth choosing a place where there are no drafts and excessive moisture: rabbits are prone to colds.
Advice! You can keep rabbits indoors, but the ideal option is combined keeping: in the summer, the rabbit houses are exposed to fresh air, and in the winter they are sent back to the shed or house.
If you are installing shedovaya cells, then it is advisable to arrange them in two rows and turn their facades towards each other. An adult must walk freely between the rows.
Rabbits do not like intense lighting, but if the houses are in a shed, then the room must be equipped with several lamps. They should illuminate the rabbit dwelling for 8-10 hours a day.
Materials (edit)
 For making cells with your own hands, it is recommended to use the following materials:
- wood (beams, slats, plywood);
- galvanized mesh with a small mesh size (it depends on the size of the rabbits);
- plastic for finishing works;
- slate or roof shingles if the cage will be outside.
Advice! All wooden parts of the product must be well sanded, and the edges of the galvanized mesh must be firmly nailed to the surface. Rabbits are gentle creatures that can easily injure themselves on poorly crafted home parts.
It is not recommended to use metal for arranging rabbit cages. Under the rays of the sun, this material heats up a lot, and in the cold season it freezes. In such a dwelling, rabbits will feel uncomfortable, start to get sick and stop breeding.
Tools
To make a house for rabbits with your own hands, you will need the following tools:
- hammer;
- roulette;
- hacksaw for wood;
- plane;
- scissors for cutting mesh;
- pliers;
- nails, screws, screws, corners;
- screwdriver and screwdriver;
- sandpaper.
Cage dimensions
 The size of rabbit cages depends on the size of the animals. A single cage for a male rabbit should have a width of at least 0.6 m and a length of 0.8–1.1 m. If the rabbits are large, then the size of the section should be increased. One rabbit weighing more than 5 kg requires a room with a length of 1.3 to 1.5 m.
The size of the room for young animals depends on the number of young rabbits. They can be placed 5–8 at a time, and with a compacted planting - 12 individuals per house. In this case, the width of the cages should be 1 m, the height - from 0.35 to 0.6 m, and the length - 2-3 m.
In any case, one adult rabbit should not have less than 0.5-0.7 m2, and one cub - less than 0.15-0.2 m2.
After reading these simple guidelines, you can easily equip your rabbit farm. If you make houses for animals yourself, then the enterprise will cost a small amount. And rabbits bring in considerable income: after all, not only the tender meat of these animals is valued, but also their wool and manure.