The ribbon foundation has a non-standard geometry: it is long in tens of times more depth and width. Because of this design, almost all loads are distributed along the tape. Self-concrete stone can not compensate for these loads: its bending strength is not enough. It is not just a concrete, but reinforced concrete, and reinforced concrete is a concrete stone with steel elements with steel reinforcement. The process of metal laying is called the reinforcement of a belt foundation. Its hands to make it easy, the calculation is elementary, the schemes are known.
The number, location, diameters and variety of fittings - all this should be spelled out in the project. These parameters depend on many factors: both from the geological situation on the site and from the mass of the building there. If you want to have a guaranteed durable foundation - a project is required. On the other hand, if you build a small building, you can try on the basis of general recommendations to do everything with your own hands, including to design the reinforcement scheme.
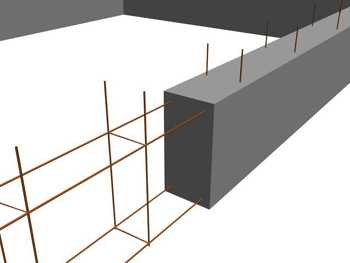
Reinforcement scheme
The location of the reinforcement in the ribbon foundation in the cross section is a rectangle. And this is a simple explanation: such a scheme works best.
Reinforcement of a belt foundation with a tape height not more than 60-70 cm
There are two main forces on the ribbon foundation: the reasons forces are pressured below with frost, the load from the house. The middle of the tape is almost not loaded. To compensate for the action of these two forces, usually make two belts of working reinforcement: from above and below. For fine and medium-sharewed foundations (up to 100 cm deep), this is sufficient. For a deep downstream tapes, there are already 3 belts: too large height requires gain.
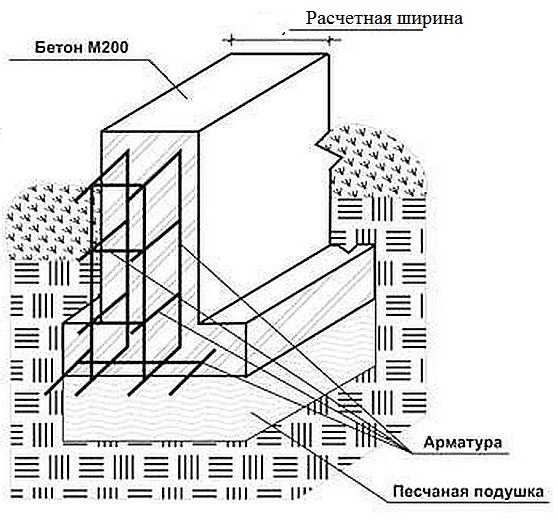
So that the working reinforcement is in the right place, it is determined in a certain way. And they do it with the help of thinner steel rods. They do not participate in work, only hold the working fittings in a certain position - create a design, because it is called this type of fittings structural.
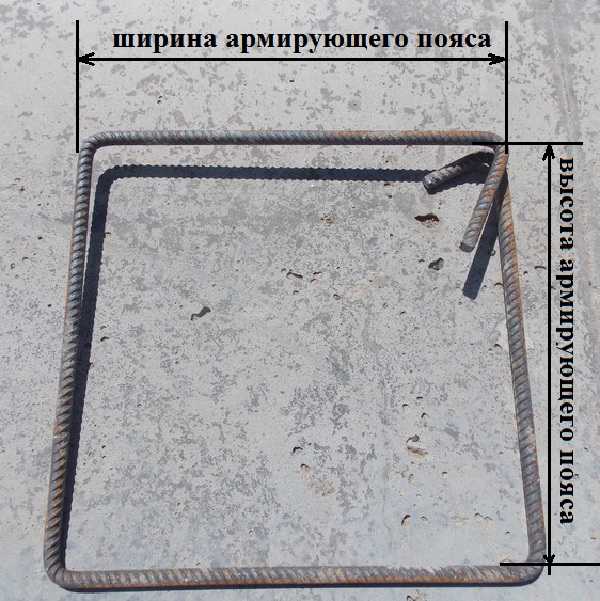
As can be seen on the reinforcement scheme of the belt foundation, the longitudinal rods of reinforcement (workers) are tied by horizontal and vertical backups. Often they are made in the form of a closed contour - a clamp. It is easier to work with them and faster, and the design is more reliable.
What an armature is needed
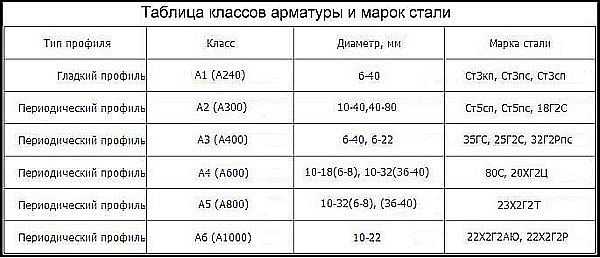
For a ribbon foundation, two types of rods are used. For longitudinal, which carry the bulk, the class AII or AIII is required. Moreover, the profile is necessarily ribbed: it is better connected with concrete and normally transfers the load. For structural jumpers take cheaper fittings: a smooth first class AI, a thickness of 6-8 mm.
Recently, fiberglass fittings have appeared on the market. According to the manufacturers, it has the best strength characteristics and more durable. But many designers are not recommended to use it in the foundations of residential buildings. According to standards, this must be reinforced concrete. The characteristics of this material have long been known and calculated, special reinforcement profiles have been developed, which contribute to the fact that metal and concrete are connected into a single monolithic design.
How the concrete will behave in a pair with fiberglass, how firmly such fittings will be tightened with concrete, how successful this couple will resist the loads - all this is unknown and not studied. If you want to experiment - please use fiberglass. No - take iron fittings.
Calculation of the reinforcement of the ribbon foundation with their own hands
Any construction work is normalized by gtostas or skills. Reinforcement is no exception. It is governed by SNiP 52-01-2003 "Concrete and reinforced concrete structures". This document indicates the minimum number of desired fittings: it must be at least 0.1% of the cross-sectional area of \u200b\u200bthe foundation.
Determination of the thickness of the reinforcement
Since the ribbon foundation in the cut has a rectangle shape, the cross-sectional area is multiplying the lengths of its sides. If the tape has a depth of 80 cm and a width of 30 cm, then the area will be 80 cm * 30 cm \u003d 2400 cm 2.
Now you need to find the total area of \u200b\u200breinforcement. SNUPE it should be at least 0.1%. For this example, this is 2.8 cm 2. Now the selection method is determined by the diameter of the rods and their number.
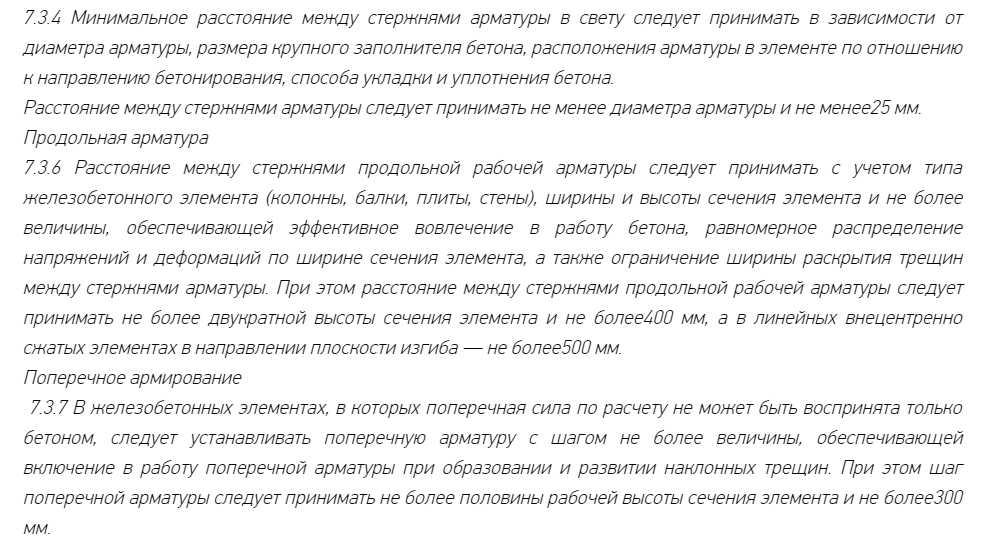
Quotes from SNIPA, which relate to reinforcement (to enlarge the picture, click on it right key mouse)
For example, we plan to use the reinforcement with a diameter of 12 mm. The area of \u200b\u200bits cross-section 1.13 cm 2 (calculated by the formula of the area of \u200b\u200bthe circle). It turns out to provide recommendations (2.8 cm 2) we will need three rods (or they say "threads"), since two is clearly not enough: 1,13 * 3 \u003d 3.39 cm 2, and this is more than 2.8 See 2, which recommends SNiP. But there will be no three threads to share for two belts, and the load will be and from the other side significant. Therefore, lay four, laying a solid margin of safety.
In order not to bury extra money in the ground, you can try to reduce the diameter of the reinforcement: calculate under 10 mm. The area of \u200b\u200bthis rod is 0.79 cm 2. If you multiply on 4 (the minimum number of rods of the working fittings for the belt frame), we obtain 3.16 cm 2, which is also enough with a margin. So for this variant of the belt foundation, you can use the ribbed fittings of the class II with a diameter of 10 mm.
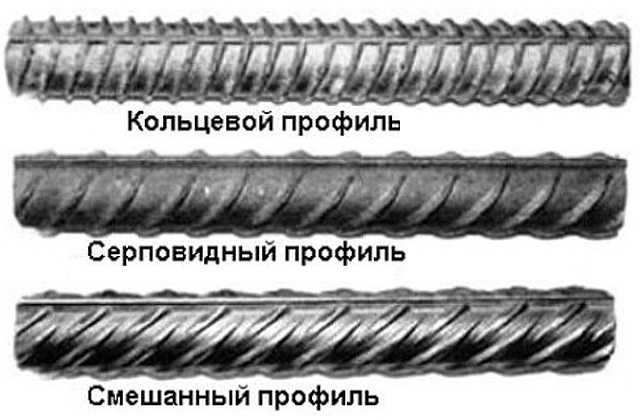
Reinforcement of the ribbon foundation under cottage is carried out using rods with different types of profile
Installation Step
For all these parameters, there are also techniques and formulas. But for small buildings come easier. According to the recommendations of the standard, the distance between horizontal branches should not be more than 40 cm. On this parameter and are oriented.
How to determine what distance to lay reinforcement? So that the steel is not subject to corrosion, it should be in the thick of concrete. The minimum distance from the edge is 5 cm. Based on this, and calculate the distance between the rods: and vertically and horizontally it is 10 cm less than the dimensions of the tape. If the foundation width is 45 cm, it turns out that between two threads there will be a distance of 35 cm (45 cm - 10 cm \u003d 35 cm), which corresponds to the standard (less than 40 cm).
The pitch of the ribbon foundation is the distance between two longitudinal rods
If the tape is 80 * 30 cm, then the longitudinal fittings is one of the other at a distance of 20 cm (30 cm - 10 cm). Since for the foundations of the middle embedding (up to 80 cm high), two reinforcement belts are required, then one belt from the other is located at an altitude of 70 cm (80 cm - 10 cm).
Now about how often put jumpers. This standard is also in Snip: the installation of vertical and horizontal dressings should be no more than 300 mm.
Everything. The reinforcement of the belt foundation was calculated with their own hands. But note that neither the mass of the house nor geological conditions was taken into account. We were based on the fact that these parameters were based on.
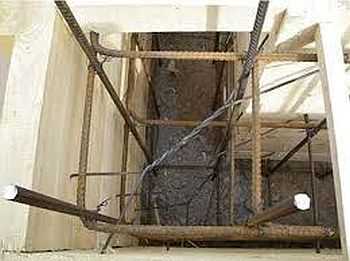
Reinforcement of corners
In the construct of the ribbon foundation, the fastest location - the corners and the adjoining of the seasplets. In these places, loads from different walls are connected. So that they have been successfully redistributed, the reinforcement should be correctly tied up. Just connect it wrong: this method will not provide the transfer of the load. As a result, after some time, cracks will appear in the ribbon foundation.
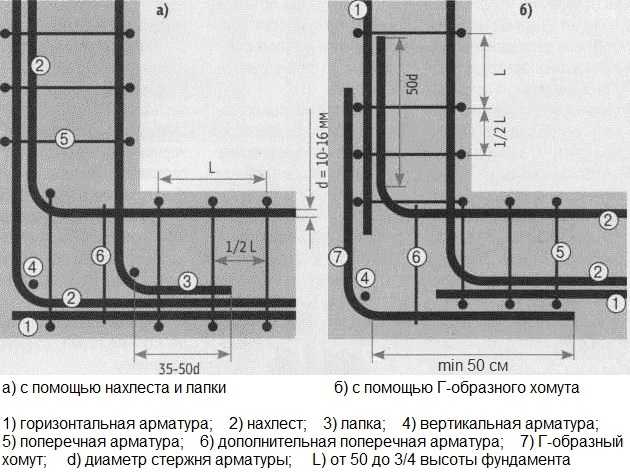
The correct corner reinforcement scheme: Used or Signs are used - M-shaped clamps, or longitudinal threads make it longer by 60-70 cm and bend over the angle
To avoid such a situation, special schemes are used during the corners: the rod on one side is bend on the other. This "sniff" should be at least 60-70 cm. If the length of the longitudinal rod to bend is not enough, M-shaped clamps with the parties are also used at least 60-70 cm. The schemes of their location and fixing of the reinforcement are shown in the photo below.
By the same principle, the adjoining of commoners is reinformed. It is also desirable to take the reserves and bend. It is also possible to use M-shaped clamps.
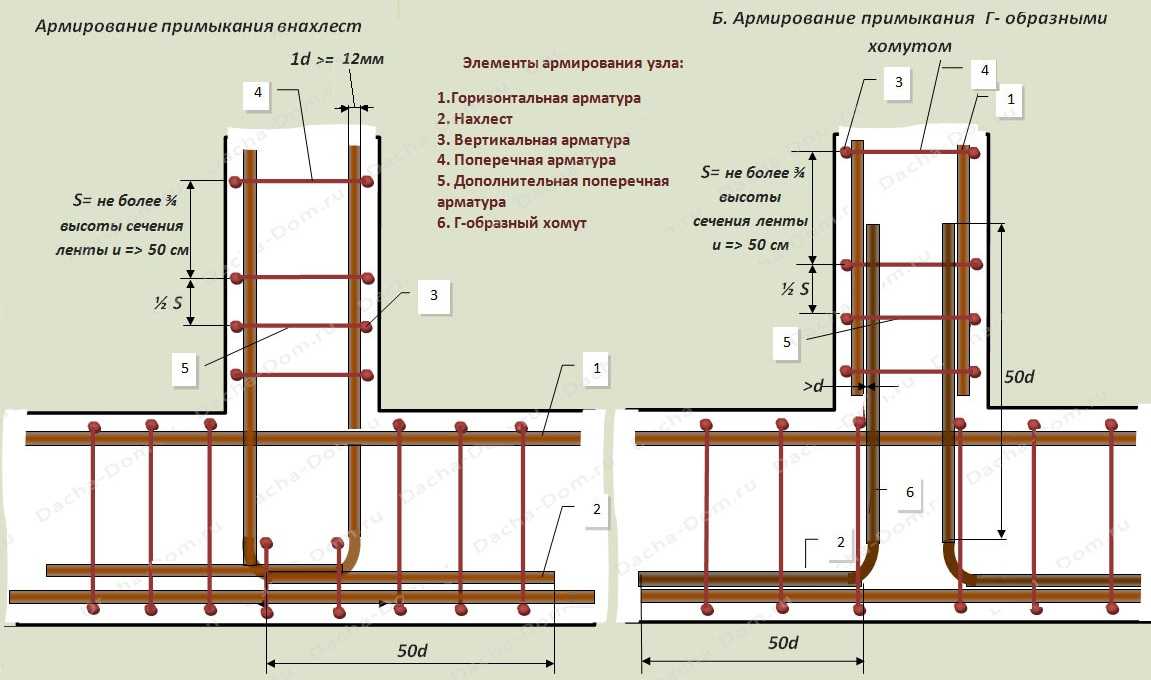
Reinforcing wall adjustment scheme in a tape base (to enlarge the image Click on it right key mouse)
Please note: in both cases, in the corners, the step of installation of the transverse jumpers is doubled. In these places, they are already becoming workers - participate in the redistribution of the load.
Ribbon Foundation
On soils with not very high bearing, on bunny soils or under heavy houses, often tape foundations are made with sole. It transmits the load on the large area, which gives greater stability to the foundation and reduces the amount of drawdowns.
So that the sole of pressure does not fall apart, it is also necessary to rein. The figure shows two options: one and two belts of longitudinal reinforcement. If the soil is complex, with a strong tendency to winter bakery, then you can lay two belts. With normal and medium-tracting soils, one is enough.
Mixed reinforcement rods are workers. They are, as for tape, take a second or third class. They are located apart from a distance of 200-300 mm. Connect with short rod segments.
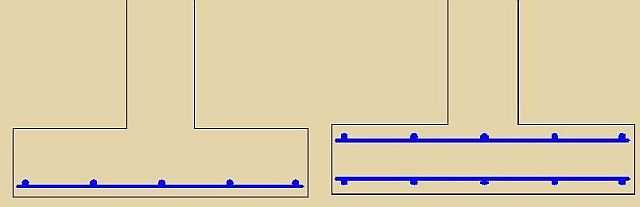
Two ways of reinforcing the soles of a tape base: on the left for bases with a normal bearing capacity, on the right - for not very reliable soils
If the sole is unintelligible (rigid scheme), then the transverse segments are structural, do not participate in the load distribution. Then they are made with a diameter of 6-8 mm, bend on the ends so that they cover the extreme rods. Tied to all with the help of knitting wire.
Fir soles are wide (flexible scheme), transverse fittings in the sole is also a working. It resists soil attempts to "scramp" her. Therefore, in this variant, the soles use the ribbed fittings of the same diameter and class as the longitudinal one.
How much do rodka need
Developing a scheme of reinforcement of a ribbon foundation, you know how many longitudinal elements you need. They are stacked throughout the perimeter and under the walls. A long ribbon will be one rod long for reinforcement. Multiplying it on the number of threads, get the necessary length of the working fittings. Then add 20% to the resulting digit - the stock into the joints and the "overlap". So much in meters you will need to work fittings.
Now you need to calculate the number of structural reinforcement. You consider how many transverse jumpers should be: Deliver the length of the tape on the installation step (300 mm or 0.3 m, if we follow the recommendations of the bottom). Then count how much it goes to make one jumper (the width of the reinforcement frame is folded with a height and double). The resulting digit multiply on the number of jumpers. To the result, add 20% (on connections). This will be the number of structural reinforcement for reinforcing the belt foundation.
Along the similar principle, you consider the amount that is necessary for reinforcing the sole. Folding all together, you will learn how many fittings need to be found on the foundation.
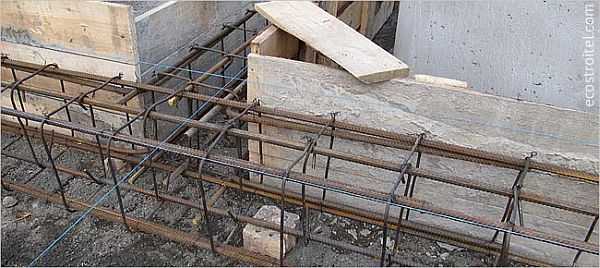
Machinery assembly technology for belt foundation
Reinforcement of the belt foundation begins with your own hands after installation. There are two options:
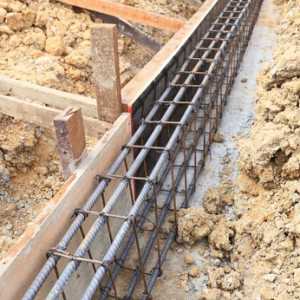
Both variants are imperfect and each decides how it will be easier. When working directly into the trench, you need to know the procedure:
- The first laid longitudinal rods of Lower Armopoyasa. They need to be raised 5 cm from the edge of concrete. It is better to use special legs for this, but developers are popular pieces of bricks. From the walls of the formwork, the armature will also be 5 cm.
- Using cross pieces of structural reinforcement or molded contour, they are fixed at the required distance using a knitting wire and a hook or knitting gun.
- Next there are two options:
- If the contour molded in the form of rectangles are used, immediately ties the upper belt to them at the top.
- If you use chopped pieces for transverse jumpers and vertical racks, then the next step is the border of the vertical racks. After all of them are tied, tied the second belt of longitudinal reinforcement.
There is another ribbon foundation reinforcement technology. The frame is hard, but there is a large rod consumption for vertical racks: they are clogged into the ground.
The second technology of reinforcement of the ribbon foundation - first drive up the vertical racks, the longitudinal threads are tied, and then everyone is connected by transverse
- First, the vertical racks in the corners of the tape and the locations of the horizontal rods are poured. Racks must have a large diameter of 16-20 mm. They are exhibited at a distance of at least 5 cm from the edge of the formwork, extinguishing the horizontality and verticality, clog into the ground 2 meters.
- Then clog the vertical rods of the calculated diameter. The installation step was determined: 300 mm, in the corners and in places of the adjoining of sterns two times less - 150 mm.
- Racks ties longitudinal threads of the lower belt reinforcement.
- In places intersection of racks and longitudinal armaturin, horizontal jumpers are tied.
- The upper reinforcement belt is linked, which is located on 5-7 cm below the upper surface of the concrete.
- Bind horizontal jumpers.
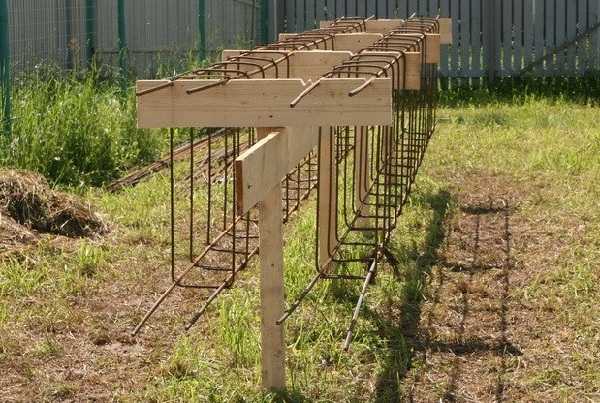
It is more convenient and faster to make a reinforcing belt using the contours molded in advance. Rod flex, forming a rectangle with specified parameters. The whole problem is that they must be made the same, with minimal deviations. And their large number is required. But then work in the trench moves faster.
As you can see, the reinforcement of the ribbon foundation is a long and not the easiest process. But you can even cope with one, without helpers. It will be necessary, however, a lot of time. Together or threesome work more handy: and transfer the rod, and put them.