Materials:
Mohair - about 0.5 skein - 100gr / 220 m. For a small kitten (10 cm), large (20 cm) just crochet in two threads with a hook number 3, which means for a large one about 1 skein.
i recommend using yarn with a high mohair content (70-80%) in the composition.
- hook No. 1.75
- filler
- eyes
- a little iris for embroidery of the nose and claws
- slicker
- long needle for stitching
Description:
The entire product is knitted with single crochet (sbn), turned inside out (the wrong side will be the face) and then combed, shaped and assembled.
HEAD
We start with the spout:
1 p. - set of sc in a double ring (6)
2 p. - an increase in every second loop (9)
3 p. - an increase in every third loop (12)
4 p. - an increase in every third loop (16)
5 p. - an increase in every fourth loop (20), 1 sbn for alignments. center.
Then the muzzle and characteristic increments begin:
6 p. - 5 loops, 2 loops in each of the next 10 loops, 5 loops (30)
(That is: 6th row - knit 5 single crochet (RLS) in the first 5 loops, then 10 increases in the next 10 loops, i.e. 10 times knit 2 RLS in one loop, and again 5 RLS in 5 loops. As a result, it turns out 5 + 2 * 10 + 5 \u003d 30 loops. And so on).
7 p. - 5 loops, 2 loops in each of the next. (7th row - 5 sc in the first 5 loops, 2 sc in the next 3 loops ... etc.) 3 loops, 14 loops, 2 loops in each of the tracks. 3 loops, 5 loops (36), 1 sbn for alignment. center.
8 p. - 5 loops, 2 loops in each of the track 3 loops, 20 loops, 2 loops in each of the 3 loops, 5 loops (42).
9 p. - no increments (42)
10 p. - no increments (42)
11 p. - no increments (42)
12 p. - no increments (42)
13 p. - knit together every 6 and 7 sts (36)
14 p. - knit together every 5 and 6 (30)
15 p. - knit together every 4 and 5 (24)
16 p. - knit together every 3 and 4 (18)
17 p. - knit together every 2 and 3 (12)
18 p. - knit each 1 and 2 together (6)
Pull off all remaining loops with a thread on the front wall.
Face design:
Turn your head inside out;
- hide the typesetting end of the thread inside the spout, fill your head with filler carefully, distributing it over the cheeks;
- comb with a slicker, you can pre-wet it. Comb strongly so that the knitted fabric is almost invisible, while the greatest diligence in combing is applied to the cheeks and backs, and the least to the nose. If it is not combed well, then dip it in water for a second, blot it with a towel and scrape it with all your strength, moistened it combes better. Then use a needle to comb the hairs on the muzzle.
Now let's get down to the design:
Earlier we have already combed and stuffed the head, now we take the iris in 1 thread with a needle and embroider a small nose with the letter Y, just around the ring of 6 inlaid loops: I knit a chain of 6 air loops, then 3 double crochet in 4 loops from the hook , double crochet in the same loop, air loop, 3 double crochets in the same loop, fastening loop in the first loop.
- We pull the beginning and end of the thread into the hole at the back of the head and tie it (we do this with all the threads).
Trying on the eyes (the model has brown glass D -10 mm) on the muzzle. I chose a place at the level of the nose, or maybe a little lower than the nose ...
We take a double thread of iris and a needle - we sew on the eyes, bringing the ends of the threads to the back of the head into a hole, there we tie, tightening as needed. Here's what happened, but it's not Persian yet ... 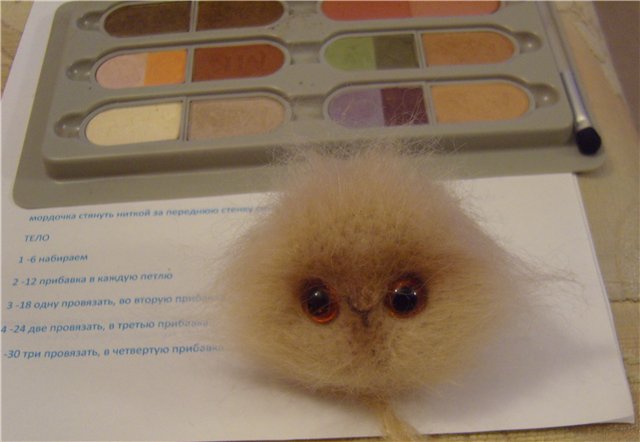
The muzzle is already slightly tinted to better see the next stage. The tinting is done arbitrarily, with eye shadows using a brush.
- The acquisition of the "Persian ploskomordia" is done by stitching with the main thread from one eye to the other, the ends, as always, in a hole on the back of the head and there pulling to tie. The stitch is straight on top, the thread goes as follows: we insert the needle and thread from the back of the head, pierce through the head to one eye on the face, then from above from one eye to the other, stick the thread in the other eye and again on the back of the head with a thread and tighten the knot. These screeds will not be visible at all after tightening.
For this stitch, the task is to sink the nose to get a flat muzzle. It is necessary to pull the eyes and the thread between the eyes with all the strength, sometimes even "to rest on the knee."
Regarding the flat head and behind too: the fact takes place! This is all due to the fact that you have to pull your face down hard! Side effectso to speak!
To eliminate it, it is imperative to put additional padding on the back of the head after tightening and then finish the head, then some roundness is still present (you can additionally try by tying the back of the head to make decreases not in each row, but through a row). Improvise!
Every needlewoman, seeing amigurumi (small knitted toys) for the first time, falls in love with them immediately and forever. And he immediately wants to get to work in order to impose a lot of bunnies, cats, bears, crochet dolls. But there is no need to rush in this matter. Even if you know a little about knitting, amigurumi takes a little more practice, perseverance and care. For example, for crocheting napkins, airiness and lightness are important, for knitted toys - on the contrary: density, perfectly flat relief of the canvas, adherence to special rules, which can be found in the article "7 most common mistakes among beginners" on our website.
It is better to start knitting toys with simple, understandable and proven descriptions (schemes). Especially for beginner amigurums, we have made the best selection for beginners. It is on these toys that it is best to learn to knit. They are simple, detailed, error-free (very important for beginners) and easy to assemble. Let's say it a secret: assembly and design is the most difficult, but at the same time exciting process in creating an amigurumi. Although it may be different for you.
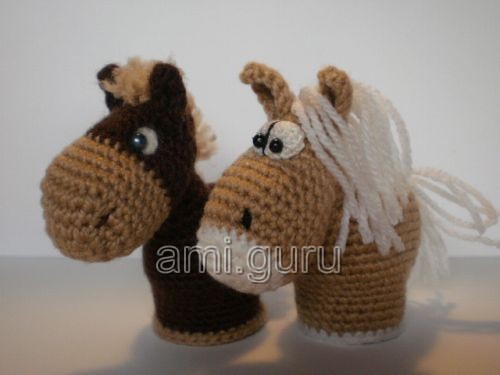
8. Although the Year of the Horse has already passed, there are very apt descriptions of these beautiful animals that have left no one indifferent. For example, here is such a simple horse from Natalia Kalmykova... Learning to knit on these horses is a very good idea.
9. Not tired of cats yet? There is a very simple and funny cat from Diana Egoyan... You can take yarn of any color, a minimum of assembly and a very fun design - what beginners need to knit toys so as not to lose interest in amigurumi.
10. Sheep. Knitting sheep, of course, is better with textured yarn. As you know, this is quite difficult, especially for beginners. However, there are textured yarns that are quite easy to crochet. For example, "Lotus grass stretch" from Kamtex or Adelia "VALERI" (you can learn more from the topic "In the world of yarn" on our forum). The most popular runet sheep -
A knitted cat is a favorite toy for children and adults. Crochet very quickly. Novice craftswomen should pay attention to solid models, and professionals create animals with the smallest details. Consider several options for cats designed for different functional purposes.
"Sofa" knitted cat
The sofa cat can be used as a decorative element of the interior or as a pillow. To do this, choose yarn according to the colors of the interior or furniture. If you take then make two cats (for symmetry) or one long one.
The sofa cat has a long body that blends into the head. Paws, ears, tail are sewn separately. The muzzle is embroidered with threads. All parts are attached so that they do not interfere during rest. Fill the product with padding polyester at your discretion. It turns out funny and at the same time practical knitted toys (cats).
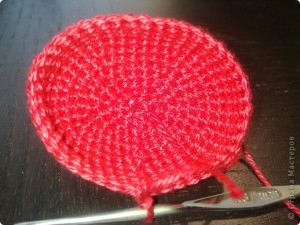
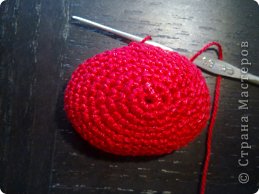
Crochet the chain, close it in a circle. Knit with regular crochet stitches with increments in each row. As soon as you have reached the required diameter (the cat will be this thickness), continue knitting without increments. For the head, do not decrease, since the muzzle is simply embroidered.
If you want to get a bright cat, then take or several colors. Fill the product with padding polyester. Finish knitting the head with decrements. Separately knit the ears, tail, paws and sew to the body. It turned out a knitted cat, and if you fill it not with padding polyester, but with herbs, you get a flavoring.
Funny cat pillows
Another option for knitting simple cats in the form of pillows. First, knit one long rectangle or two squares that are sewn together. If the pillow is immediately stuffed with padding polyester, then knit with dense columns without a crochet. If you sew fabric to the knitted fabric from the seamy side, then you can choose any pattern.
To make the knitted cat brighter, the top and bottom of the fabric can be knitted from yarn of a different color. Ears, paws, tail are best tied after padding to determine the exact size. Sew all the details, stuff with padding polyester. At the same time, put a little filler in the upper part, immediately sewing the triangles (ears) along the edges of the square.
If you want the synthetic winterizer to be removed during washing, sew a lock on the back. In this case, there should be three details for the pillow: a square and two rectangles. Now knit the paws. The front ones are sewn on the sides of the ears. Knit single crochet in a circle so that your hand reaches the edges of the pillow. And then move on to increasing the columns to tie the palms.
Fill with padding polyester, sew to the pillow. Pull the resulting oval with threads, forming fingers. Knit the lower legs immediately from the oval, forming thick fingers. Sew the tail on the back. Fasten eyes, nose, embroider eyebrows, mustache, mouth in front. For decorative purposes, you can sew a heart-pocket at the bottom, and sew a knitted mouse into it.
Rattle cat
Educational toys can be made small. To do this, you need a plastic egg (from foam plasticine, "Kinder Surprise"). You need to tie the egg with single crochets. Start from the bottom, adding an even number of loops in each row. Periodically apply the circle to the egg to move on to knitting without increments. 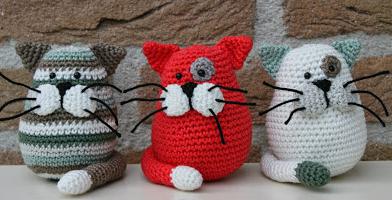
When you get to the middle, insert an egg with filler (beads, beans, peas, buckwheat, pebbles). Then the knitted cat (crocheted) will make different sounds. It will be a little inconvenient to knit, but it is clearly visible where you need to reduce the loops. Knit the ears separately. The easiest option is to make a square, fold it diagonally, bait it at the base, sew it to the head without padding polyester. The second ear is made in the same way.
Knit an oval like the soles for booties. Fill with padding polyester, round off the loops, and tie the middle with black thread, forming two cheeks. Sew them to the face, knit the nose, eyes. Also knit a tail, sew on to the cat. Antennae can be made from wire wrapped in black yarn. Or you can make a cat with paws, then the muzzle will be at one end of the egg.
Developing cats
By tying different objects, you get interesting toys. Here is another example of how developing crocheted cats are obtained. There will be no problems with the description of the circuit. Take the kid's ball. Begin to knit from the top of the head with single crochets. For the child to share, take cotton yarn of 3-5 colors. 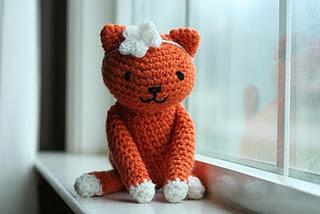
Add two columns evenly in each row. Use the knit fabric over the ball to see where to add stitches and where to knit unchanged. Once you've tied a third of the ball, switch to a different color. This will be the cat's tummy. Here you can knit several colored stripes. Next, take another thread for the torso, insert the ball, knit with it, since the loops go to decrease. Tighten the thread, hide the tail.
Now glue the eyes (you can knit or take purchased ones). You make ears, a tail from fabric without padding polyester and sew to the cat. It is better to embroider the paws to make the ball jump. According to this plan, you can make "tactile" cats. Just fill the torso with different cereals. In this version, the tail and legs are filled with any filler and sewn to the toy.
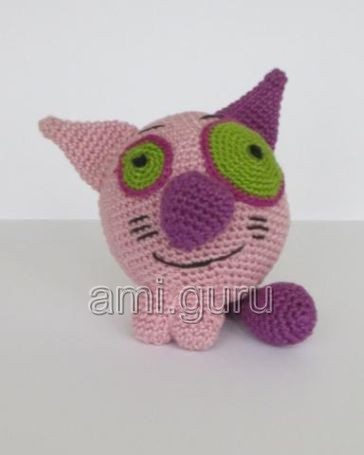
Miniature crochet cats with a description
Many adults are addicted to miniature toys. They are called amiguri. Toys knit quickly due to their size, but they require painstaking and patience, since the details are small, the thread is thin, and the hook is taken with the smallest number. Let's consider how to tie kittens.
- For the head, cast on a chain of 11 loops. Knit nine single crochets and in the last one make three columns at once. Turn the work over, knit eight stitches, make two stitches in the last one, and connect the circle with a connecting loop. There should be 22 loops. Knit the second row without changes. Crochet crocheted cat is obtained by adding and subtracting columns. In the next two rows, add single crochet stitches, getting 24, 30 loops. Then knit five rows without changes, 30 single crochet. Then decrease three rows, getting 24, 18, 12 loops.
- Glue the eyes between the seventh and eighth row, with a gap of 6 loops.
- Move on to shaping the neck. Knit two rows with extra crochet, getting 16 and 20 loops.

Amiguri kitten
Immediately fill your head with padding polyester. It turns out a knitted crochet cat.
Torso scheme:
- Knit the 15th row of twenty loops without changes. Then add up to 24 loops. Form a tail on the next two rows. Knit eleven single crochet, raise, knit five, add stitches again, finish with 6. In the next row, knit five stitches, add, then repeat twice twice, six stitches, and finish with five stitches and add, forming 30 loops. Knit three rows without changes. The next three rows go with decrements, forming 24, 18 and 12 loops. Stuff with padding polyester, finish with six reductions.
- Now you form the ears of the cat with threads, embroider the nose.
- Tie the tail separately from a chain of thirteen loops. Knit the "strip" with single crochet, sew between the 17th and 18th row.
- Tie a bow around your neck, the toy is ready!
The hook allows you to achieve any shape. To make the knitted cat the desired shape, draw its image. It can be a sleeping cat, curled up into a ball, a cartoon character (Matroskin, Kitty, Puss in boots, kitten Woof). The hook allows you to depict the toy in any action. And use sewing threads to correct the position of the cat.
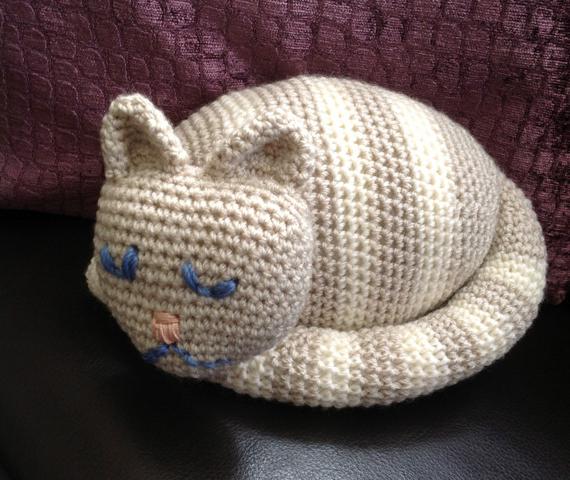
For example, for a sleeping cat, you need to tie a head in the shape of a heart, two ears, an oval body, a tail. Start the head from the bottom (5 loops), add two columns in five rows. The resulting triangle shows the border of the nose.
Then knit seven rows without increments and go to decreasing. After four rows, fill the product with padding polyester, sew the details. Embroider eyes (in an arc), nose and mouth outline on the head. Knit the ears from the top in a circle, gradually adding columns, forming a "little bag". Then form a bend with your fingers, fasten with threads, sew to the head.
Now you knit an oval-shaped torso, while making the ends narrow, that is, you get a kind of egg. To get a cat with color, alternate 5 beige with three white rows. It turns out eight stripes.
Lastly, knit a tail, alternating between beige and white thread (14 stripes in total). Stuff with padding polyester, sew to the body. Now you wrap your tail around the body, attach your head, fix the position with threads.
Souvenir with a cat
A plot knitted cat will be a wonderful souvenir. The scheme is not particularly important here, the main thing is to represent the final image. It can be a soccer cat, doctor, baker, taxi driver or kittens with a mouse, a flower, a bowl of milk. For souvenirs, it is better to use purchased eyes and noses, then the toys look miniature.
Tie the torso in a teardrop shape. Start with the widest part. Knit from a chain of three loops in a circle with increments. Determine the size of the torso. Then go to knitting without increments. The lower torso should be wide and the upper should be narrow. For example, knit five rows without increments, and then decrease the loops in each row. There are seven rows in total on the upper body.
Next, go to the head. Begin knitting with a chain of three loops, add loops in each row so that the product is in the shape of a cup. Around the thirteenth row, shape ears on both sides with four double crochets. 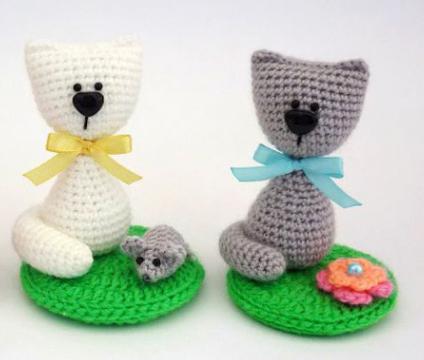
Creation of a souvenir composition
At the same time, sew the head on both sides. Stuff the product with a synthetic winterizer, fasten the head from the ear with connecting loops and proceed to the formation of the second ear.
Sew the head with the body. Knit the tail so long that it wraps around half of the body. Sew it on the back. Then wrap the body with your tail, fasten it in front. Next, attach a bow on the neck from Sew on the eyes and nose.
Then move on to creating a flower, mouse, or milk cup. They can be made from other materials. Place the composition on cardboard, determine the diameter of the circle and outline the desired size. Now tie the cardboard with green yarn (this will be grass). Glue the cat and related items onto the finished circle. This is how cats are created.
There will be no difficulties with the schemes. All toys are knitted with simple crochets. Draw a full-length image of a cat on a piece of paper. The cells will show where the narrowing is. Stick to this pattern when knitting - and you will get an exact copy of the intended cat.
Cats and cats are our common favorites! They are loved by adults and children. And a toy in the form of a cat, a cat, and a kitten evokes delight and tenderness in almost everyone. Hand-tied, they will delight both your kids and adults who have received such a cute gift. In this article we will tell you how to knit different tailed and mustachioed toys - amigurumi cat, amineko cat, and heart cat. Crochet cat - it's interesting!
Amigurumi are toys related to Japanese anime style. They are cute and fit quite simply.
You will need:
- cotton yarn;
- a hook that matches the yarn;
- synthetic winterizer (synthetic winterizer);
- eyes;
- sewing threads;
- needle.
Description
Head
We collect a chain from the VP.
1 p. - 6 st.b / n in the ring.
2 p. - 2 st.b / n in each loop (total 12).
3 p. - * 1 st.b / n, 2 columns. without crochet in one pet. * six times.
4 p. - * 2 st.b / n, 2 columns. without crochet in 1 pet. * 6 times.
5 p. - * 3 st.b / n, 2 columns. without crochet in 1 pet. * 6 times.
6 p. - * 4 st.b / n, 2 columns. without crochet in 1 pet. * 6 times.
7 p. - * 5 st.b / n, 2 columns. without crochet in 1 pet. * 6 times.
8 - 16 p. - we knit a pillar in a circle. without a crochet.
Between thirteen. and fourteen. in rows it is necessary to fix the eyes of the amigurumi cat. The distance from one eye to the other should be 7 loops.
17 p. - * 5 st.b / n, 2 columns. without crochet in 1 pet. * 6 times.
18 p. - * 4 st.b / n, 2 columns. without crochet in 1 pet. * 6 times.
19 p. - * 3 st.b / n, 2 columns. without crochet in 1 pet. * 6 times.
20 p. - * 2 st.b / n, 2 columns. without crochet in 1 pet. * 6 times.
Stuff your head with filler.
Ears
Ears need 2 pieces.
We collect a chain of 6 VP.
1 p. - 6 st.b / n in the ring.
2 p. - * st.b / n, 2 columns. without nak. in 1 pet. * 3 times.
3 p. - single crochet in each. loop.
4 p. - * 2 st.b / n, 2 columns. without crochet in 1 pet. * 3 times.
5r. - single crochet in each. loop.
Sew the ears to the head and embroider the mustache and nose for the cat.
Torso
We start knitting the amigurumi cat from the paws.
To knit each of the legs, type a chain of 6 VP.
1 p. - 6 st.b / n in the ring.
2 p. - 2 s.b.n. into each loop.
3 p. - * 3 s.b.n., 2 columns. without nak. from 1 pet. * 3 times.
4-8 rows - STB in each pet.
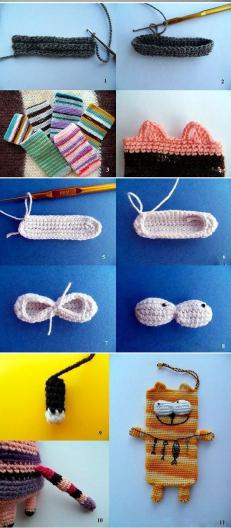
![]() Leave the thread about 20 centimeters long and set aside. Begin knitting the amigurumi cat's second foot using the same pattern. After tying the second foot, do not cut the thread, but continue knitting. Knit 15 posts with this thread. without nak. on the first foot, then knit 15 stitches without knitting. the second leg. In total, 30 loops will turn out and both legs will be connected into one part, which will become the body. Sew the hole between the legs with the thread that remains from the first leg.
Leave the thread about 20 centimeters long and set aside. Begin knitting the amigurumi cat's second foot using the same pattern. After tying the second foot, do not cut the thread, but continue knitting. Knit 15 posts with this thread. without nak. on the first foot, then knit 15 stitches without knitting. the second leg. In total, 30 loops will turn out and both legs will be connected into one part, which will become the body. Sew the hole between the legs with the thread that remains from the first leg.
 To knit a T-shirt for a cat, you need to alternate threads of different colors, starting from the thirteenth row. To create a skirt for a cat, you need to knit a circle of single crochet stitches behind the back walls.
10 p. - with. Without nak. in each loop.
11 p. - * 8 s.b / n, 2 s.b. n. 1 p. * 3 times.
12 - 13 rows - s.b / n in each pet.
14 p. - * 7 s.b / n, 2 s.b. n. 1 p. * 3 times.
15 - 16 rows - single crochet in each pet.
Stuff the legs and the already tied body of the cat with amigurumi filler and continue knitting. Do not forget to fill the torso of the toy as you knit.
17 p. - * 6 post. without n., 2 s.b. n. 1 p. * 3 times.
18 - 19 rows - single crochet in each pet.
20 p. - * 5 post. without nak., 2 s.b.n. 1 p. * 3 times.
21 p. - single crochet in each pet.
Stuff the torso and connect it to the head.
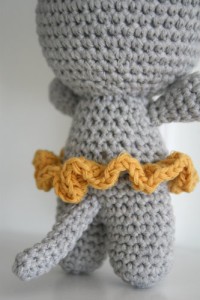 To knit a skirt, you need to take yarn of a different color and start with the 1st loop - 1 VP, 2 s.b / n in each pet, connecting column. We knit the second row in the following way - 2 VP, 2 CCHs in each loop, connecting column.
Pens
1 p. - 6 p. without crochet in the ring.
2 p. - 2 s.b.s. in every pet.
3 - 4 rows - s.b / n in each pet.
5 p. - * 2 s.b.n., 2 s.b.n. 1 p. * 3 times.
6 p. - s.b / n in every pet.
Now fill in the foot and continue knitting.
7 p. - * 1 s.b.n., 2 s.b.n. 1 p. * 3 times.
8 p. - s.b / n in every pet.
Finish knitting. Make another foot and sew them to the torso.
Tail
Dial a chain of 6 VPs.
1 p. - 7 s.b / n in the ring.
2-10 rows of 1 s.b.n. in one loop.
Sew on the ponytail at the torso.
Congratulations - your amigurumi cat is ready!
Toy Kitty video master class with description
This video master class will help you tie a cute amigurumi cat.
Amigurumi kitten video master class with a description
Cat heart master class
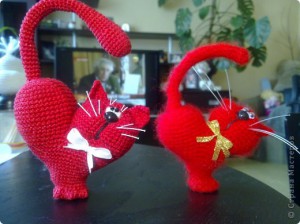 Such a cute cat heart will be a wonderful gift for Valentine's Day. And as a Christmas present, it will also come in handy. Unfortunately, there is no knitting pattern, but knitting according to the description is also easy. A detailed master class will help you cope with knitting a toy.
You will need:
- angora yarn (100gr. / 500m.);
- hook number 1.5;
- wire;
- fishing line;
- eyes and nose;
- coins.
Description
Head
 1 p. - 6 single crochet (6)
2 p. - 2 posts. without nak. in every pet. (12)
3 p. - * 1 s.b.n. + 2 s.b.n. in each pet. * 6 times (18)
4 p. - 3 s.without nak., * 2 s.b.n. in 1 p. * 2 times, 5 s. without a crochet, * 2 tbsp. in 1 p. * 2 times, 2 s.b / n, * 2 s.b.n. in 1 p. * 2 times, 2 columns. without a crochet. (24)
 5 p. - 4 columns without nak., * 2 s.b.n. in 1 p. * 2 times, 6 s. without n., * 2 s. b. n. in 1 p. * 2 times, 6 s.b / n, * 2 s.b.n. in 1 p. * 2 times, 2 columns. without nak. (thirty)
6 p. - 5 pillars. without nak., 2 s.b.n. in 1 p., 2 s. without nak., 2 s. b. n. in 1 p., 2 columns without nak., 2 s.b.n. in 1 p., 6 s.b / n, 2 s.b.n. in 1 p., 2 pillars. without nak., 2 s.b.n. in 1 p., 2 columns without nak., 2 s.b.n. in 1 p., 5 s.b / n (36)
7 p. - 6 columns without nak., 2 s.b.n. in 1 p., 3 s.b.n., 2 s.b.s. in 1 p., 3 columns without nak., 2 s.b.n. in 1 p., 6 s.b / n, 2 s.b.n. in 1 p., 3 s.b / n, 2 s.b. n. in 1 p., 3 s.b / n, 2 s.b. n. in 1 p., 6 columns without nak. (42)
 8-15 rows single crochet in each stitch (42)
16 p. - * 5 s.b.n. + 2 s.b.n. together * 6 times (36)
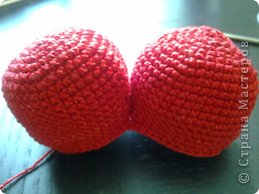
You should get an oval-shaped detail. The thread must be cut.
Second detail
We collect a chain of 6 VP.
1 p. - 6 s.b.n. in a ring (6)
2 p. - 2 s.b.n. in 1 loop (12)
3 p. - * 1 s.b / n + 2 s.b.n. in one loop) * 6 times (18)
4 p. - * 2 s.b / n + 2 s.b.n. in one loop) * 6 times (24)
5 p. - * 3 s.b / n + 2 s.b.n. in one loop) * 6 times (30)
6 p. - * 4 s.b / n + 2 s.b.n. in one loop) * 6 times (36)
7 p. - * 5 s.b / n + 2 s.b.n. in one loop) * 6 times (42)
8 - 14 rows - s.b.n. in every pet. (42)
15 p. - * 5 s.b.n. + 2 s.b.n. together * 6 times (36)
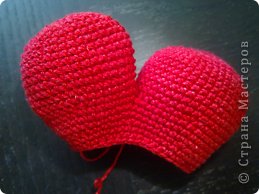
We begin to connect the parts of the toy. To do this, connect the head and the second part using six single crochets, taking into account that the head should be on the right side. Then we continue to knit the connected parts.
16 - 18 rows - s.b.n. in each loop (60)
19 p. - * 6 RLS + 2 single crochet together * 7 times, 4 single crochet. (53)
20 p. - s.b.n. in each loop (53)
21 p. - * 2 s.b.n. together + 5 s.b / n * 7 times + 4 s.b / n (46)
22 p. - s.b.n. in each loop (46)
 23 p. - 8 s.b / n, 2 single crochet together, 1 sc, 2 single crochet together, 11 sc, 2 st.b.n. together, 5 s.b / n, 2 s.b.n. together, 5 columns without nak., 2 s.b.n. together, 6 sc (41)
24 p. - 8 sc, 2 s.b.n. together, 1 s.b / n, 2 columns without a crochet, 10 sbn, 2 s.b.n. together, 5 sc, 2 s.b.n. together, 5 s.b / n, 2 s.b.n. together, 2 s.b / n (36)
25 p. - 6 senior biological sciences, 2 biological sciences together, s.b / n, * 2 single crochet together * 2 times, 10 sc, 2 s.b.n. together, 5 sc, 2 s.b.n. together, 4 columns without nak. (31)
 26 p. - 5 RLS, 2 st.b.n. together, 1 s.b / n, 2 s.b.n. together, 11 sc, 2 single crochet together, 8 sc (28)
Now you need to fill in the part a little. When adding, keep in mind that the muzzle must be stuffed looser, in order to make a tightening later.
27 p. - senior biological sciences in each loop (28)
28 p. - 24 s.b.n., * 2 s.b.n. together * 2 times (26)
29 p. - 3 s.b.n., * 2 s.b.n. together * 3 times, 17 sc (23)
30 p. - 2 s.b / n, 2 s.b. n. together, 2 s.b / n, 2 s.b.n. together, 15 sc (21)
31 p. - 3 SBN, 2 s.b.n. together, 1 s.b / n, 2 s.b.n. together, 1 s.b / n, * LARGE COLUMN, SS, RLS * 3 times, 6 RLS (19)
32 p. - 2 s.b / n, 2 s.b. n. in one loop, 2 s.b / n, 2 s.b.n. in one loop, 10 s.b / n, 2 s.b. n. in one loop, 2 PRS (22)
The base of the heart-cat is ready.
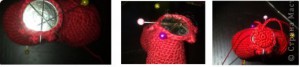
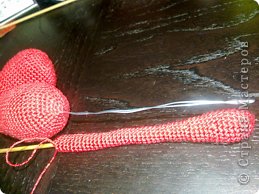
Through the hole at the top of the second part, we insert the wire, which will later become the tail. We pass it through the paw and make a loop in the paw so that the tail does not come out when the cat is hung from it.
We take a coin slightly larger in diameter than the hole in the paw and slip it under our fingers so that the cat does not fall over. That is, in this way we give it heaviness in the legs. 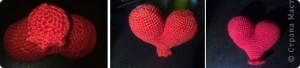
Now we need to tie the base slightly smaller than the hole we got.
We collect a chain of 6 VP.
1 p. - 6 s.b.n. in a ring (6)
2 p. - 2 s.b.n. in every pet. (12)
3 p. - * 1 s.b.n. + 2 s.b.n. in one pet. * 6 times (18)
Sew on with a flat seam.
 We collect a chain of 6 VP.
1 p. - 6 s.b.n. in a ring (6)
2 p. - 2 s.b.n. one loop (12)
3 p. - * 1 SBN + 2 s.b.n. in one loop * 6 times (18)
4 - 8 rows - s.b.n. in each. pet. (eighteen)
9 p. - * 4 s.b.n., 2 s.b.n. together * 3 times (15)
10-14 rows - s.b.n. in each. loop (15)
15 p. - * 3 s.b.n., 2 s.b.n. together * 3 times (12)
16-18 rows - s.b.n. in each. loop (12)
19 p. - * 3 s.b.n., 2 s.b.n. together * 2 times, 2 sbn (10)
20 row and the rest at your discretion - s.b.n. in each. pet. (ten)
Don't forget to stuff the cat.
Ears
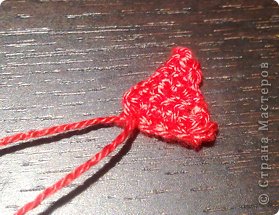 1 p. - a chain of 6 VP.
2 p. - RLS in the 2nd pet. from the hook, 4 sc
3 p. - lifting loop, 3 s.b. beck., 2 s.b. beak. together.
4 p. - lifting loop, 2 SBN, 2 s.b. nak. together.
5 p. - lifting loop, 1 SBN, 2 s.b. nak. together.
6 p. - lifting loop, 2 s.b.n. together.
7 p. - 2 pet. together, cut the thread and sew on the ears.
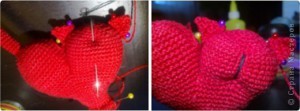
Tighten the muzzle in two or three punctures. Glue eyes and nose. Decorate with a ribbon or bow. The toy or souvenir is bound!
Ameneko cat master class
You can connect a cute and funny amineko cat by watching a detailed video master class.
Such an amineko cat will be a great gift for a friend or work colleague.
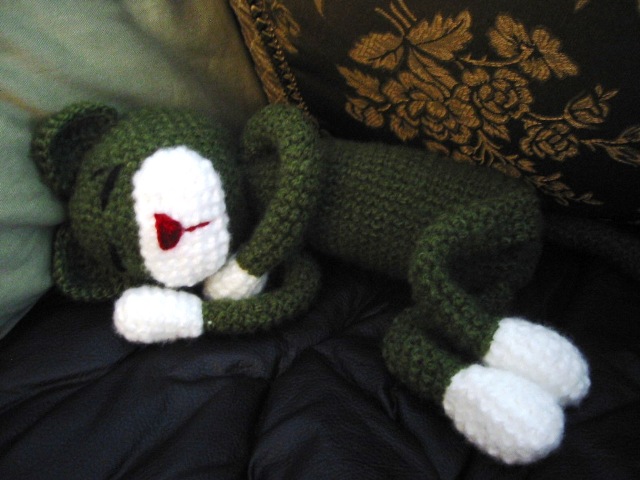
Sleeping amineko.
Enamored cat and amineko cat.
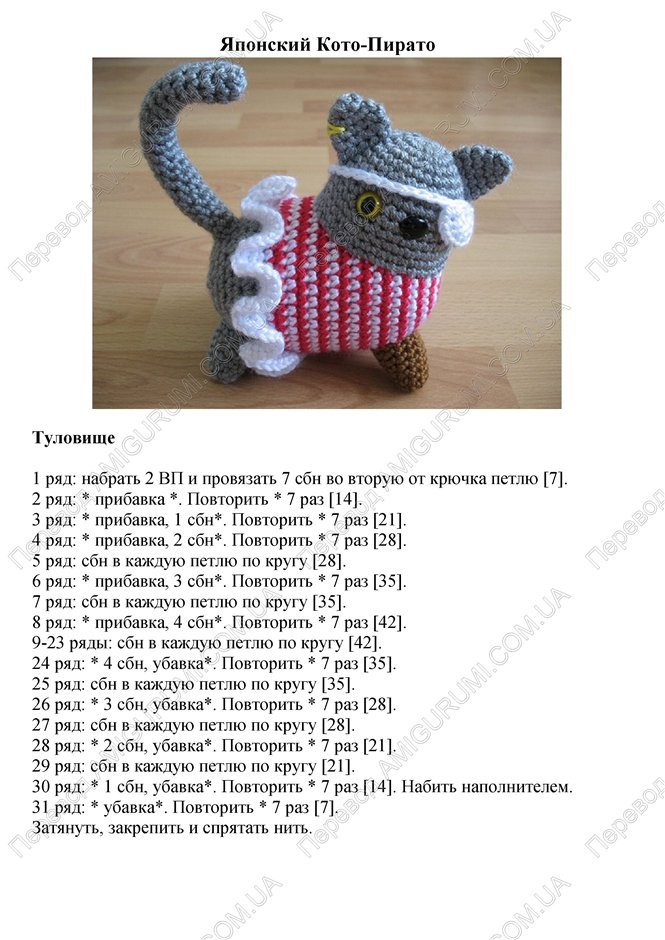
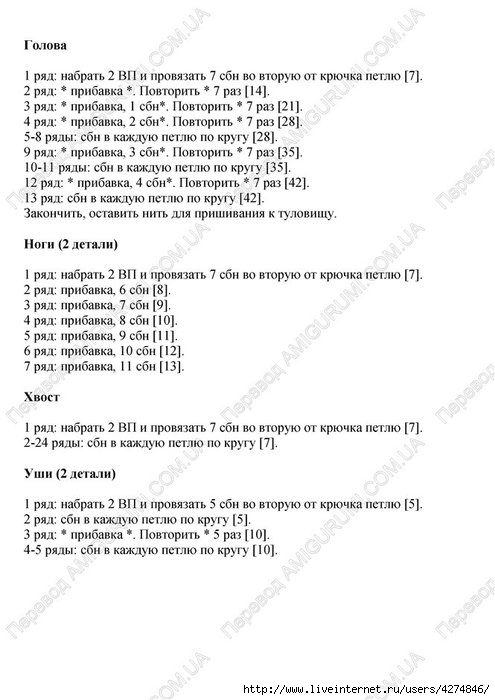
Pirate cat diagram with description
And this is a pattern for knitting a funny pirate cat. You can tie in a couple of hours.
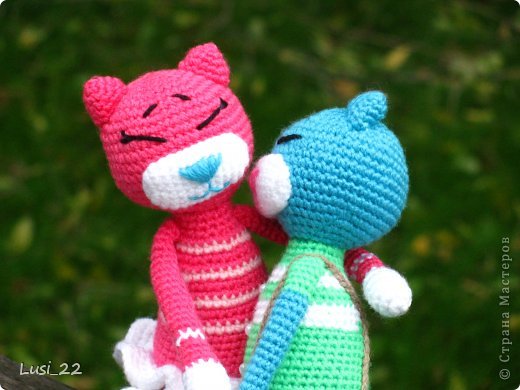
Good afternoon.
Here are some cats I got in touch (it seems they are discussing something 🙂)
Embroidery of muzzles is not provided here, since the kids from the Waldorf kindergarten will play them (knitted to order). Waldorf education systems are based on the development of a child's natural abilities, and toys are designed to contribute to this. They are handmade from natural materials. The absence of faces in Waldorf dolls contributes to the development of imagination in children, allows them to think out the mood and emotions of the character.
And such cats are knitted quite easily.
You need knitting needles, suitable yarn, a sewing needle and natural filler. I have this wool for felting. (They use even cheaper wool fleece, but I did not find it in stores.)
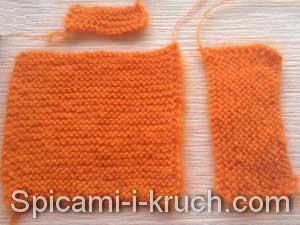
So, the Waldorf cat with knitting needles, a master class.
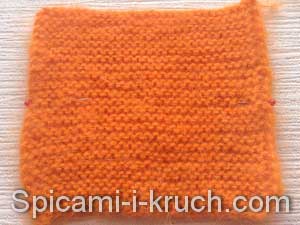
To create a cat, you need to knit with garter stitch (all face loops.) 3 parts: a square (about 14 x 14 cm), a rectangle (like half of a finished square 14 x 7 cm) and a small rectangle (5 x 2.5 cm for the tail).
(The size of my knitted cat is 12 x 11 cm.)
And then we start building:
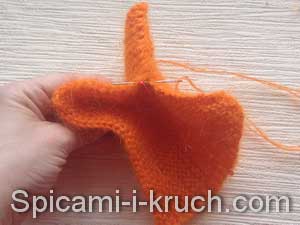
We mark the middle of the sides of the square with pins,
Fold it diagonally and start sewing from the corner to the middle of the sides.

This will be the paw of the cat, knitted.
We do the same from a different angle:
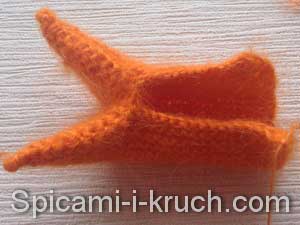
and then from the 3rd and 4th. Do not tie these paws a little so that there is a hole in the middle:
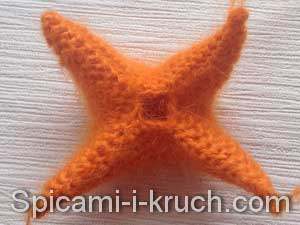
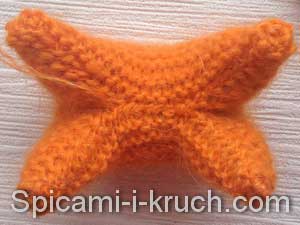
Now we need to turn our "starfish" inside out (now it will be the front side). So that its rays (that is, the cat's legs) are not sharp, at the beginning of the assembly it is better to make several stitches in the corners.
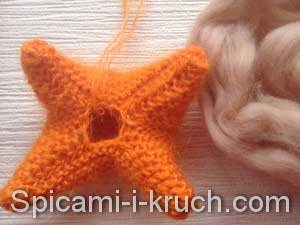
We fill the knitted toy and sew up the hole, grabbing the paws a little so that they do not stick out in different directions.

We got the front and hind legs of the cat with knitting needles.