To raise rabbits, you need to create the necessary conditions... Rabbit breeders prefer to use hopper feeders. This design not only saves time, but also helps maintain the correct diet for rabbits.
The device and advantages of the hopper feeder
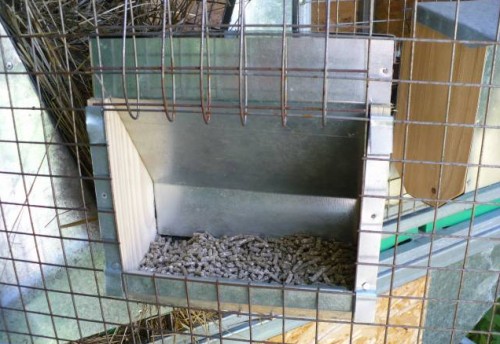
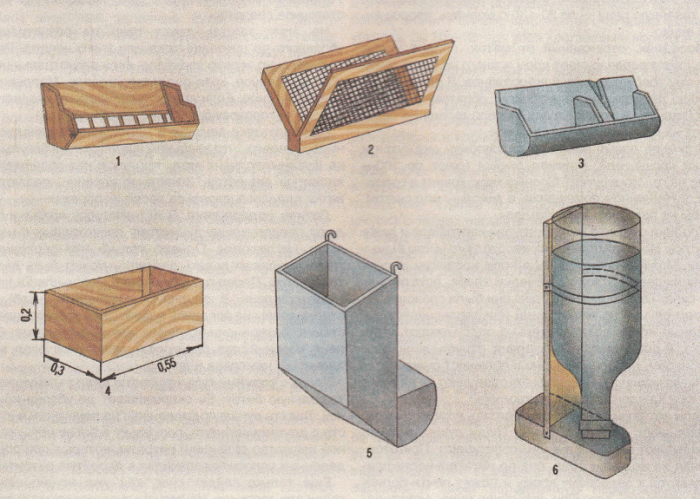
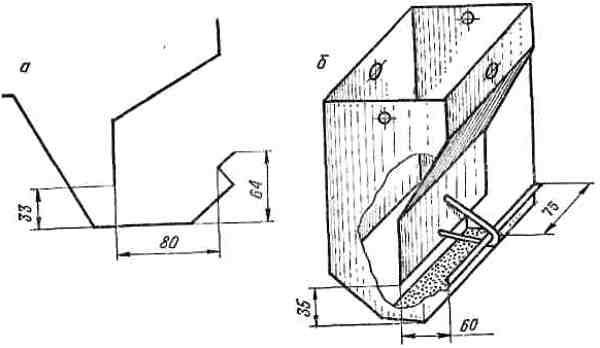
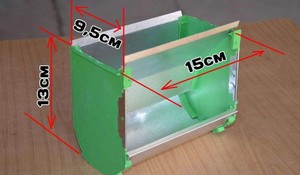
The bunker for rabbits is a box. Three walls are located vertically, and the front one is at an angle, so that it is convenient to fill the food and easy to clean this structure. To protect animals from atmospheric precipitation, mice and birds, there is a visor on top of the box. At the bottom of the hopper there is a slot through which the feed flows directly into the tray. At the bottom there is a dust collector in the form of a mesh or a homemade sieve, which is designed to collect flour dust. In addition, the mesh prevents condensation at the bottom of the structure.
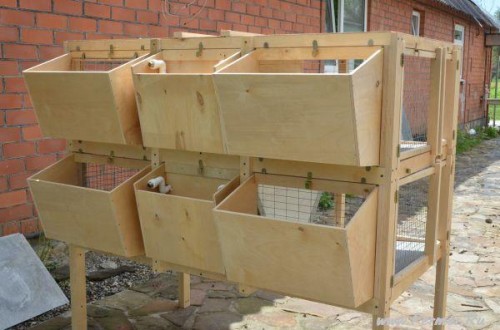
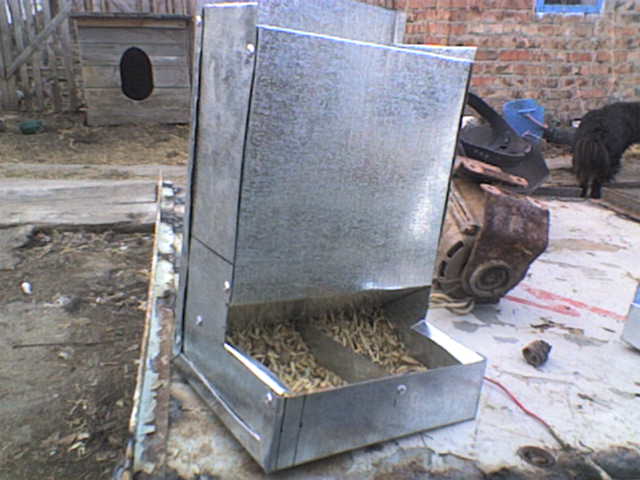
General view of the structure empty and filled
The hopper feeder can be of several types:
- With transverse partitions.
- Combined.
- Round.
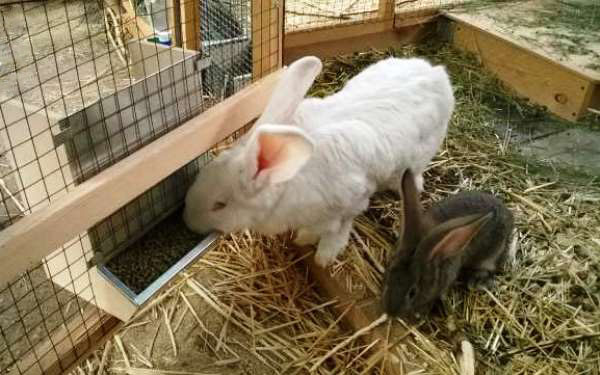
The principle of operation of the design: as the feed is eaten and the trays are empty, the food automatically flows from the hopper into the tray. In this case, the food is laid for several meals. As a result, the farmer will have more time and the rabbits will have constant access to feed. Mainly, hopper feeders are used for feeding bulk and granular feed.
To prevent rabbits from scooping up the food, a bar is placed on the edge of the tray. When constructing a wooden bunker, all parts are connected using self-tapping screws or nails. Parts of the metal structure are soldered.
The main advantages of using a hopper feeder:
- Saving time;
- Facilitating the work of the farmer;
- Free access to feed;
- Automatic screening of dust from feed;
- Mount in any convenient place.
Material selection
Rabbit structures should be simple and easy to use, with minimal costs. Most often, farmers make feeders for breeding rabbits from scrap materials.
When making a feeder, use:
- Metal profiles;
- Boards;
- Slate;
- Plastic.
Glass, wire or rod are chosen from auxiliary materials.
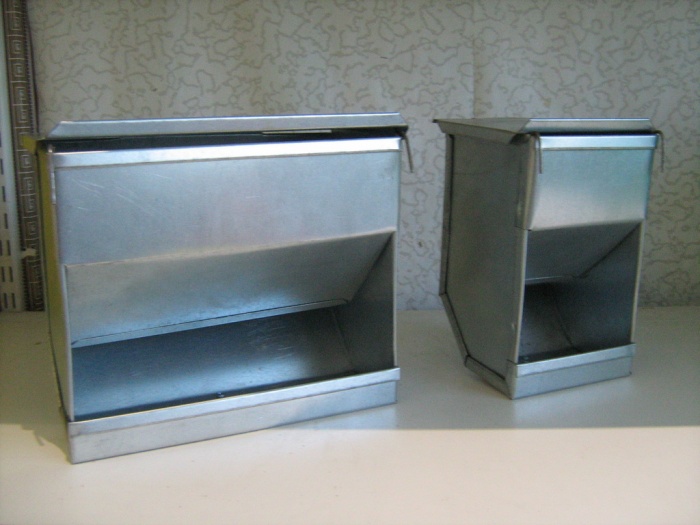
A bunker feeder is usually made of wood or metal. The metal structure is more durable and strong, but wooden feeders are more environmentally friendly.
Advice! Rabbits are capable of gnawing wood at the point of teeth. If wood will be used for the base, then it is recommended to cover all protruding parts with metal plates.
The use of a plastic structure is not recommended, as due to the low strength, there is a high probability that animals will break the feeder. In addition, plastic structures can deform at high temperatures and crack at low temperatures.
Slate is commonly used to make creches. In a bunker-type feeder, this material is used in the construction of the side and rear walls. All sharp edges and jagged edges should be ironed out so that the domestic rabbits do not damage their skin.
Tools for work
Having decided on the choice of material for the structure, you should prepare necessary tools... When constructing a metal feeder you will need:
- Hammer;
- Drill;
- Drill;
- Pliers;
- Scissors for metal;
- Tin sheet;
- Metal grid.
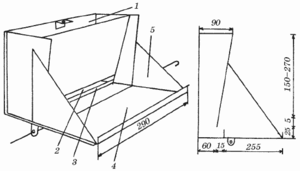
For the bunker base, a 195 × 265 mm tin sheet will be used, for the front wall - 185 × 135 mm. The metal mesh should be purchased in the size 155 × 290 mm.
The table shows the main parameters of the parts and their number that will be needed to create a wooden bunker feeder:
|
Detail |
Size in mm |
number |
|
Sidewall |
||
|
Sidewall |
||
|
Sidewall |
||
|
Sidewall |
||
|
Rear wall top |
||
|
Rear wall bottom |
||
|
Front wall |
||
|
Horizontal cross member |
||
|
Horizontal cross member |
||
|
Vertical cross member |
||
To make a wooden bunker feeder, you will need wood screws 35 mm and 25 mm, 6 pieces each, bolts with 6 mm nuts. The design can be based on plywood or chipboard. A tin sheet is used as a partition. The front wall can be made of plastic. This way the filling of the trough can be controlled.
Step-by-step instructions for the construction of a wooden feeder
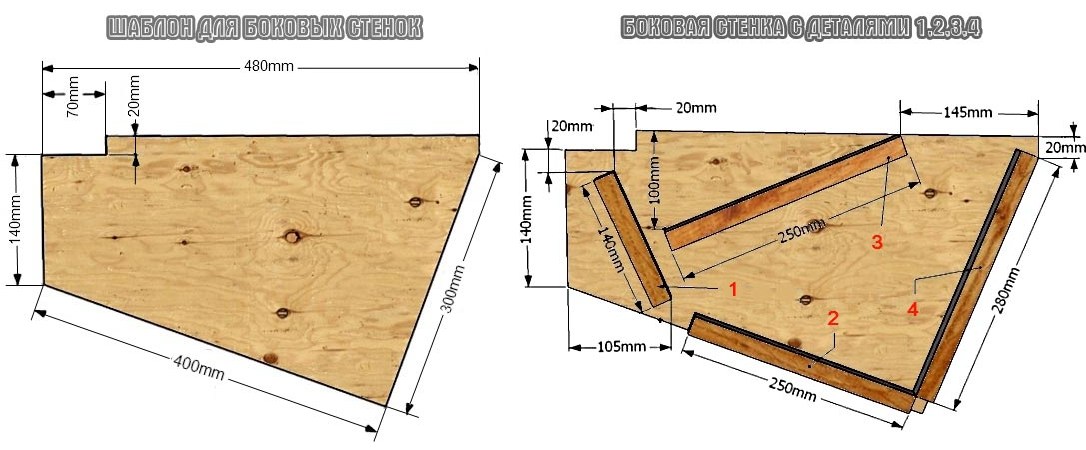
Special skills and knowledge of making a feeder is not required. Even a novice rabbit breeder can make a structure with his own hands. First, you need to prepare tools, materials and make the correct calculations. To facilitate the work, it is advisable to study the drawings and diagrams.
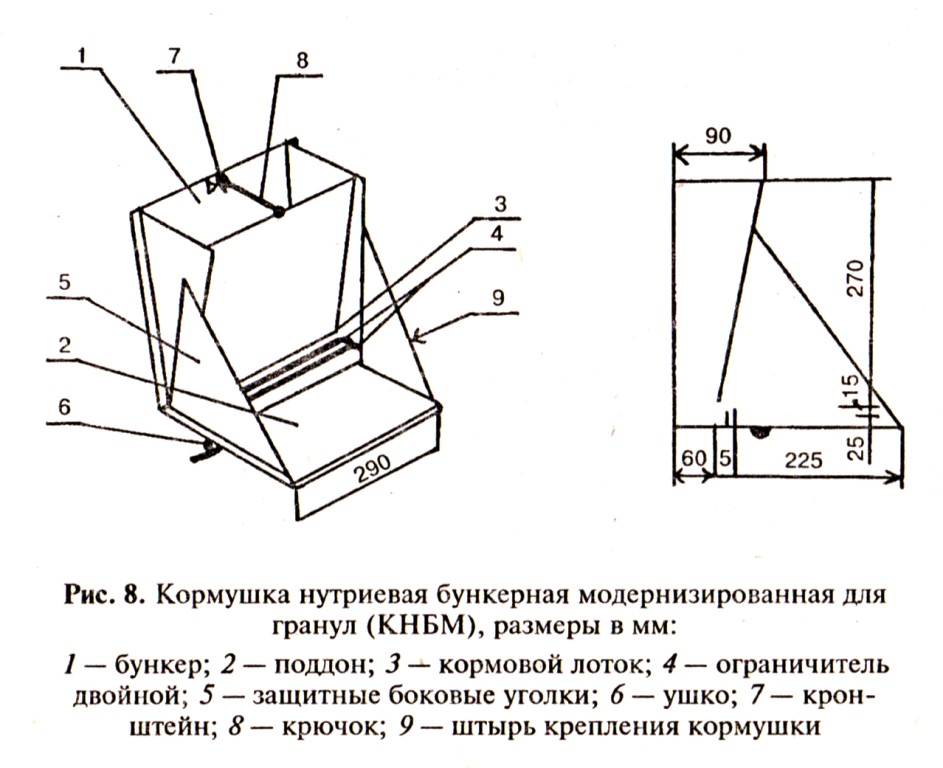
Diagram of a wooden rabbit feeder
The main stages of manufacturing a bunker-type feeder:
The bunker feeder for rabbits is ready. It is necessary to inspect the entire structure for sharp edges or protruding screws. If there are such places, then we eliminate the shortcomings so as not to injure the rabbits.
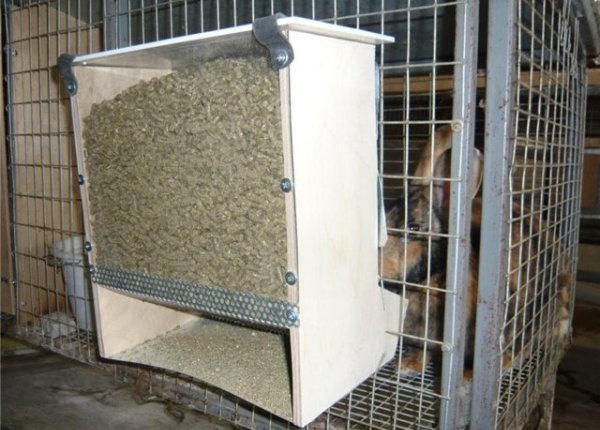
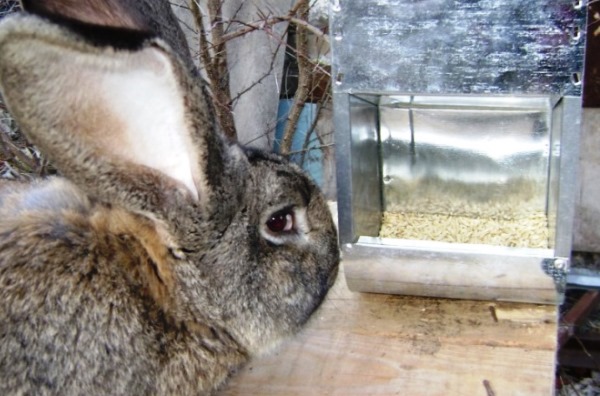
Loose feed is poured from the hopper into the feeder as it is eaten by the animals
How to make metal
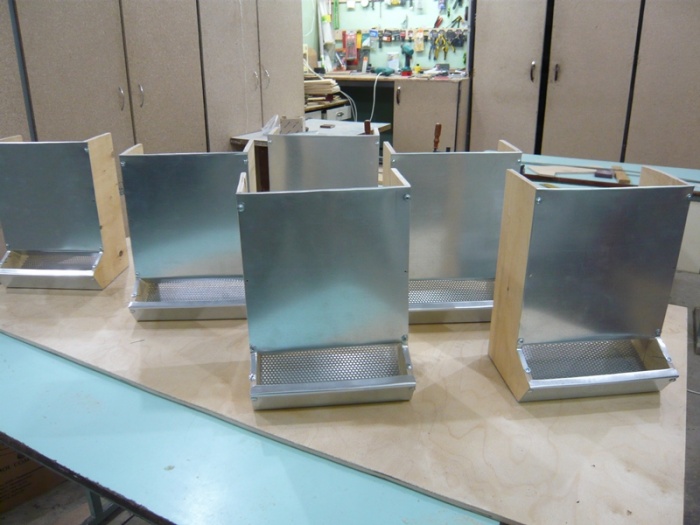
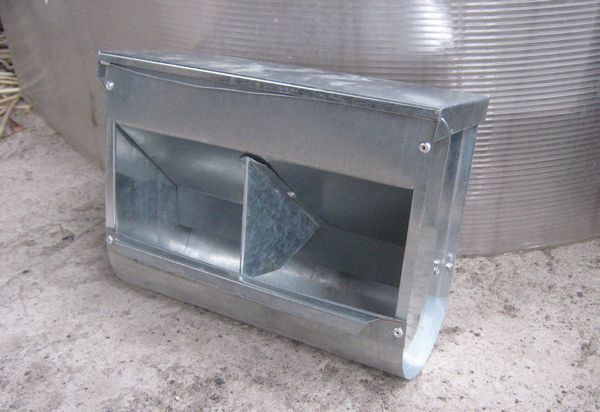
For the construction of a galvanized iron feeder, blanks should be made. The metal structure consists of a pallet, a rear wall with curved sides and a front wall. Two limiters are also needed here.
Where rabbits eat is an important part of their comfort and healthy life. Moreover, it is important not only what the eared eat, but also what type of dishes they do it from.
The most common and demanded version of feeders among farmers is a bunker feeder for rabbits from a profile, which can be purchased ready-made or made yourself.
Features and Benefits of Hopper Feeder

For feeders of any type, as well as for structures of a bunker type, the following requirements are imposed:
- Free access and a convenient approach in which rabbits scoop out food without being constrained;
- Sanitation level. Always clean and tidy feeder;
- High quality materials of manufacture, which ensure the strength and durability of the structure;
- Correctly selected sizes;
- Cleanliness around the trough;
- Convenience in choosing the place of installation and strong fastening, eliminating the shakiness of the feeder.
Bunker feeders for rabbits have a huge number of advantages over other varieties:
- Economical feed consumption, since rabbits cannot scatter and pull it out of the container;
- Protection against contamination of the feed, due to the closing upper part of the hopper;
- Cleanliness and hygiene of the space around the trough;
- The large capacity allows the filling of the trough to be made less frequent, allowing the animals to feed from it for several days;
- Ease of use and the possibility of placement in cages of various types and shapes;
- Simplicity of care;
- It's easy and simple to make a bunker feeder with your own hands.
Important! A properly organized process of feeding rabbits determines their health and mood, as well as weight gain.
The bunker feeder for rabbits can be of different types and is selected according to preference. Such constructions are common:
- Combined;
- Round;
- With a transverse partition.
Structures should also be chosen according to the strength of the material used and in size.
Varieties of materials used
When choosing the material from which to make a bunker feeder for rabbits, it should be understood that rabbits are rodents, and therefore the material for the container must be used appropriately. Most often, experienced farmers use metal-based materials to create a rabbit feeder with their own hands - thin tin, tin and metal cans, a profile.

You can make such a structure from a pipe, from wood, various boards or plywood, in some cases, plastic or plexiglass is used, as well as slate.
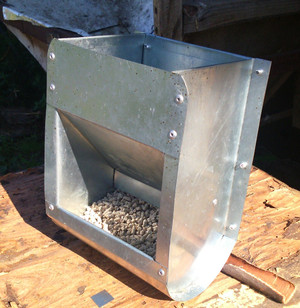
The photo shows a variant of a tin bunker feeder.
Wire, rods, glass are used as auxiliary materials.
Attention! So that the rabbits do not gnaw through the places where wood is present in the structure, they are additionally sheathed with metal, glass or other materials, and in order for the animals not to damage their skin with sharp edges, everything must be sanded and smoothed.
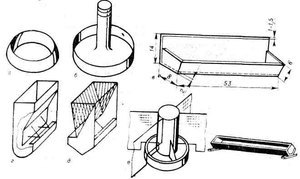
DIY methods and drawings
Do-it-yourself bunker feeder for rabbits is easy. The main thing is the availability of materials in sufficient quantities and good drawings. One example of a drawing of a hopper feeder is shown in the figure below.
First, the dimensions of the future structure are selected, which should correspond to the size of the cage, that is, not take up too much or too little space in it. Further, the dimensions are transferred to the drawings, and the final diagram of the future feeder is drawn on paper.
The necessary tools that will be needed for the job depend on the type of material used. Let's consider how to make a bunker feeder from a sheet of tin. For this, come in handy:
- Tin sheet of the required size according to the drawing;
- Mesh and sheet made of metal with pre-drilled holes;
- Drill;
- Pliers;
- Hammer;
- Electric drill;
- Scissors for metal.

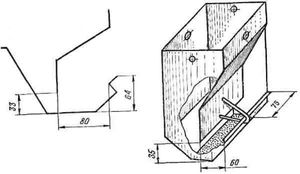
On the right in the figure there is a drawing for a trough blank, and on the left - a limiter. In the case of a wooden structure, it is necessary to sheathe it with a tin sheet from the inside of the feeder hopper so that the made feeder is protected from sharp rabbit teeth, and it is easy to clean it of debris and dirt. It will also significantly extend the life of the rabbit canteen.
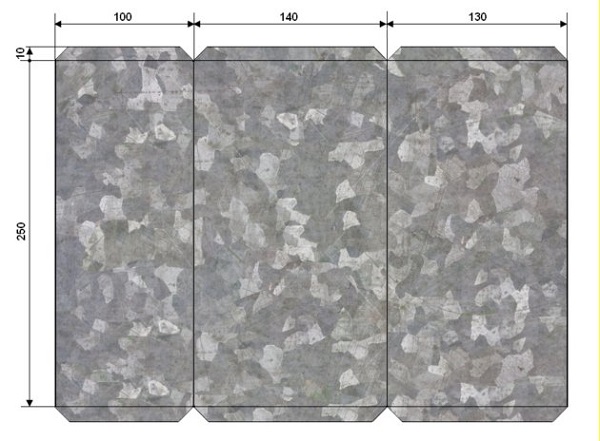
The dimensions of the sheet metal must be at least 120 x 250 mm. Choose a sheet thickness of about 0.5 mm. The design is based on three main parts:
- Front wall;
- Back wall;
- Pallet.
Attention! Many experienced farmers also propose to make a limiter in such a feeder, which will prevent the eared from scattering feed and taking it out.
According to the above drawing, the dimensions of the trough are 250 mm by 220 mm with an allowance for bends of 10 mm. The cut sheet should be bent along the marked lines into three sections, taking into account the fastening allowance. Section widths are 150, 50 and 20 mm.
To make it much easier to mount the feeder, the side and back walls should be cut from one sheet, and divided by a fold.
The thickness of the sheet allows you to bend it in the necessary places by hand, and in areas where the workpiece has to be bent a short distance, you can use pliers or pliers for this. On the blanks in the areas marked in advance, holes should be drilled for fasteners, and then all structural elements should be fastened together. For this, both rivets and bolts can be used. The last step is to set the mesh to the bottom, but if necessary, you can do without it. If you require the installation of a cover that is not available in this version, you can make it additionally. To do this, in addition to the previously listed pieces, cut out a piece with parameters 250 by 150 mm, and secure it from above with hinges.
Attention! It is very important to secure the feeder firmly so that the rabbits cannot turn it over.
When making your own feeder, do not forget such important rules:
- It should be comfortable for both animals and the person who cleans and fills it;
- You should not make a feeder so large that a rabbit can fit in it.
An option for self-production of a bunker feeder for rabbits is shown in the video
The bunker canteen can be purchased ready-made or made by hand. In the second case, it will be cheaper, and you can also make a design according to your own drawings. The main thing is not to forget that it must contain at least daily dose feed, or better even a little more. And then the always well-fed rabbits will grow and develop well, which means they will effectively fulfill their role in the farm, delighting their owners.
Those who want to breed rabbits need to know that they need to be provided with quality food regularly and in a timely manner; do it yourself or order solid, high-quality cages and feeders.
When the cages and feeders are ready, then it is already worth looking into buying small rabbits.
Here are the nuances you can face when buying a finished product:
Standard rabbit cage has the form of a block, inside which there is a feeder and a drinking bowl. Outside on the cage, usually a manger for hay or grass is hung.
Feeders are:
- bunker;
- cup;
- grooved.
They can be made mobile and stationary. The former move easily and calmly, while the stationary ones are firmly attached to the wall.
Making a feeder with your own hands
If you bought your first feeder, then after a while you already clearly know what an ideal dining room should look like. If not yourself, then with the help of the masters, you can make it. The basis for it will be wood, and a metal profile is suitable for upholstery.
It is imperative to use the profile, since the rabbit will gnaw the tree very quickly.
- length 40 cm;
- width 4 cm;
- depth 4 cm.
 The narrow shape of the feeder prevents the rabbits from staining food with dirty paws. For adult animals, the height of the finished dining room should be at least 7 cm from the floor of the cage.
If we talk about a combined feeder, then it is very beneficial. It can be installed in a cage with both adults and rabbits. You can lay all types of feed, and each rabbit will choose what he wants.
If we talk about individual cages, then special feed troughs are suitable for them. They contain the entire rabbit meal, which consists of coarse, juicy and combined feed. The structure itself consists of two compartments: upper and lower. The upper compartment is a feeder; and the lower compartment resembles a trough-shaped manger into which concentrated feed is poured.
A hand-made feeder will make it possible to fill it without opening the door. To fill it with rabbit food, you need access from the outside.
The material for making the trough must be durable and natural. From the inside, the cage is lined with galvanized or tin sheets.
To make a sennik you will need a bar and a mesh... Plastic can be selected as an exception.
Nursery feeder
This type of feeder is the most popular. Hay is laid in it, which should always be in abundance. Since the product is dry and clean, it reduces the risk of intestinal infections in rabbits.
The nursery feeder should be on the light side of the cage, the dining room should be measured correctly. It can be triangular or square, and can be attached both outside and inside the cage.
The V-shaped nursery trough is the most popular. If you managed to make it yourself, then making another version of the dining room will not be difficult.
To work you need to use:
- plywood;
- hacksaw or saw;
- screws or nails;
- wire;
- hammer or screwdriver;
- nippers.
We make a drawing, not forgetting that the dining room cannot occupy the entire sunny side of the cell. Perhaps you can find what you need on the Internet. Ready the drawing must be carefully studied, and only then start manufacturing.
The double-sided sennik can be used in a cage as an additional partition between rabbit apartments. To make it you will need the following materials:
- wooden planks - 5 pieces;
- grid;
- nippers;
- nails.
Work order:
- The basis of the structure is a board or timber, the width of which is not less than 10-15 cm.
- 4 pieces for the side walls (40 cm) and 3 pieces for the top and base (all 50 cm) are cut out.
- The net is the wall through which the animals will feed. We need two rectangles, the size of which is 40x30 cm.
- The design resembling the letter "P" is made from one long and two short pieces, which are connected to each other using self-tapping screws. You need to make two such blanks.
- We connect the resulting blanks to each other at an angle of 45 degrees.
- We attach the mesh to all the walls of the nursery.
- The finished product is placed in the cage.
The main condition for such a feeder is that it should not reach the floor, since it will be inconvenient for you to pour grass into it.
The advantage of such a dining room is: always clean and dry grass; convenience for both humans and animals; simple and convenient design and its repair.
Cup
This type of dining room is no less popular, however, it also has disadvantages. The bowl can be made from any tin can or ceramic plate (bowl). Feed in granules is poured into it or used as a drinker.
Disadvantages:
Such a dining room can only be temporary.
Bunker feeder
This design is only intended for bulk products... It is a box with a trough and a net at the bottom. The box is designed to restrict the feed as it is eaten. Thanks to this, the superfluous will never wake up by.
For its manufacture, you can use wood or plywood, which is then upholstered with tin. Or you can simply make the entire structure only of tin, which significantly extends its service life.
If, for some reason, you cannot beat it with tin, then the rodents will very quickly turn it into sawdust.
The bunker canteen has advantages and disadvantages. The advantages include:
- clean feed without garbage;
- portion automation;
- saving feed;
- ease of use and washing.
And the disadvantages include the cost of materials that will be required for its manufacture.
Do-it-yourself bunker feeders for rabbits will be safer and more practical. For their manufacture, you will use only high-quality material.
Groove
 This type of dining room is considered the most versatile. You can fill it with grain, root crops or lay hay. For manufacturing, wood or metal is used.
Of the advantages of this invention, it can be noted simple design... It has four walls and a bottom.
You can make it yourself according to a special drawing, or you can use a metal or plastic pipe. It needs to be cut in half in length and the walls (edges) should be soldered. It can also be used as a drinker.
Such a structure is attached to the wall, then the rabbits will not be able to reach the feed with their paws and scatter it around the cage.
Profile rabbit feeder
This is nothing more than a hopper feeder. Only the material for its manufacture is the profile taken. The thicker it is, the more reliable the whole structure will be.
A drawing of a rabbit feeder is presented on almost every website on the Internet - you just need to make the right choice.
Rabbit hopper feeder - the most successful dining room option.
You can make a dining room for your pets from scrap material. It could be a new plastic sewer pipe. It is convenient to pour food and water into it. The pipe is a great substitute for a feeder bought at a pet store.
Conclusion
When buying or how to make a do-it-yourself rabbit feeder, you need to evaluate its convenience and durability. The material should only be of high quality and durable. A do-it-yourself dining room will make the rabbits comfortable in your cages.
Let's talk about secrets ...
Have you ever experienced joint pain? And you know firsthand what it is:
- inability to move comfortably and easily;
- pain during or after exercise;
- discomfort when going up and down stairs;
- inflammation in the joints, swelling;
- unpleasant crunch, clicking not of their own free will;
- unreasonable and unbearable aching joint pain ...
We ask you to answer the question: does this suit you? How can you endure such pain? How much money have you already "poured" on ineffective treatment? It's time to end this! Do you agree? Today we publish an exclusive interview with Professor Dikul, in which the doctor revealed the secrets of getting rid of joint pain, treatment of arthritis and arthrosis.
Attention, only TODAY!
Rabbit breeding is a troublesome and costly occupation, but if you approach this business creatively and wisely, you can greatly facilitate your life and save a lot of money. For example, why not make your own drinking bowls and feeders for rabbits?
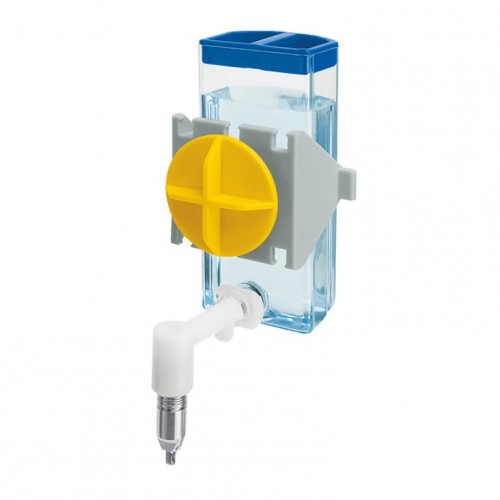
Rabbits constantly need clean water. In summer, they can get liquid from fresh juicy vegetables and fruits, but they still cannot do without a drinker. If you made a rabbitry yourself, then making drinkers for rabbits will not be difficult. The main problem is to determine the type of construction. It is necessary to choose the type of drinker taking into account the materials from which it is made. So, plastic products will not last long, because rabbits will chew on them. If you pour water into ordinary canned food cans, then it will quickly become cloudy, dirty, and you will need to change it more often than usual. AutomaticOn large farms for rabbits, complex automatic drinkers in the form of large stainless steel tanks are usually installed. Water is poured into them, and it flows through a hose into a distribution tank with floats and a flush system (like in toilets). From the distribution tank there is a water supply pipe line, which fits individually to each cage. Small cups are attached to the ends of the tubes, from which the animals drink. As the water decreases, the liquid from the main tank automatically replenishes the level in the cups, ensuring that there is always a drink in each cell. So, when too little liquid remains in the glass, the float system in the distribution tank is triggered, the valve opens, and the drinkers are refilled with fresh water. It is quite difficult to make such a drinker for rabbits with your own hands, so it is better to purchase it in the appropriate store. NippleRabbit nipple drinkers are convenient and practical. If rabbits can pour water from glasses, then using nipples this is impossible. The only but significant drawback of such designs is that at low temperatures in winter, the liquid in the nipples quickly freezes. In addition, the volume of nipple drinkers is quite small, so you have to constantly add fresh water (up to several times a day). Despite these inconveniences, many rabbit breeders prefer just such drinkers, because the water in them is constantly clean and fresh, which means that the rabbits will be healthy and well-groomed.
HandicraftCraft drinkers for rabbits are any containers that you do not mind putting in a cage. These can be aluminum bowls, cans, trays, etc. Of course, when using such drinkers, it should be borne in mind that rabbits can spill water, turn the bowl over, throw hay and mud there. But if there is no way to buy or make a more reliable structure, then the maximum that can be done is to fix the jar on the cage wall with a wire. Drinking bowls manufacturingBottle drinkerIf you do not know what and how to make a drinker for rabbits, use the proven method and make it from a regular plastic bottle. Progress: 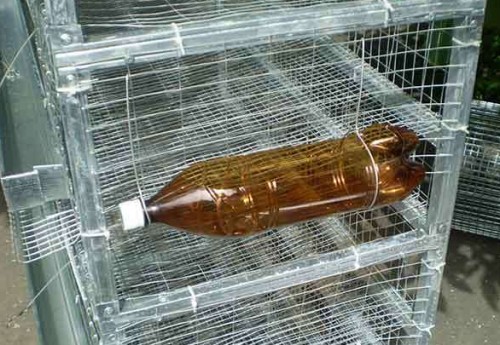 You will have to add water to such a drinking bowl quite often, and it will not be very convenient to do this, but this method is the fastest, simplest and most economical. The lifespan will directly depend on the nature of your pets. They will gnaw it in any case, the only question is in time. Young rabbits will cope with such a design in one and a half to two weeks. Adults usually do not show much interest in plastic, so the drinker can last for several months. In any case, it is recommended to change the bottle once a month, and if algae appear in it (the water “bloomed”), then immediately. Vacuum drinkerMaking a vacuum drinker is also not difficult. Think back to your physics lessons in high school and get to work! Progress: 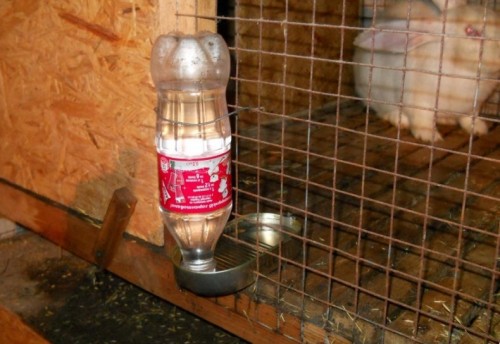 Large drinking bowlIf you want to build a large drinker for several individuals at once, go to the store and buy herring in a wide can. You will not need the herring itself, but a can from under it is perfect for creating a "collective" drinker! Progress:
For those who want to make a drinker for rabbits with their own hands, without spending a penny on it, we suggest that you familiarize yourself with an interesting video material on this topic. FeedersIf the drinker can be dealt with at any time, then the drawings of the rabbit feeder should be ready at the construction stage of the cage itself. If you have two-tier cages, then you need to install built-in feeders that can be adapted to the characteristics of the "apartment". Types of feedersAlso, the type of feeders depends on what you will regale your furry pets.
So, rabbit feeders can be divided into three types: Sennik is best done during the construction of the cage itself. This is a very convenient thing that can save you from problems in the winter. You can put the required amount of grass in it and for a week or two not even worry about the rabbits not having enough food. Of course, if the cages are equipped with appropriate "long-playing" drinkers. So, what you need to know about building a sennik. First of all, it must be securely attached to the side wall of the cage from the light side. During construction, leave a slot 8-10 centimeters from the floor along the entire width of the wall. The sennik itself looks like a nursery from which livestock are fed. The feeder should go inside the cage through the slot at a slight angle to make it easier for the animals to get food. It is better to insert and fix it with a wire with a diameter of 5-7 mm.
You can also make the hay feeder as a removable corner frame. It will be more convenient if its dimensions coincide with the dimensions of the side wall of the cage to which it will be attached. But if you can't do it for some reason, it's okay. Required tools and materials:
Progress: 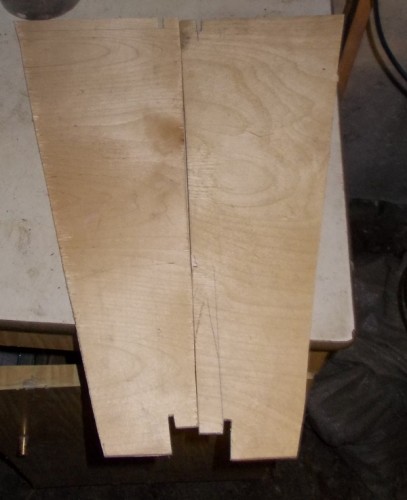 |