When renovations are not expected soon, but you really want changes, small room design ideas using butterflies will come to the rescue. Every apartment dweller will enjoy this activity. You can make them with your child, be it a girl or a boy. You can attract both by choosing the appropriate type of production and raw materials.
Dedicated to creative people.
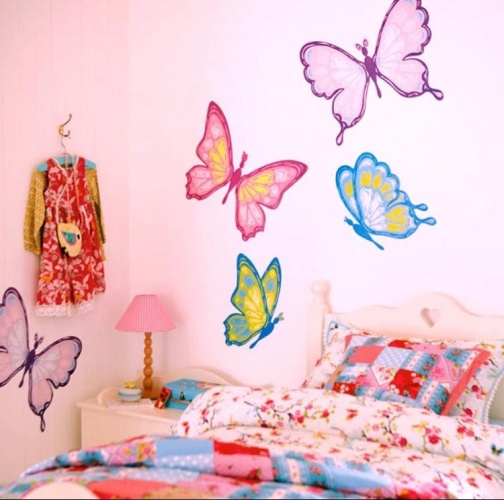
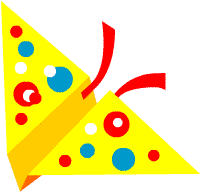
Butterflies are perfect for updating your room design
Why butterflies?
Living butterflies are amazing creatures. Many beliefs, fairy tales and myths are dedicated to them. Want to add magic to your everyday routine? This option will be the best. Thinking about what to do for your other half for a special date? A delicious dinner and appropriate decor will do the trick. Hearts are an outdated version, and I want something new. Magic butterflies will help create a romantic, soft atmosphere.
In science, these amazing insects have been given a separate niche. Lepidopterologists are scientists specializing in the study of butterflies. They are ready to spend a long time in tropical rains to catch a rare butterfly. There are entire collections that show us all the diversity of species of these insects. But we don’t have to kill an animal and put it behind glass to admire it. We can make artificial butterflies for the wall.
 Butterflies in the interior of the room look very beautiful and unusual
 What style is acceptable
Handmade decorations should be used with caution. And especially so specific. Having chosen a strict style as a basis, DIY butterflies on the wall will be out of place. They personify airiness and freedom, and earthy tones fly around. Classics, baroque, rococo, exotic (Mexican, Egyptian, etc.) are quite strict and do not accept unnecessary elements.
Speaking of modernism. There is more freedom here. Although modern styles can be quite conservative and strict, they provide more room for creativity. Art deco, minimalism, high-tech, loft, and even harsh Scandinavian are a mixture of many trends, and butterflies will allow butterflies to participate in their creation. Much still depends on the style of the butterflies themselves. Skillful use of raw materials and a modern approach to the placement and appearance of decorations will allow them to harmoniously combine with any modern design.
 Butterflies on the wall are more suitable for modern styles
 Manufacturing Features
The chosen style and functionality of the room influence the manufacturing method and base material. And believe me, there are a huge number of them. Butterflies allow you to realize any of your fantasies and realize your wildest ideas. Let's cover this topic from different angles. Go!
Material
Let's start by choosing a base. The raw materials for making butterflies with your own hands can be very diverse. The choice largely depends on the surface where the product is located.
- Consider paper - the first thing that comes to mind. Perhaps you have already used such decorations in kindergarten or school. Let's go further and consider this raw material in the context of a larger one. After all, paper butterflies can fly to the wall of your house at any age. By choosing an unusual stencil to create an insect, a color that matches the room and thick paper, you can get a quite solid butterfly that can decorate even the most austere interior.
- Another close option is cardboard. It differs from the previous one in density. Thanks to this, it provides great opportunities for creativity. Cardboard is more durable and the decoration will last longer. However, it is also a little more difficult to work with. One of its main advantages is the ability to varnish. It does not deform, unlike paper, and in this state it will retain its shape and color longer.
- Vinyl. The material is even more durable. It's great for creating butterflies on the wall. You need to work with it carefully. This option is not suitable for creating decorations together with a child. However, the result will please the eye and will look attractive in any environment.
- Dye. The second most common option after paper. It will allow you to express your creativity to the fullest.
 The material for making butterflies may vary
 Way
By choosing paper as a base, you can use several ways to make decorations.
Method No. 1
Choose the stencil you like, attach it to colored paper (it’s better to use double-sided paper), trace along the outline with a pencil, and cut out the resulting sample. Follow this pattern to make the remaining elements. Then, having collected the required amount, start decorating. Make a sketch showing the location of the future composition. If desired, transfer it to the wall with a simple pencil, in case it can be easily erased from it later. This option is the simplest. These butterflies turn out to be two-dimensional, but they look amazing.
Method No. 2
You can make 3D butterflies using the origami technique. It's quite simple. Take a square measuring 10x10 (or another convenient, optimal size of 10x10 and 9x9 centimeters), and fold a voluminous butterfly according to the pattern. This option is used not only for wall decoration. Window sill, table, floor decoration items. Such products will look even better on a horizontal surface.
 Using origami techniques you can create a three-dimensional butterfly
 Method No. 4
We use cardboard. The beginning is similar to using paper. After using a stencil to cut out the desired shape, you can moisten the resulting butterflies (carefully!), give them some bends, secure them in this position and let them dry. After drying, the product will take on a certain shape and will hold it for quite a long time.
Method No. 3
Making vinyl butterflies is a little more difficult. To do this you will need an old vinyl record. Place it on a baking sheet lined with paper and place in the oven for 2 minutes. During this time it will soften. Now let's get down to business. Attach the stencil you like to the base, outline with chalk or soap (the edges should be sharpened). While the vinyl is still warm, cut out a shape along the outlined outline. Then you can give it fancy curves. In this form it will harden and retain its shape for a long time. They need to be positioned and secured in the same way as paper moths.
 A butterfly can be made from a vinyl record
 Method No. 4
This option is based on the use of paint. Using plastic or other dense material, make a stencil, attach it to the wall and paint over the void. You can use spray paint, oil paint, water-based paint, or watercolor paint. Having remarkable artistic talent, you can draw butterflies yourself without using stencils. However, the above method is quite simple and beautiful.
Method No. 5
Another option is to use marble or salt dough. For stucco lovers, it is best suited. This sculpture is quite acceptable for the Baroque or Classicism style. It is suitable for people who practice modeling, since the method is quite complex. But with skillful use of this raw material, you will get a real masterpiece.
 If you do everything according to the rules, you can get a real masterpiece
 Fastening
An important issue that you should pay attention to before starting work. It all depends on the base material and coating. Attach paper butterflies to the wall with double-sided tape or glue (PVA or polymer is suitable). Cardboard lends itself better to polymer glue. For vinyl, accordingly, only this mounting method is suitable.
Before attaching the product, carry out preparatory work so that the composition holds better. First you need to remove all dirt from the wall (it is advisable to wash it, but if the surface is not washable, wipe it with a damp cloth), then let the base dry, and start decorating.
 The fastening of butterflies depends on the material from which they are made
 Unusual ideas
The most common, but no less attractive ideas are considered. We offer several options for non-standard ideas. What to use, how to mount, and for what room they will be appropriate. One minute and you will know everything.
 Choose the material for production based on your own preferences.
 Glowing butterflies
Tell your child a fairy tale. Luminescent paint will help you with this. Moreover, this will be a plus if the baby is afraid of the dark. This technique is used both with a drawing and with a paper product. Decided to use paper? Then cut out the butterflies, arrange them according to a pre-designed pattern, then sprinkle them with glowing paint. To do this, you can purchase an aerosol type, or take a small amount on a brush and spray the wings.
We use this type of decoration with painted butterflies. You have the right to depict a moth entirely from a luminescent base. But the best option would be to combine it with oil or watercolor. Make the base and then highlight the wings or other parts.
 These butterflies are perfect for a child's room.
 Use old tights
Many people know the story of when I bought new nylon tights, and they immediately tore. In our case, this is not a problem. We can use them to create beautiful moths and cheer ourselves up. Yes Yes. You heard right. Old nylon tights.
Both thick and thin nylon is suitable for manufacturing. You will need wire, threads to match the material, and scissors. Take 4 pieces of wire: 2 larger, 2 smaller. Form them into circles and give them the shape of wings. Then cover the resulting workpiece with nylon so that the wire is between the layers of nylon. Secure it with threads on a wire base, trim off the excess. Fasten all 4 elements together. The butterfly is ready.
 You can make such a butterfly from nylon
 This option can be used by attaching it to a wall or other base. Having “planted” them on a wire, insert them into a flower pot. This will add a special touch to the flower garden. You can thread the thread through the base and attach the other edge to the ceiling. Such floating butterflies will look like real ones and will decorate any interior.
As for the colors. You can use black nylon tights in their original form. Color beige if desired. To do this, soak them in water with fabric or food coloring. Another option: purchase nylon at a textile store. So you have the opportunity to choose any color and density of the material.
 The material can be painted or left in its original form
 Unusual photo frame
Butterflies will help you create a frame for photos on the wall. Paper, cardboard or vinyl are the best options here. They will be easier to attach, and they will create an airy mood.
In this case, your imagination is not limited. Frame the entire wall. To do this, cut out a variety of butterflies according to the selected stencil from multi-colored paper, and decorate them with a frame. Place photos inside, interspersed with butterflies and other decorations.
The next option is to design a panel. Take a dense base, preferably chipboard, or durable cardboard. Place a photo on it, place cut out and drawn butterflies between them. You can draw them using foam rubber. To do this, dilute the paint in a container (so that it is liquid), prepare small pieces of foam rubber (separate for each color) and clothespins. Take pieces of foam rubber with clothespins, dip them in paint and, applying the butterfly stencil to the panel, fill it with color. There are plenty of options. You just have to use your imagination.
 There are a lot of options for decorating walls with butterflies.
 Rules of care
Do you want your creation to please the eye longer? Follow the care instructions. Regardless of which material is chosen as the base, it is necessary to clean it from emerging dirt and settling dust.
Paper butterflies on the wall should be wiped off with a dry cloth to remove dust. If you have varnished them, use wet cleaning. The same goes for cardboard. Vinyl can be washed or sprayed with a spray bottle. It is better to open the drawing with varnish, then it needs to be washed periodically. Without coating, it is better to use the dry cleaning method.
As you can see, creating floating butterflies is not difficult. Moreover, any material is at our service. And following simple care rules, the product will bring joy to the owner and guests for a long time.
Video: Paper butterfly. Origami
Video: Decorating a room with butterflies
Paper crafts made with children can be different. You can start folding figures using the origami technique, or you can create a fun craft, like our butterfly. It has a small pocket on the front where you can put some surprise (for example, candy). Step-by-step creation of such a paper butterfly is given in our master class.
For work we will prepare:
- paper yellow, orange, red, blue, white;
- black marker;
- scissors;
- glue stick;
- compass.

Let's start by creating the body of the butterfly. To do this, take orange paper from which we cut a triangle.

Fold the bottom side of the triangle up. This is what will allow us to create a pocket in our craft.

Trim the edges with scissors.

Let's turn the body blank over to the reverse side. Let's fold the left side towards the middle.

The right side needs to be folded symmetrically.

Now let's glue all the folds.

We round off the upper part of the resulting workpiece with scissors.

Cut out circles from red and yellow paper. These will be the wings of our butterfly. The red circle has a diameter of 4 cm, and the yellow circle has a diameter of 3 cm.

On the back side of the body, first attach the large butterfly wings with glue.

Then glue on the yellow wings.

From the remaining orange paper, cut out the antennae and glue them.

To decorate the wings we use circles cut out of blue paper.

Draw eyes on white paper with a black marker and glue them in place.

Draw a mouth with a black marker, and use scissors to carefully curl the mustache.

Our paper butterfly is ready.


How to make an origami butterfly out of paper

Carefully use a stationery knife to cut along the contour. After cutting out 5 zones, this is the result.

Gradually cut out the indicated lines, and the butterfly will acquire delicacy.


After all the elements in the middle of the template have been cut out, you can begin cutting out the butterfly outline itself. The result is a butterfly like this.

Glue the blank obliquely to the green leaf.

To make the work look like a painting, you can frame it with light green stripes. This is such a beautiful and original picture with a butterfly. It can be used as decoration.

Alternatively, you can cut out a butterfly from thick paper and fold it in half. In this form, it can be planted on a bouquet of flowers or in a vase.
How to make a FLYING BUTTERFLY from paper
Video lesson “Do-it-yourself butterflies for wall decor”
In decoration, paper butterflies are deservedly in high demand, as they allow you to get a decent solution for most situations in a short time and with minimal expenditure of money.
Of course, if you want to make the perfect decor option, you will have to choose the right paper and materials, you will need to work to ensure that the shape of the product is correct, without slanting and uneven lines and areas, but, in any case, it is much more affordable and simple An option that allows you to create interesting products with your own hands and not spend additional money on decoration.

Choosing the butterfly option
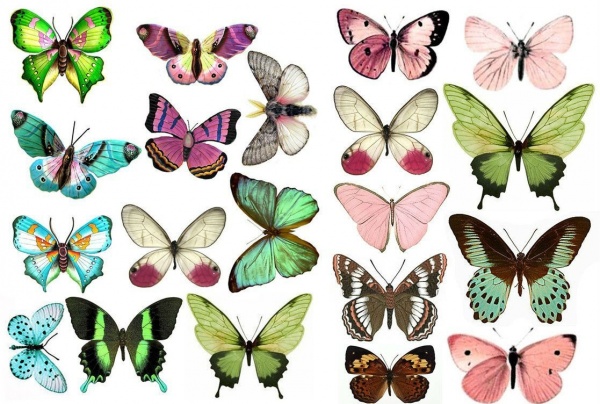
On the Internet, if you search, you can find photos of paper butterflies in such shapes and colors that your head will spin - on the Internet there are thousands of photographs of a wide variety of plans, in which you can look at what the butterfly looks like, what materials it was made from and why it was made this way and not otherwise.

That is, with the help of the Internet, you get a large catalog of options; all you have to do is choose for what purpose you want to collect this decorative product, what costs you expect and how much time you have to do it all productively.


For adults and children
For example, if you just decided to spend time with your child and want to load him with manual work, then you can choose simpler options. It is difficult for a child to understand the technical features of a butterfly, but if you give a simple version, imaginative thinking will develop, the child will begin to better understand colors and shapes, begin to think logically, and so on.

Plus, if possible, it is better to choose a butterfly model that can be made without the use of scissors or cutting tools, there are also many such options, the connections are made using glue or thread, so there is no need to cut anything, which will protect your child from accidental damage with scissors or paper.

If you decide to make a butterfly for room decoration and you are no longer a child, but a fully grown person, then you can look at more interesting options for butterflies, select suitable materials and spend some time creating a design element.

Fortunately, on the same Internet, there are options for the most complex butterflies for decoration - you can decorate walls, furniture elements, paintings, ceilings, chandeliers and other lighting fixtures, you can even make a lampshade for a floor lamp or pendant lamp with a certain choice of materials, you have a lot of choice and very decent, you just have to decide what exactly you want to do and for what purposes.


Quilling - for strong nerves and dexterous hands
A very interesting technique for creating paper butterflies is quilling. If you don’t know how to make a paper butterfly as beautiful as possible, then look at this option. In the case of quilling, a butterfly is created from several strips of colored paper, and it is colored on both sides. You need to cut the paper into even lines of the same width, then fold them into rings of different diameters and make even, identical wings for the butterfly from them.

Naturally, this process requires a certain skill - cutting paper into even strips is quite problematic, plus molding them is very problematic; you need to carefully glue each strip and align it so that nothing sticks out and visually the wings appear the same. It's really difficult, but there are certain tricks.

You can find a paper butterfly template online and cut all the parts according to this pattern, and then practice gluing the parts. As practice has shown, literally from the third or fifth butterfly you can cut the parts more or less evenly, plus learn how to glue the parts correctly, without bent paper or other defects.

After a lot of work and selection of suitable color options, you will get a fairly attractive butterfly that will fit perfectly into the interior of most rooms.

Types of butterflies
There are other options for butterflies - openwork, when something like a snowflake is cut out of paper, only the shape is different, there are garlands of paper butterflies, there is even a special origami technique so that you can practice creating paper products of various shapes and sizes.

To work with paper as efficiently as possible, you should try all the options - certain styles, like openwork butterflies, are great for learning how to work with scissors and cut out small details with a blade, but this is a task for an adult, of course, and if you want to keep your child busy with an interesting activity, then look at origami - it is very interesting, does not require the use of additional tools, and for a certain age it will be an ideal activity - educational, interesting and does not require large expenses, which is also very, very pleasant.


Useful properties of working with paper
It has long been known that paper origami can improve fine motor skills of the hands, improve visual images, creative thinking and memory, plus it is an excellent relaxing activity for the brain - you move away from the outside world and do only handicrafts, this is a big advantage.

Other options for working with paper involve cutting paper and gluing, so this is a task for the older generation, which is definitely worth taking into account - origami is interesting for children, but cutting paper with scissors is dangerous and not entirely reasonable. Good luck in your endeavors!

Photo of paper butterflies


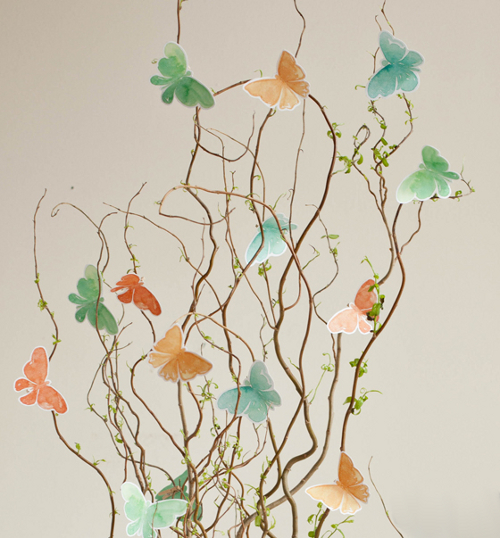
At the final stage of renovation work, there is certainly a desire to add some zest to the updated interior. The opposite situation, when no fundamental changes are expected in the near future, also gives rise to the idea of enlivening the situation with original decor. In both cases, hand-made butterflies will help to decorate the wall in an interesting way. The creative process can captivate all family members; depending on the chosen concept, there is something for everyone.
Preparatory work
Decorating a wall with butterflies is a relatively new trend in the world of design solutions. Winged flowers will make the atmosphere refined, filled with romance, lightness and carefree dreams. The translation of creative ideas into reality is preceded by a preparatory stage:
- Choose the most suitable wall for the butterflies. A wide view will allow you to admire the original decor more often.
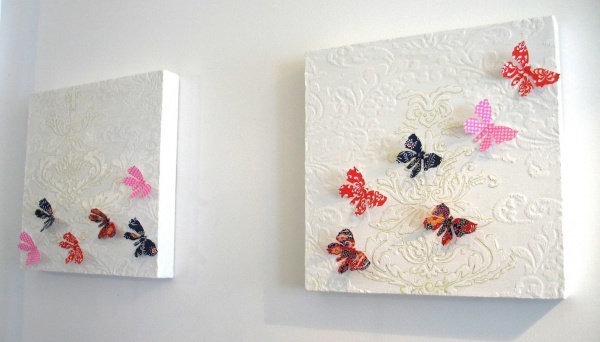
- Calculate the shape and area of the image on the wall, whether it will occupy a small area or be scattered over the entire surface. In addition to direct mounting on the wall, butterflies can be made into a panel, framed, or hung from a sconce.
- Decide what material is best to make butterflies from. Take care of its compatibility with the interior of the room. The article presents traditional and extravagant ideas for creating moths.
- Consider the color, size and shape of the jewelry. Bright shades on a light wall are the optimal solution. Butterflies of different sizes look much more impressive than those made from one stencil. Butterflies made with asymmetry will help you get as close to the natural image as possible. You should not strictly observe specularity; in the end, small deviations will add volume and dynamism to the appearance of the application.
- Depending on the chosen direction, prepare the material and tools with which you will decorate the wall.
Advice ! The overly intricate shape of the butterflies will create difficulties when cutting. If there are time constraints, it is better to stick to simple figures.
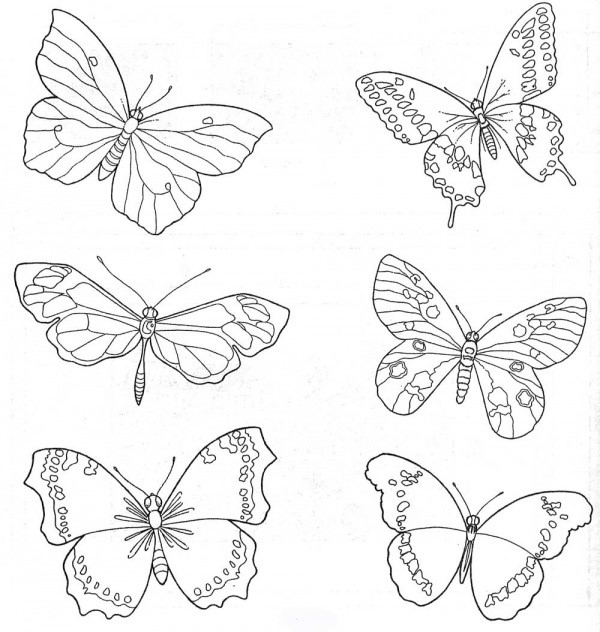

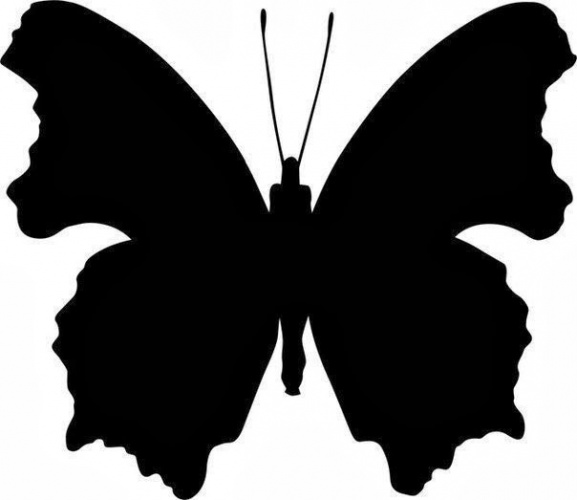
Having basic artistic skills, you can make a stencil for future butterfly blanks yourself on plain paper or using available picture editing programs. In the absence of talent, ready-made templates of butterflies for the wall, designed for cutting, will come to the rescue.

Paper moths
The most affordable way to decorate is to decorate the wall with paper butterflies. Making the moths monochromatic or combining two colors depends solely on the imagination of the novice designer. If the required shades are not available, acrylic paint and white paper will solve the problem. Butterflies on the wall made from bright sheets of glossy magazines look interesting. The variety of shades is difficult to create on your own, but bright printed designs will whimsically decorate the wall without additional costs. A pre-arranged palette will allow you to make smooth transitions in the composition.

Having selected the sketches you like in various sizes, you determine the required number of butterflies. After this, the images are printed and stencils are made. It is most convenient to attach a simple shape to cardboard and cut out the inside. The design of complex designs is applied to a thick sheet and carefully cut out with a stationery knife. To speed up the process of preparing figures, just fold several sheets of paper and cut them out at the same time.
Cardboard version
Making cardboard butterflies on the wall is more difficult. However, the material allows for greater variation in shape design. To achieve the desired curves, just slightly moisten the product and, giving the desired bend, fix it with a weight. After drying, the butterfly will retain the required shape.

Another interesting option for making butterflies out of paper for the wall is to make origami. This activity has recently become especially popular among children.

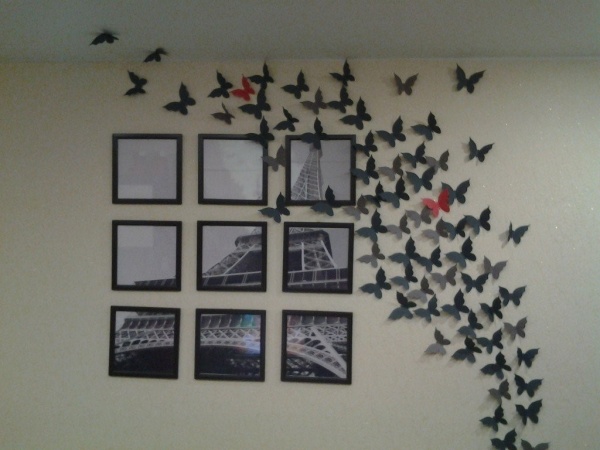
The idea of placing butterflies on the wall is initially drawn on paper. It is advisable to ensure compatibility with the wallpaper pattern and the overall theme of the room. A whirlwind of moths or a flock flying from one side of the wall to the other looks extravagant. To make a heart or a large butterfly from small parts - there are no limits to imagination. The sketch is transferred to the wall using chalk or a pencil, carefully marking the lines along which the figures will be located.
Mounting methods
Butterflies cut out of paper or cardboard are attached to the wall in several ways:
- PVA glue. If the goal is not to preserve the attractive appearance of the wall after removing the decor, PVA glue or wallpaper solution is quite suitable. Fully glued butterflies will not create a natural effect. Volumetric applications look much more interesting. To do this, the wings of the moths are slightly bent and only the middle is fixed. When the air conditioner is running or there is a summer breeze, the butterflies will come to life, fluttering with the air flow. The glue is applied to the base in small doses so as not to spoil the surface of the wall outside the template.
- Pieces of foam plastic are used to secure light moths. Initially, the material is glued to the product, then to the wall.
- Double-sided foam tape, cut into small squares, is attached to the butterflies, after first removing the protective film. Having completed all the details, we begin to decorate the wall.
- If there is a prospect of removing butterflies from the wall without subsequent repairs, it is better to mount them with pins. This is only acceptable for wallpaper; the option of plastered walls will not allow the proposed method to be applied. Having selected hairpins decorated with beads or stones, they are bent using pliers at an angle of 90 degrees. Having secured the upper part to the body of the butterfly with glue, the end is carefully placed behind the wallpaper. If necessary, the decor can be easily dismantled without leaving marks on the wall.
Note! When fixing cardboard products, take into account their large mass, unlike their paper counterparts.
Decorating with a stencil
Butterflies made using a stencil will add originality to the wall design. Having selected and printed the sketches, the design is applied to thick film or laminated with strips of tape, outlined with a permanent marker and cut out with a sharp stationery knife. Several blanks will make the work easier; it is advisable to make one copy for each color. Luminescent paints will add extravagance to the design. At night, with directional light, the spectacle looks breathtaking. Further work includes the following steps:
- Stencils with butterflies are attached to the wall using spray adhesive or construction tape.
- A sponge cut into several parts and equipped with a handle will allow you to make a suitable brush. Purchasing ready-made tools will shorten the preparatory period.
- Ordinary paints are applied regardless of the time of day; it is better to work with phosphor material in dim light. Remove excess dye from the sponge, ensuring minimal contact with the stencil.
- A blue outline made with a regular brush along the edges of the wings will allow you to highlight the image glowing on the wall. After drying, the stencil is removed.
Advice! To prevent regular paints from stretching, first draw along the contour with a blade or sharp knife.
In addition to paints, decorating the surface with butterflies is done with putty. To do this, after fixing the template on the wall, the building material is applied using a palette knife. Upon completion of the process, the stencil is removed and washed with water to remove putty residues. After the solution has dried on the wall, you can make an extraordinary coloring of the butterflies.
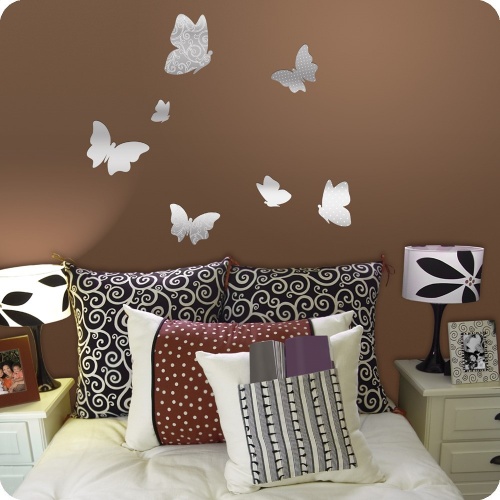
Vinyl and plastic
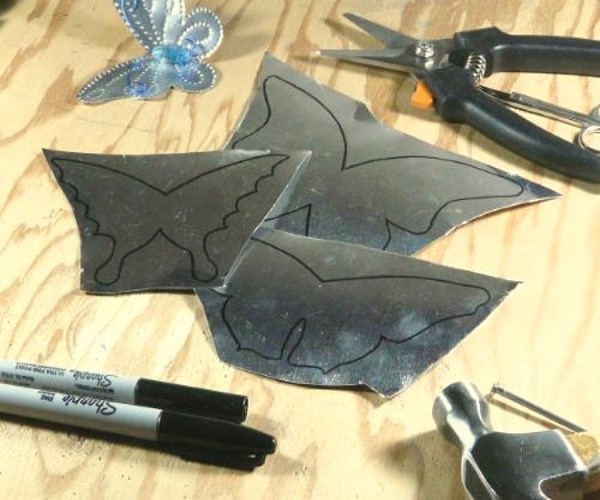
The times when every home had an impressive collection of vinyl records are gone. Butterflies on the wall made of vinyl can remind you of the past and put stale rarities to good use. The template you like is applied to the plate, and the outline is outlined with white chalk or a piece of soap. To make the material pliable, it is placed on a baking sheet lined with baking foil in the oven. The desired condition is achieved in a few minutes, this is indicated by the curling edges. Without wasting any time, start cutting butterflies from softened vinyl using sharp scissors. If you don’t have time to do it before it hardens, you will have to repeat the procedure of placing it in the oven, so don’t rush to turn it off. Sanding them with sandpaper will make the edges of the butterflies less sharp.
Advice ! While the vinyl is warm, make the products voluminous; fancy curves will add personality to the decor on the wall.

Double-sided tape will help secure the butterflies on the wall. Pieces cut along the length of the moth's abdomen are initially glued to the wall, then the figures are attached directly to them. Silicone glue is another way to securely fix the decor to the wall.
It’s enough to simply make a butterfly out of plastic and then decorate the wall of your country house. To work, you will need the middle part of the bottle and materials for decoration. Having selected the stencil you like, the design is transferred to plastic with a permanent marker and cut out. The butterfly is painted with varnishes of bright colors, with sparkles; if available, you can use acrylic ones or those left over after repairs. Little needlewomen will be interested in making a butterfly for the wall, decorated with rhinestones and beads. Don't forget the wire antennae.

Fabric and metal design
On walls with liquid wallpaper or decorated with draperies, butterflies made from fabric look appropriate. This creates an atmosphere of special warmth and homeliness. Cut and processed butterflies are attached to the wall with glue. Thin fabrics will allow you to create a three-dimensional image on the wall. To do this, the cut out moth is soaked in a soap or glue solution and dried in a certain shape.
Butterflies on the wall made from tin cans look radically opposite. Working with the material will require a lot of effort and accuracy. Golden spray paint can give the workpieces an attractive look. It is better to subsequently dilute the monotony with an additional pattern. The extravagant design on the wall will harmoniously fit into the interior designed for brutal men.
Regardless of which wall design option you choose, the decor you make will definitely add individuality to the room and emphasize refined taste and awareness in matters of design art.
Summary: Craft butterfly. DIY paper butterflies. How to make a butterfly out of paper. Origami butterfly diagram. Butterflies master class. Butterfly pattern. How to make a butterfly from a plastic bottle. Crafts from plastic bottles.
In the spring, as soon as the sun warms up, the first spring flowers begin to appear and insects come out of their winter homes. Butterflies are one of the most beautiful insects, the appearance of which reminds us of the coming spring and the upcoming long-awaited summer. In this article we will tell you how you can make butterfly crafts with your own hands. Butterflies made of paper, origami butterflies, butterflies made of plastic bottles - you will find all this on our website. We will also tell you interesting facts about the life of these insects.
1. About butterflies for children. Life cycle of a butterfly
Butterflies are insects with complete metamorphosis, since the larva (caterpillar) is completely different from the adult. Their life cycle consists of 4 stages: egg, larva (caterpillar), pupa and adult insect.
Before they can begin to reproduce, butterflies must find a partner of their own species. After mating, the female butterfly must perform its main life function and lay eggs. From the eggs, larvae emerge - caterpillars. They actively feed, grow and accumulate substances for the next transformations. Caterpillars have gnawing mouthparts and, for the most part, feed on the leaves of various plants. Caterpillars grow quickly. Gradually, the outer covers (cuticles) of the larva become too tight for it, and they need to be replaced. Molting occurs, which is preceded by a period of growth. Most larvae have 5 or even more. At the last molt, the caterpillar turns into a pupa.
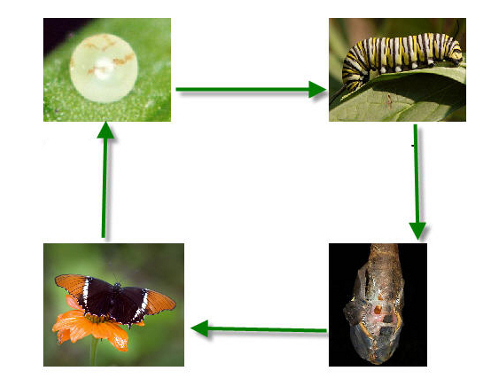
The pupal stage lasts several days, in some species up to three years. The duration of the pupal stage largely depends on external conditions - temperature and humidity. When the pupa bursts, a butterfly emerges. Having been born, the first thing she does is look for a place where she can freely spread her wings. The butterfly then dries them for several hours. Gradually the wings lose elasticity and become stronger. Now you can make your first flight. Most butterflies emerge from their pupae in the early morning, when it is not yet hot and the air is humid with dew. Straightening and drying your wings at this time is much better than at noon when the sun is scorching. When the butterfly is ready to fly, it rushes out in search of a partner. After mating, the female lays eggs and the life cycle repeats from the beginning.
Almost all butterflies usually overwinter as eggs, caterpillars or pupae, while the wren and lemon grass overwinter as adults. Therefore, as soon as it becomes warm enough, we notice them first. The hives are the first to wake up - a bright, motley butterfly. Her wings are bright orange with black and yellow spots. Do you know why urticaria is called that? It is named nettle because only its caterpillars can eat stinging nettles.

Later, ten days after the hives, lemongrass wakes up. Why do you think it was called that? This butterfly has lemon-yellow wings, which is why it was named that way. Lemongrass with folded wings is difficult to notice: it looks like a yellow leaf. This butterfly also has an interesting feature: if you suddenly disturb it, it falls to the ground, folding its wings and pressing its legs. Try it, notice this one!

What do butterflies eat?
Some butterflies feed on the nectar of flowers, others on tree sap and fermented fruit juice, while others do not mind snacking on animal droppings and tears, as well as dirt, in order to compensate for the lack of mineral salts after mating.
It is curious that there are even “vampire” butterflies. Most calyptras live in the tropics of Asia, where they drink the blood of buffaloes. Interestingly, only males drink blood - this is how they receive the substances necessary for reproduction. Female calyptras prefer fruit juice.
2. Pasta craft “Life cycle of a butterfly”
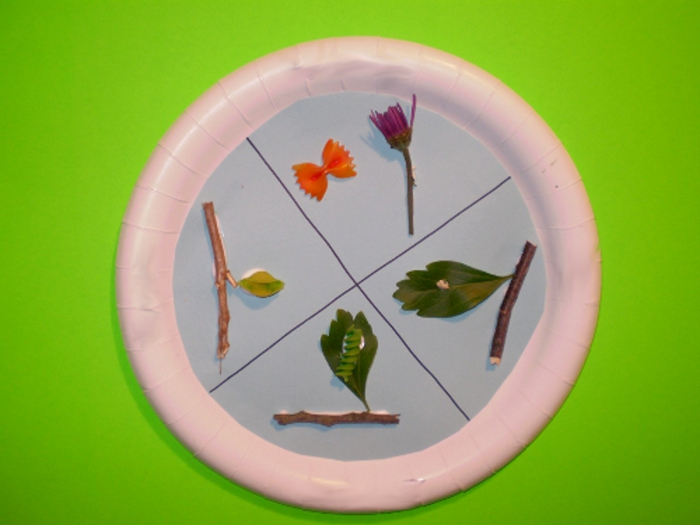
To make this DIY pasta craft, you will need three types of pasta: a spiral (this will be a caterpillar), a shell (= pupa) and a butterfly-shaped pasta (= an adult). The egg will replace the grain of rice. Take a regular paper plate and divide it into 4 sectors. Glue a twig with a leaf onto one sector, onto which attach a grain of rice. In the 2nd sector - a twig with a “eaten” leaf and a spiral pasta - a caterpillar. Glue a twig with a shell-shaped pasta (pupa) onto the 3rd sector. Glue a butterfly pasta and a flower to the last sector. The pasta craft is ready!
3. Butterfly crafts. Paper crafts butterfly
Let's start with the simplest butterfly crafts, which even kids can handle under the guidance of an adult assistant.
Option 1.
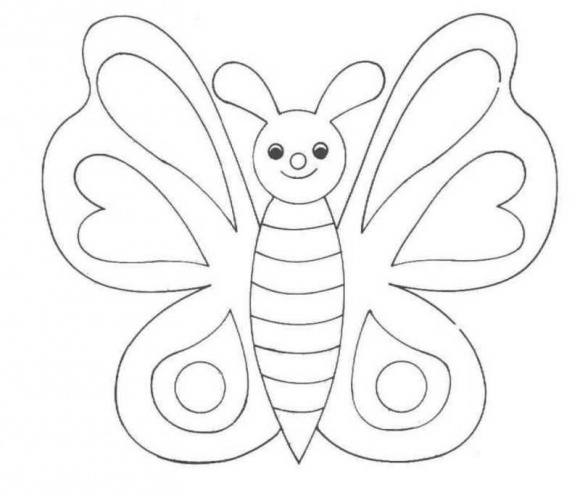
From a cardboard tube from a used toilet paper roll, you can make a cute DIY butterfly craft in just 5 minutes. To do this, print out a butterfly template from Krokotak.com on thick paper and stick it on cardboard. See the craft template at the link >>>>

Option 2.
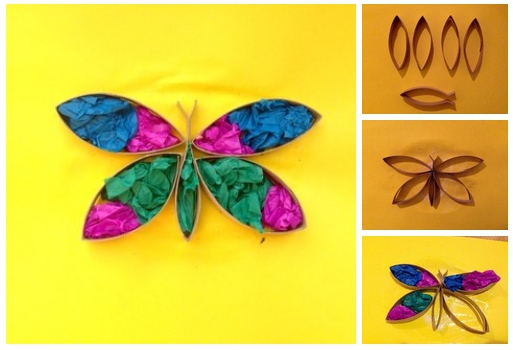
From a cardboard roll and corrugated paper you can make this bright voluminous spring applique “Butterfly”.
Option 3.
If you have food coloring, a paper towel and chenille (fluffy) wire for children's creativity at home, then it will not be difficult for you to make a bright, colorful butterfly, as in the photo below.
To do this, fold the paper towel in half, then in half again, again and again. Dilute food dyes of different colors with water, each color in a separate container. Briefly dip each corner of the resulting small square of paper towel into its container with dye. Unroll the towel and dry it.
Now gather it in the middle and tie it with wire. The butterfly craft is ready! For detailed instructions with step-by-step photos, see.
Option 4.
Look what cute butterflies you can make from corrugated paper and wooden clothespins. It’s great that even a very small child can make such a spring craft with his own hands. The antennae of the butterflies are made of tailor's pins.

Option 5.
Crafted butterfly from natural material - tree leaves. Simple, fast and beautiful!


Option 6.
Origami butterfly for kids. See step-by-step instructions on how to fold this paper craft at BabyLessons.ru
Option 7.
Another original paper butterfly craft from the site BabyLessons.ru is a butterfly on a mirror.
Create a sunny mood for yourself and your loved ones by decorating the mirrors in your home with these bright spring crafts. Draw half the body and the wing of a butterfly on thick paper. You can also download ready-made butterfly templates from the link >>>> Cut the butterfly template exactly in half, paint it on both sides and attach it to the mirror using tape. Spring butterfly craft is ready!
Working on this craft develops not only artistic taste and motor skills in children, but also spatial thinking, and forms their understanding of what symmetry is.
Option 8.
Another butterfly craft will help children understand what symmetry is.

Download the butterfly template from the link >>>> Print and cut it out. Fold the butterfly template in half. Apply paint to one side of the butterfly, and while the paint is still wet, fold it over. Now open it up. You have a completely symmetrical pattern.
Option 9.
You can make an original spring applique from butterfly-shaped pasta.

Option 10.
These bright, beautiful butterflies are made from ordinary cardboard disposable plates.

4. DIY butterflies. How to make a butterfly out of paper
To make this craft you will need thin colored paper. Scrapbooking paper or crepe paper or corrugated paper work well. You will also need wire, or better yet chenille wire. You can buy the latter, for example, in the online store Read.ru

Cut out two squares from paper. Round off their sides. See photo below. Fold them like an accordion. The more times you fold the paper like an accordion, the better.

Now take a piece of chenille or regular wire, bend it in half, twist it a little to form the body of the insect.

Place the wings between the wire and twist it again. Shape the antennae and spread the wings. The paper butterfly is ready!
If you use ordinary wire to make a butterfly with your own hands, you can put beads on it for beauty.

5. Craft butterfly. Origami butterfly diagram

To make these fun origami butterflies, you will need double-sided colored paper for the wings and matching colored cardstock for the body and head.
First we will make the wings, or rather, one wing, and you will make the second one yourself according to the sample.
Origami butterfly diagram:
1. Prepare a square-shaped sheet of paper. Fold it in half diagonally.


2. Fold it in half again as shown in the photo below. Then expand it. This way you have outlined the middle line of the triangle.


3. Fold the corners of the base of the triangle towards its apex.

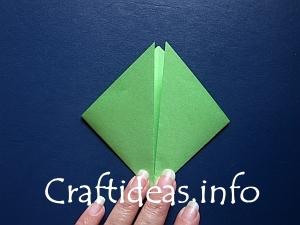
4. You have a diamond shape. Now you need to partially fold the corners back so that the sides that are now parallel to the center line of the diamond overlap its bottom sides.


One butterfly wing is ready. Fold the second wing using the same principle. Now, to match the size of the wings, make the body and head of the butterfly from colored cardboard. Glue the wings on the back of the body. The origami butterfly craft is ready!
6. DIY butterfly crafts
You can collect tree branches in a forest or park and put them in water at home. After some time, green leaves will bloom on the branches. Decorate the branches with homemade paper butterflies. Butterfly templates can be downloaded from the link >>>>
7. Butterfly crafts. Butterflies master class
Option 2. Paper craft butterflies. Mobile "Butterflies"

Download paper craft template >>>>
>>>>
The Disney website FamilyFun offers its own version of a spring paper craft for children - a mobile with butterflies.

Print out the butterfly sheets as many times as you need butterflies. Fold the sheets in half along the dotted line. Carefully cut out the butterflies. Now take a ribbon, fishing line or thread of a suitable length. Glue the butterflies onto it in random order as shown in the instructions (see the last sheet).
Option 3. How to make a butterfly out of paper
The butterfly on a flower craft will serve as a wonderful gift for a loved one, which a child will make with his own hands. The craft is quite complex (with many small details), designed for primary school age and older. The child must do it together with an adult assistant.

Download a template of a paper butterfly and a paper flower >>>>
Download assembly instructions >>>>
Epson offers its own version of paper butterfly crafts. This craft is simpler than the previous one, so you can try it with older preschool-aged children. See the butterfly template and instructions at the link >>>>

8. Homemade paper butterfly collection
Look at photographs of various butterflies with your child. Pay attention to their size, shape and coloring of the wings. Create your own collection of paper butterflies. You can either copy existing types of butterflies or come up with your own. Before drawing a butterfly, fold a piece of paper in half, then draw only one half of the insect. When you cut out the craft, you will have a completely symmetrical butterfly.

Another interesting craft is a panel made of paper butterflies. To make this craft with your own hands, you will need to cut out many identical butterflies from paper, or use a special “Butterfly” shaped hole punch. Glue the butterflies onto thick cardboard and insert it into the frame.

You can also pre-paint a sheet of paper with paints of different colors, and then, when the paint dries, cut out butterflies from it. It will turn out very beautiful!


9. Butterflies made from plastic bottles
Plastic bottles are a suitable material for making children's crafts. There are a large number of crafts made from plastic bottles. Here we will tell you about one of them - butterflies made from plastic bottles.
How to make a butterfly from a plastic bottle?
Take a plastic bottle of any size, cut off the top and bottom parts. Cut the resulting cylinder to obtain a rectangular sheet of plastic. Find butterfly stencils on the Internet, choose the one you like, print it on a printer and copy it onto plastic. Cut out the butterfly. Now all that remains is to color it. Acrylic paints or nail polish are suitable for painting. Some instructions for making butterflies from plastic bottles recommend sanding them with sandpaper before painting so that the paint adheres better to the plastic. You can decorate the finished craft with sparkles and beads.

Material prepared by: Anna Ponomarenko