Weaving from wire
Among the finds in ancient Russian barrows, a significant place is occupied by wire products: temple rings, pendants, signet rings, bracelets, chains, chain mail. The most ancient products used forged wire, the production process of which was so laborious that products from ordinary copper wire were valued as highly as, for example, cast from precious metals. To make at least a simple ring for a chain, the blacksmith had to first forge a metal cord, and then, applying frequent and uniform blows with a hammer, give it - by eye - a cylindrical shape. Of course, making a wire with a uniform cross section was not so easy. The search led to the invention of a more perfect method for making wire. A groove was cut in the anvil, corresponding to the section of the wire. A preheated blank was put into it, and a stamp with a groove similar to the one that was cut on the anvil was placed on top. Striking the stamp with a hammer, they gradually pulled the wire, giving it a cylindrical shape. But this method is not so easy and simple either. A significant event in the history of metalworking was the invention of drawing, which, like forging and casting, became one of the main technical methods of metalworking, especially in jewelry. In contrast to the forged wire, the wire made by drawing had a regular cylindrical shape and the same cross-section throughout. Now you can make it longer and thinner. The wire making process has become simpler and less labor intensive. Since the 12th century, wire drawn by drawing has gradually replaced the forged wire.
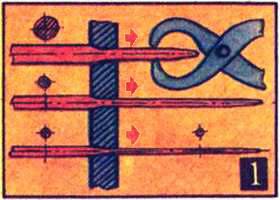
What is the drawing technique? Tapered holes of various sizes were drilled into a special steel plate called a gauge or wire drawer. The holes were arranged in decreasing order of diameter. The master inserted the pointed end of the workpiece into the largest hole and gripped it with pliers on the other side of the plate. Then, with effort, he pulled the workpiece through the hole. At the same time, it decreased in diameter and lengthened, simultaneously acquiring a regular cylindrical shape. After passing through the next hole with a smaller diameter, the wire became even thinner and longer. To obtain a very thin wire, the workpiece was sequentially driven through a series of decreasing holes. With repeated drawing, work hardening was formed on the surface of the wire, that is, an intracrystalline stress appeared, which reduced the plasticity of the metal. To restore plasticity, the wire was annealed on fire before the next drawing, and to minimize friction, it was lubricated with fat or oil.
1 is a diagram of manual wire drawing;
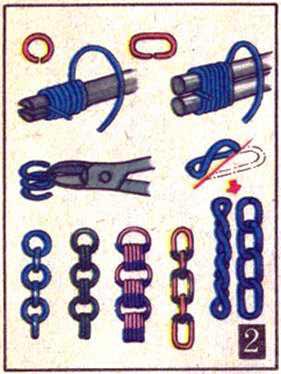
2 - molding on mandrels of round and elongated links and samples of chains collected from them;

3 - molding on two cylindrical mandrels of links in the form of a figure eight and samples of chains made of them.
Torques and bracelets were made from thick wire, thin wire was used to manufacture various chains, temple rings, pendants. The twisted wire was used by masters of filigree, or Russian filigree, creating original patterns. The perishable craftsmen of the village of Bronichi near Moscow (now the city of Bronnitsy) were famous for the art of weaving various decorative chains and chain mail. The ancient craft gave the name to the village, and later to the city. Beautiful and graceful chains for various purposes were woven from gold, silver and copper wire, and strong chain mail was made of steel. Gradually, the chain mail craft died out, and the art of weaving decorative chains continues to develop in our time. At the Bronnitskaya Jewelry and Art Factory, craftsmen develop new, original methods of weaving chains, create various decorations, often combining wire weaving with colored stone inserts and metal overlays. Simple chains are made on automatic machines, and curly ones - by hand.
Of course, you do not need to make your own wire. After all, cuttings of steel, copper and aluminum wire can be found in everyone. To work with wire, you will need wire cutters, pliers, round-nose pliers, a triangular file, a hacksaw for metal, a small anvil and a table or hand vise. To master the techniques of working with wire, start with the manufacture of the simplest chains. The most elegant chains with fine weaving are assembled from links bent from steel wire. Depending on the size of the chain, wire with a diameter of 0.3 to 1.5 mm is used. The chain links are formed on mandrels, which are metal rods that can be made from conventional nails of various thicknesses. A sharp end and a cap are sawn off from the nail. If the mandrel is intended for forming round links, then at one of its ends it is necessary to cut a recess into which the end of the wire could freely enter. The surface of the mandrel is ground with fine-grained emery paper. With the wire ready, lightly lubricate the mandrel with Vaseline or sewing oil and clamp one end of it in a vise. Then, having inserted the wire into the slot of the mandrel, start winding it in a spiral, tightly pressing one turn to the other. You can wind the wire both clockwise and counterclockwise, that is, as you like. When the turns of the wire are laid, saw the finished spiral with a file or a hacksaw along the axis of the mandrel. In this case, the spiral disintegrates into separate rings-links, which can be easily removed from the mandrel. But you can use a file or a hacksaw only when it is necessary to prepare single links. The links, consisting of two, three or more turns, are separated from the spiral with pliers. Suppose that the harvested links must have two turns. In these cases, do so. The spiral removed from the mandrel is placed on the table and pushed apart with a knife every two turns. Then each two-turn link is sequentially cut off with pliers, making sure that one end of the turn is exactly opposite the other.
It is convenient to assemble a chain of single links in this sequence. Divide all the prepared links into two parts. If, for example, you have prepared thirty rings, then fifteen of them must be left open, and the other fifteen must be closed with pliers so that the ends of each ring fit snugly against each other. Then connect in series with each open ring two closed ones. Also, in the future, it will be necessary to collect all other types of chains, with the exception of those that consist of spiral links. Such chains are assembled by screwing one link into another.
The elongated links of the anchor chains are molded on two mandrels. The mandrels are clamped in a vice so that there is a gap between them, into which the end of the wire could be inserted. The wire wound on the mandrel is sawn with a file, or each link is separated from the removed spiral with nippers. A simple chain of elongated links is assembled in the same sequence as for round ones. Using elongated links, you can also make a more complex chain that commemorates the twisted rope. But for this, each link must first be bent at an angle of 90 °. The figure shows the red line along which you need to bend each link. The link is clamped with pliers or in a vice and bent with light hammer blows.
The expressive lace silhouette has chains made of 8-shaped links. Such links are also formed on two cylindrical mandrels clamped in a vice so that there is a distance between them equal to two diameters of the wire. With one end inserted between the mandrels, go around the wire first around one, and then, pushing through the gap, around the other mandrel. In the same sequence, the mandrels are wrapped with wire until a coil of sufficient length is obtained. Each link from the removed spiral is separated by pliers. The simplest chain of such links is assembled by connecting them with rings. The silhouette of the chain will be different if one part of the link is rotated relative to the other at a right angle using pliers. Eights can also be used to assemble an original flat chain that will fit a bracelet. Two rings of one figure eight are connected in series with two rings of the other. The resulting openwork strip is compacted by forging it slightly with a hammer on the anvil.
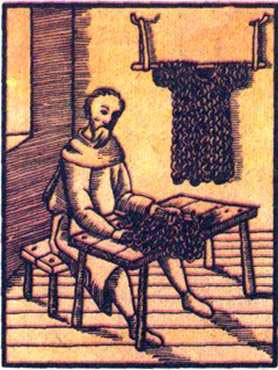
Mail Master's Workshop (from an old drawing)

1 - diagram of the connection of chain mail links;
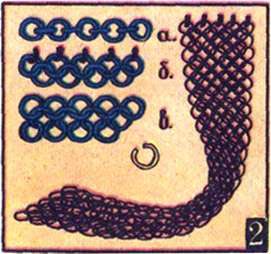
2 - the sequence of assembling a belt with chain mail:
a) making a simple chain;
b) hanging the chain (through one link) on hooks;
c) assembly of the third row.
Chain mail has long been a thing of the past, but the methods of weaving them still attract the attention of masters. From small rings they collect belts, bracelets, necklaces and other adornments, using the old methods of chain mail weaving, though somewhat simplified. The master spent a lot of time and labor on making chain mail. He cut the previously forged wire into small equal pieces, from which he then bent the rings. The rings, of course, should have been enough for a whole chain mail. The master welded half of the prepared rings tightly. And each ring of the other half was additionally processed. Its ends were slightly flattened on the anvil, and small holes were punched into them. When assembling the chain mail, the master interconnected four solid rings with one open ring, the ends of which were brought together so that one hole was exactly opposite the other. A rivet was inserted into the holes, which the master flattened with a hammer. All other rings were connected in the same sequence. Such a connection made the chain mail very durable. Modern craftsmen are primarily attracted by the decorativeness of chain mail weaving. After all, jewelry does not have to have the strength that the chain mail needed. Therefore, decorative items are made without welding and riveting rings.
To make a chain-braided wire belt, prepare steel wire rings in advance. The figure shows the assembly sequence for a belt with a width of five rings. Drive five nails into a wooden board located at a slight angle to the plane of the table and bend them in the form of hooks. The distance between the hooks should be equal to the width of the rings. First, assemble a simple anchor chain of nine ring links. Then, passing one ring at a time, hang the five chain rings on the hooks. Two rows of the chain are ready. Now start assembling the third row, with each new ring interlocking two rings of the chain. The fourth, fifth and all subsequent rows are also assembled. You can collect the belt in the same sequence in which the old masters collected chain mail. In this case, half of the rings must be closed in advance. Then, when assembling the belt with one open ring, it will be possible to interlock four closed rings at once.
Steel chains of all types can be blued after assembly. The simplest and most common bluing method is as follows. The chain is heated red-hot over the fire and dipped in sewing or vegetable oil. In oil, the metal takes on a deep blue-black color. Then the oil is allowed to drain and the chain is wiped with a clean dry cloth.
You can read about how to give different colors to copper, brass and aluminum products in the article "Decorative metal finishing".
Different types wire weaving can be successfully combined with other decorative materials: bone, wood, metal, amber, ornamental stones. Ordinary anchor chains with twisted wire go well. In addition to chains, other decorative elements are also bent from the wire, which are organically woven into the composition of the art product.
Wire products are amazing and unique due to their diversity and uniqueness. This material allows you to create magnificent decorative elements, precious and semi-precious jewelry. Thanks to the use of wires of various diameters, it is possible to obtain interesting products for the home, garden and furniture elements. Jewelry made of gold and silver wire is still highly valued today.
To make a high-quality wire product, you need to obtain the required level of knowledge, gain experience and assemble the necessary equipment for the job. Talent, skill and imagination allow you to create truly amazing masterpieces. This process requires a lot of diligence and patience.
It is gaining its former popularity. More and more often you can find wire decor in houses and apartments. Contemporary galleries and exhibitions are also adorned with wire exhibits.

History
People began to weave in ancient times. In 3000 BC, wire products appeared in Egypt. Also, hair jewelry was made of gold and silver wire in Sumer in 2600. Later it reached Europe. The wire was prepared by cutting pieces of metal and rolling between two flat surfaces to smooth out sharp edges, or by spiraling a thin tape onto a core. In the 6th century BC, the Persians began to make wire by drawing. But in Europe this method began to be used only in the 10th century AD with the beginning of the industrial production of this material. Many products made of iron wire have been lost as they are highly susceptible to corrosion. Currently, the processes of tinning and varnishing significantly prolong the life of products.
Weaving tools
Today wire weaving is thriving in Mexico and Africa. There was also a demand for similar products in Europe, which led to the revival of this craft.
You will need special tools to work with the wire. You can align the wire with a mallet. Round nose pliers are used to obtain rings and bends. To achieve an angled bend, you need a pair of pliers. Cuts are made with wire cutters, and if the wire is too thick, then it is chopped with a chisel. To eliminate irregularities and roughness after cutting, files of various shapes and notches are used.
![]()
Weaving materials
Weaving wire is various sections and diameters. It can be round, square, hexagonal and semicircular. The coating on the wire can be polymer or enamel.
It has a warm pleasant color. Due to the presence of a large number of different degrees of hardness, a variety of diameters and an abundance of colors of the enamel coating, it is most often used in modern weaving. Silver-plated wire products look especially beautiful.
Brass wire is also divided into soft, hard and semi-hard. Good anti-corrosion properties and the presence of various alloys allow it to be used in many products.
Very easy to use due to its softness and flexibility. Has a bluish gray color.
Galvanized steel is quite difficult to use because of its hardness. It is very springy, and when working with it, you must strictly follow safety rules.
Copper wire weaving
A wide variety of products can be made from copper wire. Various toys and Christmas tree decorations, money trees, figurines of birds and animals, fish and insects, flowers and lampshades, stands and holders are just a few examples of such works. We should also highlight women's accessories. So, you can make a belt, bracelet, ring, earrings, necklace, chain or pendant from copper.
For weaving a product made of copper wire, a material with a diameter of 0.2 to 1.5 mm is used. Thick wire is used to create the base of the product, medium wire is used for braiding, and thin one is suitable for weaving and finishing work.
The combination of copper wire and beads allows you to create not only magnificent masterpieces, but also helps children of different ages to develop hand motor skills and artistic talents.
and wire
For weaving from beads, it is possible to use both ready-made schemesand develop your own. There are several weaving techniques that allow you to create different crafts. Children can be encouraged to make simple flat figures of animals or favorite cartoon characters using the parallel weaving technique, and more experienced users practice creating three-dimensional figures or decorative ornaments. A wide range of colors and sizes of beads makes it possible to make amazing jewelry and decorative elements. Products made of beads and wire allow you to create unique accessories and make life brighter.
Weaving wire at home

It is quite possible to create a beautiful home decoration. Making a wire product with your own hands is a rather laborious and painstaking process. Depending on the complexity of the work, it takes from several hours to several days, or even weeks to complete work on your creation. The correct selection of materials and the availability of the necessary equipment will make it possible to make your wildest dreams come true. Many hobbyists are constantly improving their skills in making wire products. Photos of some of the works can be seen in this article.
Using wire weaving, you can make crafts of varying complexity and beauty. Modern materials and a large number of educational information will help everyone try their hand at this craft and assess their capabilities.
Among the finds in ancient Russian barrows, a significant place is occupied by wire products: temple rings, pendants, signet rings, bracelets, chains, chain mail.In the most ancient products, forged wire was used, the production process of which was so laborious that products from ordinary copper wire were valued as highly as, for example, cast from noble metals. To make at least a simple ring for a chain, the blacksmith had to first forge a metal cord, and then, applying frequent and uniform blows with a hammer, give it - by eye - a cylindrical shape. Of course, making a wire with a uniform cross section was not so easy. The search led to the invention of a more perfect method for making wire. A groove was cut in the anvil, corresponding to the section of the wire. A preheated workpiece was put into it, and a stamp was placed on top with a groove similar to the one that was cut on the anvil. Striking the stamp with a hammer, they gradually pulled the wire, giving it a cylindrical shape. But this method is not so easy and simple. A significant event in the history of metalworking was the invention of drawing, which, like forging and casting, became one of the main technical methods of metal processing, especially in jewelry. In contrast to the forged wire, the wire made by drawing had a regular cylindrical shape and the same cross-section throughout. Now you can make it longer and thinner. The wire making process has become simpler and less labor intensive. Since the 12th century, wire drawn by the method of drawing gradually replaces forged wire.
What is the drawing technique? Tapered holes of various sizes were drilled into a special steel plate called a gauge or wire drawer. The holes were arranged in decreasing order of diameter. The master inserted the pointed end of the workpiece into the largest hole and gripped it with pliers on the other side of the plate. Then, with effort, he pulled the workpiece through the hole. At the same time, it decreased in diameter and lengthened, simultaneously acquiring a regular cylindrical shape. After passing through the next hole with a smaller diameter, the wire became even thinner and longer. To obtain a very thin wire, the workpiece was sequentially driven through a series of decreasing holes. With repeated drawing, work hardening was formed on the wire surface, that is, intracrystalline stress appeared, which reduced the plasticity of the metal. To restore plasticity, the wire was annealed on fire before the next drawing, and to minimize friction, it was lubricated with fat or oil.
Torques and bracelets were made of thick wire, thin wire was used to manufacture various chains, temple rings, pendants. The twisted wire was used by masters of filigree, or Russian filigree, creating original patterns. The armored craftsmen of the village of Bronichi near Moscow (now the city of Bronnitsy) were famous for the art of weaving various decorative chains and chain mail. The ancient craft gave the name to the village, and later to the city. Beautiful and graceful chains for various purposes were woven from gold, silver and copper wire, and strong chain mail was made of steel. Gradually, the chain mail craft died out, and the art of weaving decorative chains continues to develop in our time. At the Bronnitskaya Jewelry and Art Factory, craftsmen develop new, original methods of weaving chains, create various decorations, often combining wire weaving with inserts of colored stones and metal overlays. Simple chains are made on automatic machines, and curly ones by hand.
Of course, you do not need to make your own wire. After all, cuttings of steel, copper and aluminum wire can be found in everyone.
To work with wire, you will need wire cutters, pliers, round nose pliers, a triangular file, a hacksaw for metal, a small anvil, and a table or hand vise. To master the techniques of working with wire, start with the manufacture of the simplest chains. The most elegant chains with fine weaving are assembled from links bent from steel wire. Depending on the size of the chain, wire with a diameter of 0.3 to 1.5 mm is used. The chain links are formed on mandrels, which are metal rods that can be made from common nails of various thicknesses. The nail is sawn off - a sharp end and a cap. If the mandrel is intended for forming round links, then at one of its ends it is necessary to cut a recess into which the wire end could freely enter. The surface of the mandrel is ground with fine-grained emery paper. With the wire ready, lightly lubricate the mandrel with Vaseline or sewing oil and clamp one end of it in a vise. Then, having inserted the wire into the slot of the mandrel, start winding it in a spiral, tightly pressing one turn to the other. You can wind the wire both clockwise and counterclockwise, that is, as you like. When the turns of the wire are laid, saw the finished spiral with a file or a hacksaw along the axis of the mandrel. In this case, the spiral disintegrates into separate rings-links, which can be easily removed from the mandrel. But you can use a file or a hacksaw only when it is necessary to prepare single links. The links, consisting of two, three or more turns, are separated from the spiral with pliers. Suppose that the harvested links must have two turns. In these cases, do so. The spiral removed from the mandrel is placed on the table and pushed apart with a knife every two turns. Then each two-turn link is sequentially cut off with pliers, making sure that one end of the turn is exactly opposite the other.
It is convenient to assemble a chain of single links in this sequence. Divide all the prepared links into two parts. If, for example, you have prepared thirty rings, then fifteen of them must be left open, and the other fifteen must be closed with pliers so that the ends of each ring fit snugly against each other. Then connect in series with each open ring two closed ones. Also, in the future, it will be necessary to collect all other types of chains, with the exception of those that consist of spiral links. Such chains are assembled by screwing one link into another.
The elongated anchor chain links are formed on two mandrels. The mandrels are clamped in a vice so that there is a gap between them, into which the end of the wire could hang. The wire wound on the mandrel is sawn with a file or each link is separated from the removed spiral with nippers. A simple chain of elongated links is assembled in the same sequence as for round ones. Using elongated links, you can make a more complex chain that looks like a twisted rope. But for this, each link must first be bent at an angle of 90 °. The figure shows the red line along which you need to bend each link. The link is clamped with pliers or in a vice and bent with light hammer blows.
The expressive lace silhouette has chains made of 8-shaped links. Such links are also formed on two cylindrical mandrels clamped in a vice so that there is a distance between them equal to two diameters of the wire. With one end inserted between the mandrels, go around the wire first around one, and then, pushing through the gap, around the other mandrel. In the same sequence, the mandrels are wrapped with wire until a coil of sufficient length is obtained. Each link from the removed spiral is separated by pliers. The simplest chain of such links is assembled by connecting them with rings. The silhouette of the chain will be different if one part of the link is rotated relative to the other at a right angle using pliers. Eights can also be used to assemble an original flat chain that will fit a bracelet. Two rings of one figure eight are connected in series with two rings of the other. The resulting openwork strip is compacted by forging it slightly with a hammer on the anvil.
Chain mail has long been a thing of the past, but the methods of weaving them still attract the attention of masters. From small rings they collect belts, bracelets, necklaces and other adornments, using the old methods of chain mail weaving, though somewhat simplified. The master spent a lot of time and labor on making chain mail. He cut the previously forged wire into small equal pieces, from which he then bent the rings. The rings, of course, should have been enough for a whole chain mail. The master welded half of the prepared rings tightly. And each ring of the other half was additionally processed. Its ends were slightly flattened on the anvil, and small holes were punched into them. When assembling the chain mail, the master interconnected four solid rings with one open ring, the ends of which were brought together so that one hole was exactly opposite the other. A rivet was inserted into the holes, which the master flattened with a hammer. All other rings were connected in the same sequence. Such a connection made the chain mail very durable. Modern craftsmen are primarily attracted by the decorativeness of chain mail weaving. After all, jewelry does not have to have the strength that chain mail needed. Therefore, decorative items are made without welding and riveting of rings.
To make a chain-braided wire belt, prepare steel wire rings in advance. The figure shows the assembly sequence for a belt with a width of five rings. Drive five nails into a wooden board located at a slight angle to the plane of the table and bend them in the form of hooks. The distance between the hooks should be equal to the width of the rings. First, assemble a simple anchor chain of nine ring links. Then, passing one ring at a time, hang the five chain rings on the hooks. Two rows of the chain are ready. Now start assembling the third row, with each new ring interlocking two rings of the chain. The fourth, fifth and all subsequent rows are also assembled. You can collect the belt in the same sequence in which the old masters collected chain mail. In this case, half of the rings must be closed in advance. Then, when assembling the belt with one open ring, it will be possible to interlock four closed rings at once.
Steel chains of all types can be blued after assembly. The simplest and most common bluing method is as follows. The chain is heated red-hot over the fire and dipped in sewing or vegetable oil. In oil, the metal takes on a deep blue-black color. Then the oil is allowed to drain and the chain is wiped with a clean dry cloth.
You can read about how to give different colors to copper, brass and aluminum products in the article "Decorative finishing of metal".
Different types of wire weaving can be successfully combined with other decorative materials: bone, wood, metal, amber, ornamental stones. Ordinary anchor chains with twisted wire go well. In addition to chains, other decorative elements are also bent from the wire, which are organically woven into the composition of the art product.
You can create a beautiful piece of jewelry or decorative piece of furniture using many different methods. However, the most sophisticated and elegant products look like those made from wire.
Wire history
As a material for creativity and the creation of the necessary household items, people began to use it 3000 years BC. Archaeologists managed to establish that in Sumer (about 2600 BC) wire was used to make women's hair jewelry, which is a gold and silver ribbon. Over time, they began to use it for the manufacture of chain mail, candlesticks, brushes for brushing horses and more.
But where did the craftsmen get the wire suitable for such products? Initially, it was created in a rather laborious way: they cut metal sheets into thin strips, then twisted them together and rolled them between two flat sheets. The second method of obtaining it was also winding thin metal strips onto a round core. Today it is produced by pulling it through special conical shapes, which is why the method of its production is called drawing.
Wire types
Most often, wire weaving involves the use of copper wire that has a beautiful appearance and color. In addition, brass, steel, silver and aluminum wires are used in needlework. In addition to the entire sale, you can find wire with additional coating (an alloy of other metals), which allows you to change its color.
Also, an important characteristic of any wire is its diameter. Hand-made uses a wire with a diameter of 0.2 to 2.0 mm.

What do you need to have to work with wire?
Even despite the fact that today there are a large number of special devices and devices, working with wire can hardly be called simple. Indeed, in order to create the simplest jewelry, the master needs to have at hand:
- Pliers
- Side cutters
- Round nose pliers
- Anvil
- Spring winding device
- Hammer
- and Jig-Wig (plate with rows of holes and special attachments of various diameters)
Each of the aforementioned tools needs to be used correctly. And this, of course, takes time. Therefore, you should not expect that everything will work out the first time. Nevertheless, the presence of such difficulties does not mean that wire is an unpopular material among needlewomen. On the contrary, it enjoys special attention among hand-made masters, because it makes it possible to create complex, exclusive jewelry, which has no analogues.

Wire jewelry
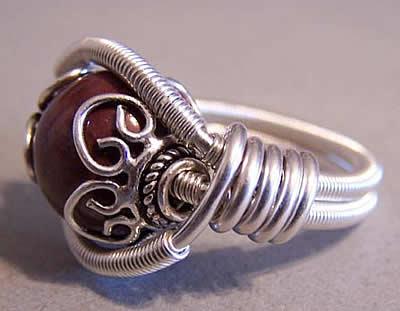
Well, now let's get down to the most interesting and tell you what you can create from wire. First of all, these are, of course, earrings, bracelets, rings and all kinds of pendant necklaces. The variety of weaving techniques, as well as their combination with bright stones and other decorative elements, allows you to create a large variety of women's jewelry.


All of them differ in style of design, so they can be selected for a wide variety of occasions.
This is how, for example, they might look like earrings:

Most of them have a complex curled shape. Some are made in the form of small studs, while others, on the contrary, are made in the form of large and massive earrings. Here are some examples:


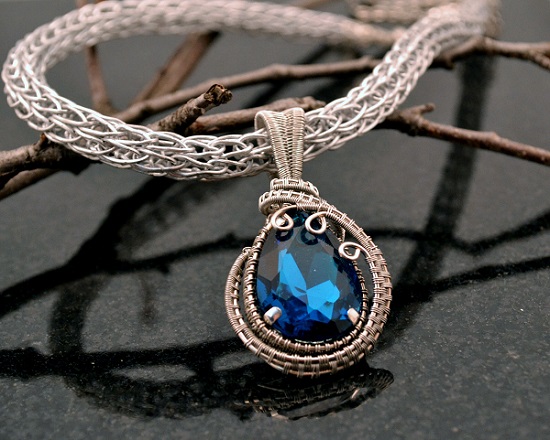
As already mentioned, chains and pendants are often made from wire. Chains can have completely different shapes and diameters, which completely depends on the chosen weaving technique. In addition, needlewomen often like to complement them with extraordinary-shaped pendants, which together looks pretty and quite original.
![]()
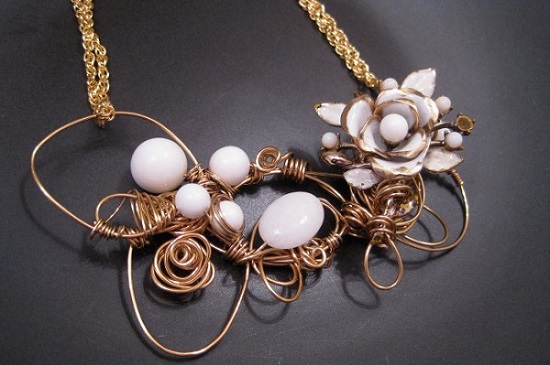
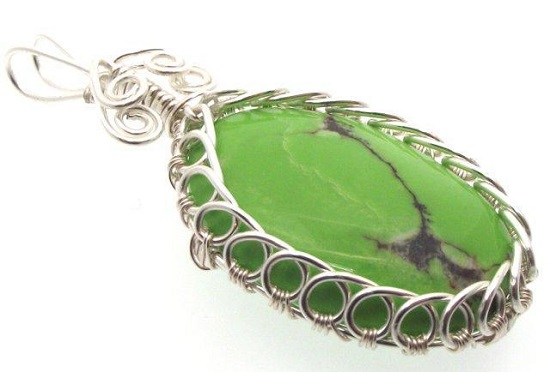
As for pendants, then they can either completely consist of wire, or represent a cabochon braided by it. The choice of this or that method of creating a pendant or a pendant completely depends on the imagination of the master and the materials at his disposal.

If desired, the wire can also be used to make full jewelry sets... Below is a video tutorial on how this is done in practice. In the course of it, you can see what it takes for the master to create with his own hands even a seemingly very elementary decoration:
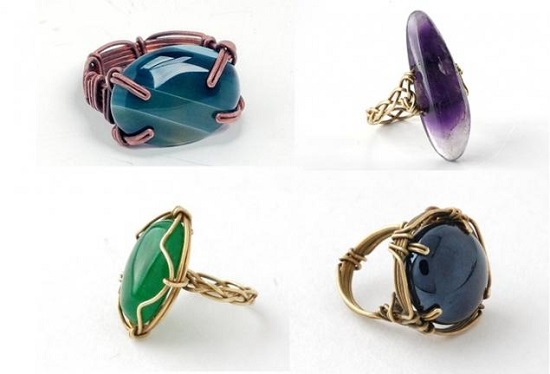
Wire rings:
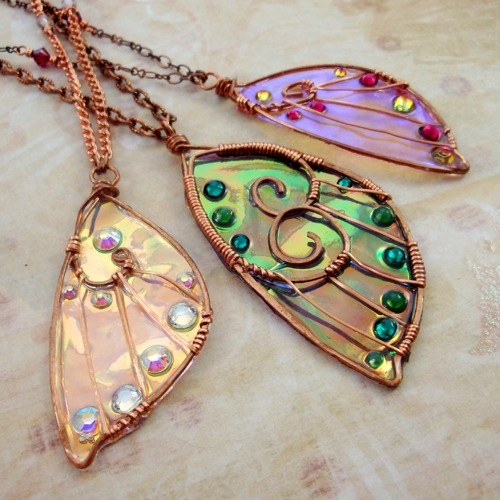
However, do not assume that the wire is no longer good for anything. In the world of handmade, anything is possible. Therefore, in many homes you can see wicker trees, stands, candlesticks, bottle holders, decorative figurines and many other wire products.
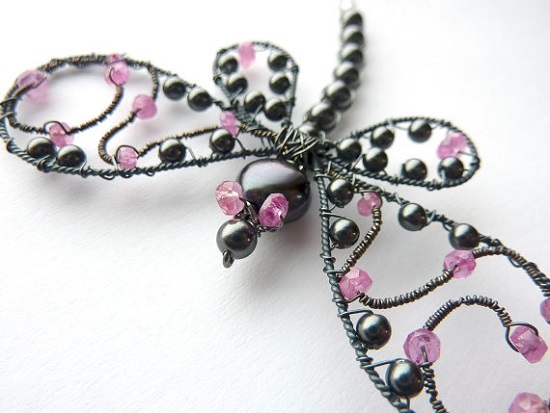
Alternatively, it can be so cute butterflies and dragonflies:

All of them fit perfectly into a modern interior, and can also be matched to decorate a home decorated in any other style.
Care must be taken when working with wire. Wear gloves to prevent sharp points from scratching and goggles to protect your eyes, as the bitten piece can bounce in any direction.
Wire connection.
Connect the ends of the wire with tapered-nose pliers or round-nose pliers using small loops. Lock the hinges together and flatten them for extra strength with pliers or pliers. This is the easiest way.
Wire tying.
Another connection method is linking. Bring the two ends close to each other and wrap them tightly with thinner wire.
Making double twisted wire.
Take a long piece of wire and loop it around the doorknob. Tie the free ends around a round wooden rod. Keeping the wire taut, wind it around the rod until you achieve the desired tightness. Do not twist the wire - it may break. Loosen the twisted wire carefully, as the residual voltage will cause it to unwind in the opposite direction.
Making curls.
Use round nose pliers to make small rings at both ends of the wire. Squeezing one of them with round-nose pliers, wind a flat spiral around it with an equal distance between the turns. Repeat the same from the other end, winding the spiral in the opposite direction.
Production of double flat spirals.
Double flat spirals are bent in the same way as curls, but both ends of the wire are bent in the same direction so that the end spirals face each other. If you need to get spirals of the same size and shape, draw a template and apply a workpiece to it during bending to check its shape.
Making hearts.
Make a double, flat spiral with a long enough straight wire between the spirals to bend the outline of the heart. Place your index finger in the center of the straight section and bring the spirals together with your thumbs. For a more pointed heart, bend the wire around the lip of the round nose pliers.
Making a flattened spiral.
Drill a hole at the end of the wooden rod, rub the rod with a piece of candle so that the wire wound around it can be removed more easily. Pass the end of the wire through the hole so that it does not move during winding.
While pressing the wire against the bar, rotate it until you have a tight, even wire spiral. Move your thumb gradually, holding the spiral as it lengthens. Cut off the end of the wire threaded into the hole with pliers, remove the rod and remove the finished spiral.
Holding the spiral firmly with your thumbs, pull it to the side so that the loops lie on one straight line, next to each other.
Lay a stretched spiral on a piece thick fabric (to protect the work surface - as the wire can damage the wood worktop) and flatten it with a rolling pin.
Loop wire making.
Determine the desired length of the loops and mark two points on the wooden block at this distance. Make two small pegs (dowels) from a round wooden bar and drill two blind holes at the marked points on a block of the same diameter as the dowels. Glue the dowels into the holes.
Such a wooden device is called a gig. For small loops, make gig dowels from a thin rod; use a thicker pin for larger loops. Work with different wire thicknesses for greater effect.
Hold the gig firmly so that the dowels are in one straight line, directed forward and up from you. Pressing the end of the wire firmly against the top of the bar to the left of the tongue with your thumb, slide the free end of the wire to the bottom tongue and bend the free end of the wire at a right angle around the base of the bottom tongue Then bend the wire upward between the two dowels and around the top. Remove the bent section from the tongue and slide it to the left to repeat the process to create two more folds. Continue these operations until the looped wire is the desired length.
You can make looped wire without gig, by hand, bending it with round-nose pliers. To keep the loops the same length, mark the straight wire at regular intervals. Measure the width of the loops with your fingers.
Coiling of spirals.
Pinch the end of the wire with round nose pliers and bend the wire around one jaw to create a small loop.
For a spiral with gaps between turns, hold the center loop with round nose pliers while continuing to bend the wire with the spiral. Pass the free end of the wire between your thumb and forefinger to guide it and maintain a constant spacing between the turns.
For a tightly wound spiral, clamp the central loop from the sides with parallel-jaw pliers (utility pliers can be used). Wind the spiral by moving the wire between the jaws of the pliers to keep the spiral flat.
Making a looped spiral.
Drill a hole at the end of the wooden rod, rub the rod with candle wax, and thread the end of the wire through the hole. Wrap the rod with wire loop to loop to create a tight spiral, then remove it.
While holding the spiral firmly with one hand, bend each loop to the side with the index and thumb of the other hand. Maintain the same distance between adjacent turns by measuring with the tip of your index finger.
As the new turns are bent, the wire itself coils into a secondary spiral (spiral from a spiral). Continue until all the turns are folded back.
And remember, the best things are the ones you make yourself!